DO NOT use the lasercutter without having received instructions and official permission from an authorized person.
This page is about the older Epilog Zing laser cutter. Are you looking for the newer xTool P3?
¶ xHain Lasercutter
Please read the Space Rules first, especially the sections on "safety" and "use of machinery".
This page is intended as a reminder and does NOT replace a personal introduction to the Laser.
If you break the rules layed out on this page, your permission can be revoked.
- contact: Please ask in the #maschinenraum channel to receive a personal introduction
¶ Overview
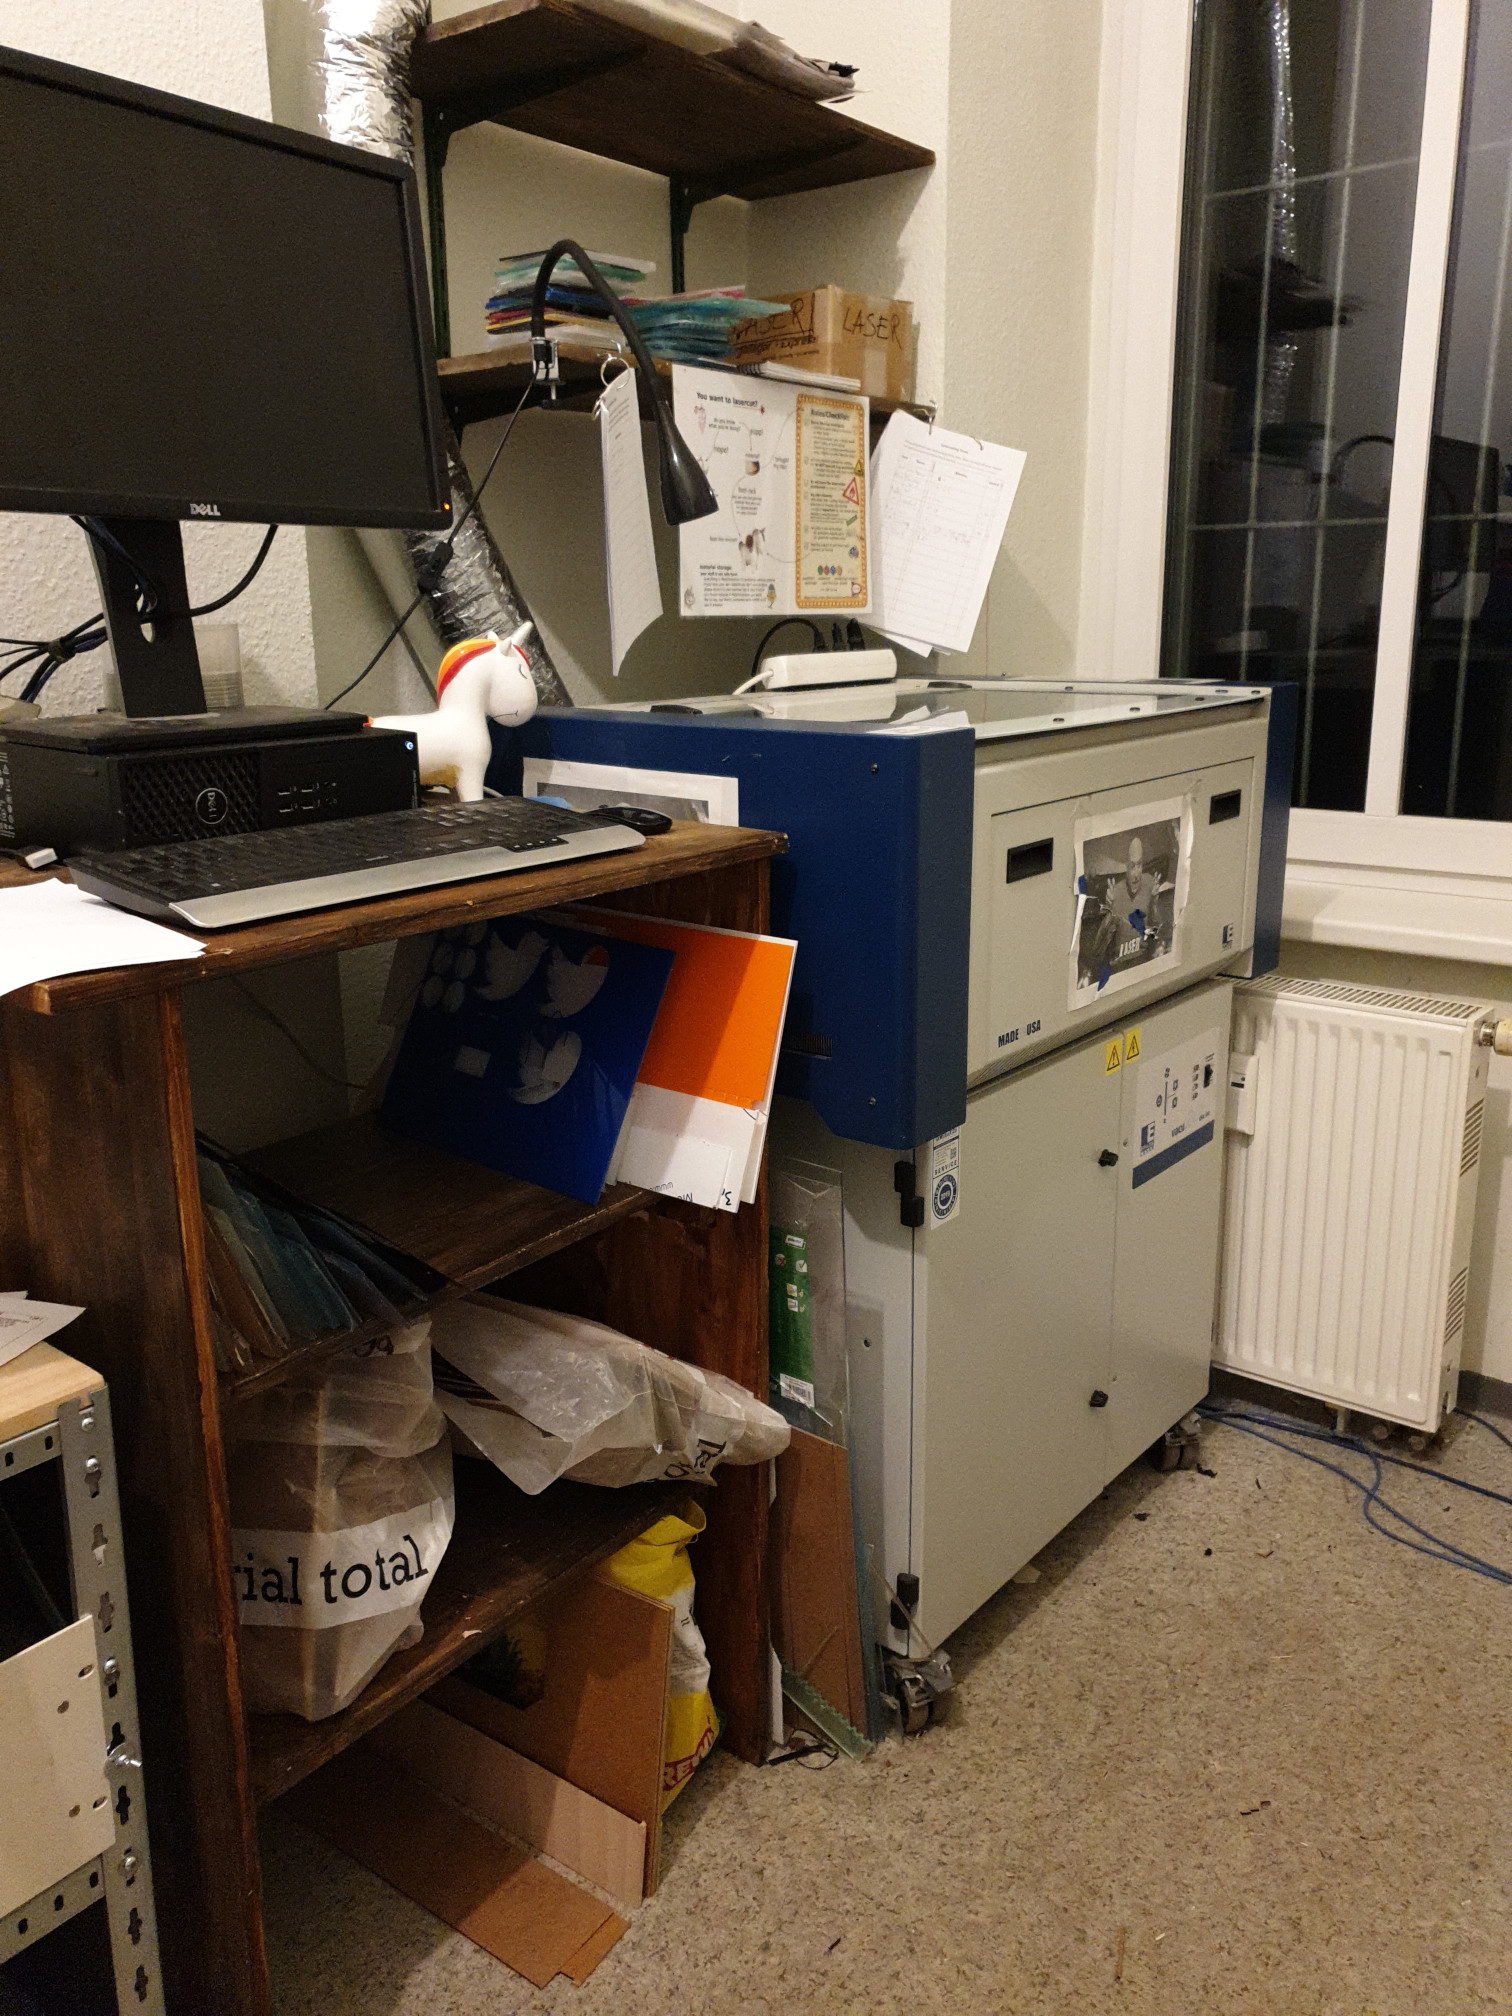
Our laser machine is a 30W Epilog Zing laser. The size of the work grid is 30x60cm, which also corresponds to the maximum dimensions the laser can cut/engrave. Any workpiece that is larger than these dimensions will not fit into the machine. Depending on the material, the cutting depth can be up to 6mm.
¶ Settings
The settings file for our laser cutter can be found here:
xhain-laser-settings.vcsettings
Since Visicut changed its UI and allows to overwrite all settings with two clicks, it may happen that the settings are wrong or not set for your material.
PLEASE DON'T USE THE MENU OPTION:"Download Recommended Settings"
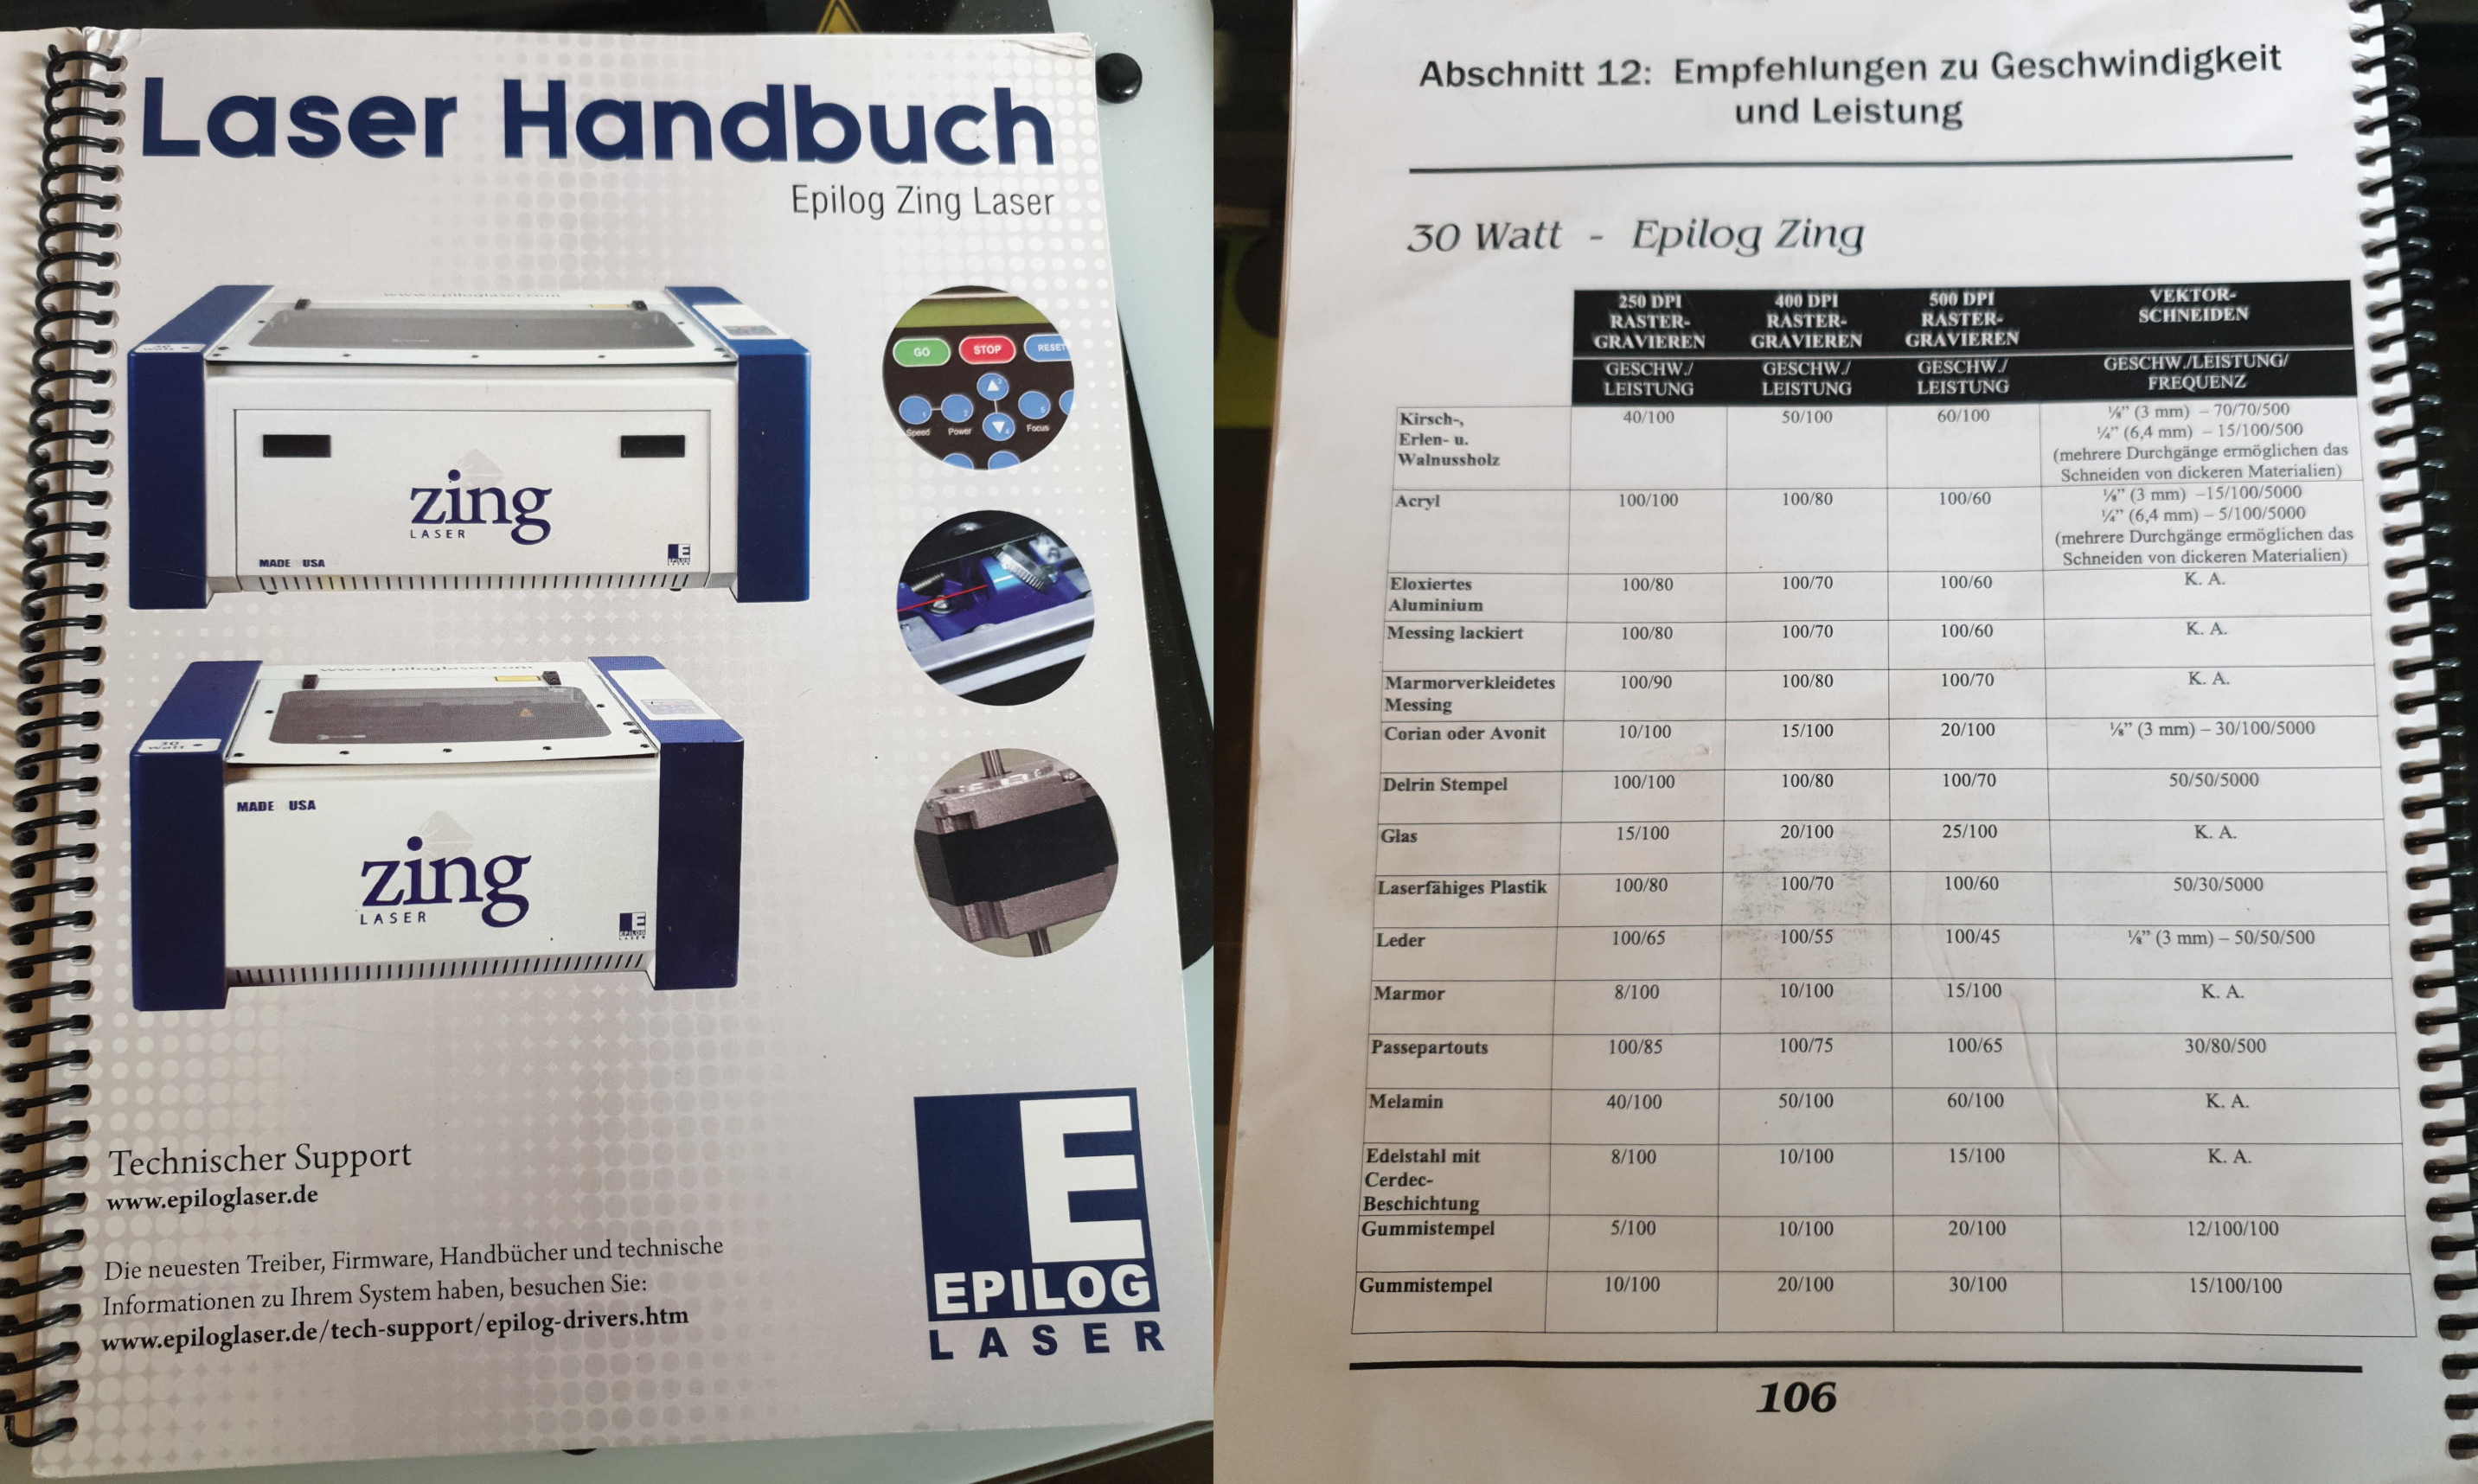
If the settings are wrong, please use these values as reference: https://www.epiloglaser.com/assets/downloads/zing-material-settings.pdf
if someone downloaded the wrong settings and you need to reconfigure everything, the IP address of the laser cutter is 192.168.42.3
¶ Important Notes
-
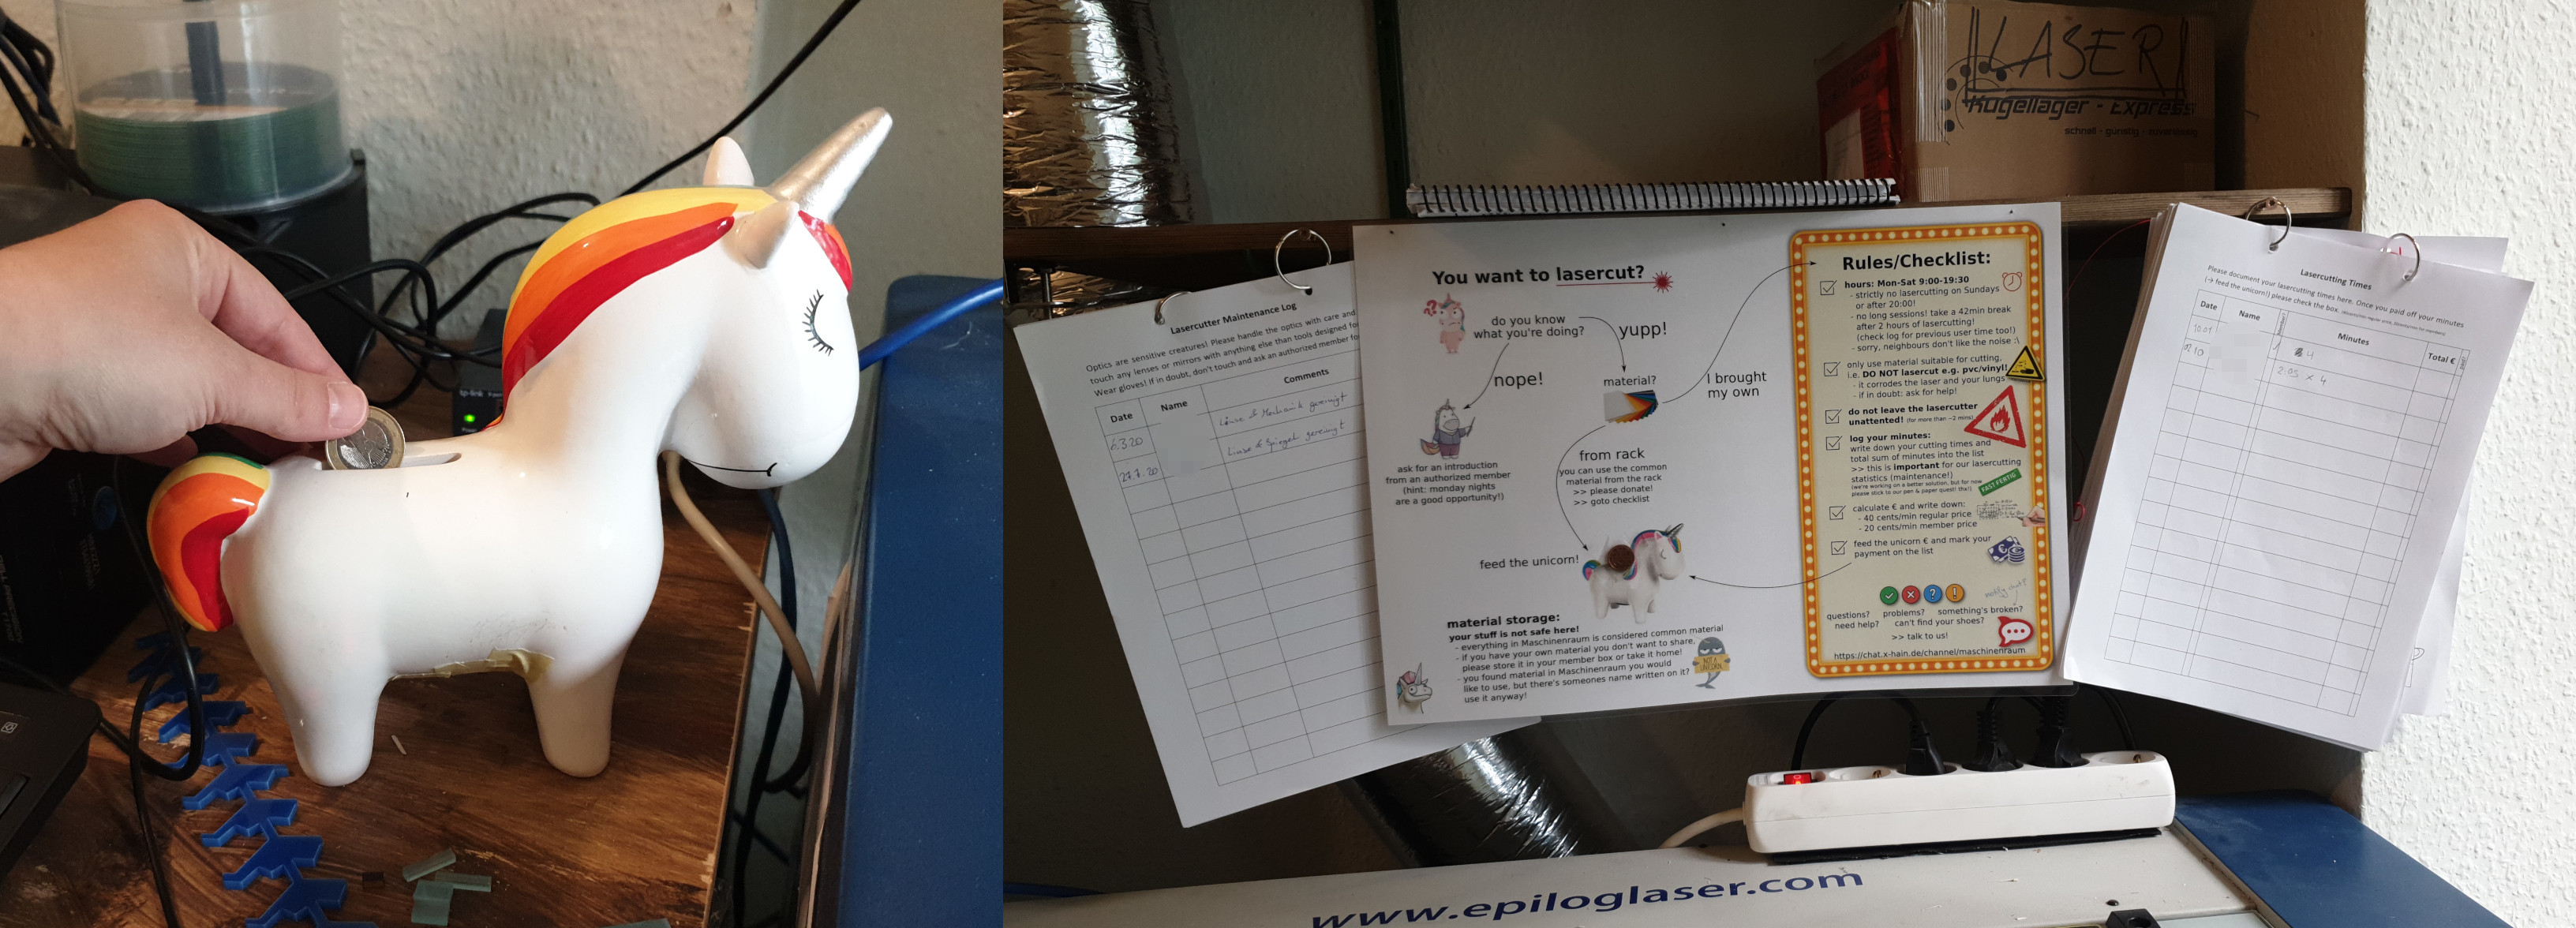
Suggested donation: 30 cents/minute for members and 80 cents for non-members to cover the cost of the laser cutter consumables (i.e. carbon and hepa filter, lens, mirror, etc.),
-
DO NOT leave the lasercutter unattended for more than ~2min (you may use the bathroom or kitchen, but don't leave the space for a lunch break!)
-
DO NOT lasercut materials that will damage/corrode the laser (e.g. PVC/vinyl).
-
Make sure you DO NOT touch the lens or any mirrors at any time!
-
Always document your lasercutting minutes in the sheet provided.
-
Always leave the ventilation running for ~10min after your last job was finished before switching it off.
-
Make sure the ventilation is fully operational before starting a job! The laser cutter will not engage otherwise (see "Safety Interlock")
-
If you don't use the lasercutter for a while, switch off the ventilation in between jobs.
-
DO NOT switch off laser or pull the power plug while the laser cutter is in operation!
-
In case of an emergency, follow the procedure as describe in step 6: emergency abort.
-
We have two lasercutters in the LaserLab. Do not run both at the same time!
¶ Operating hours
- working days: 06:00 to 22:00
- Sundays 06:00 to 20:00
- No lasercutting for more than 2 hours in one go. Take a 42 min break. Also check the time-sheet for the previous user time (wait a while if necessary.)
¶ Materials
It is important to only use materials that are suitable for lasercutting for health and safety reasons.
If you're not sure about a material, check our material list or ask in the LaserLab channel for help.
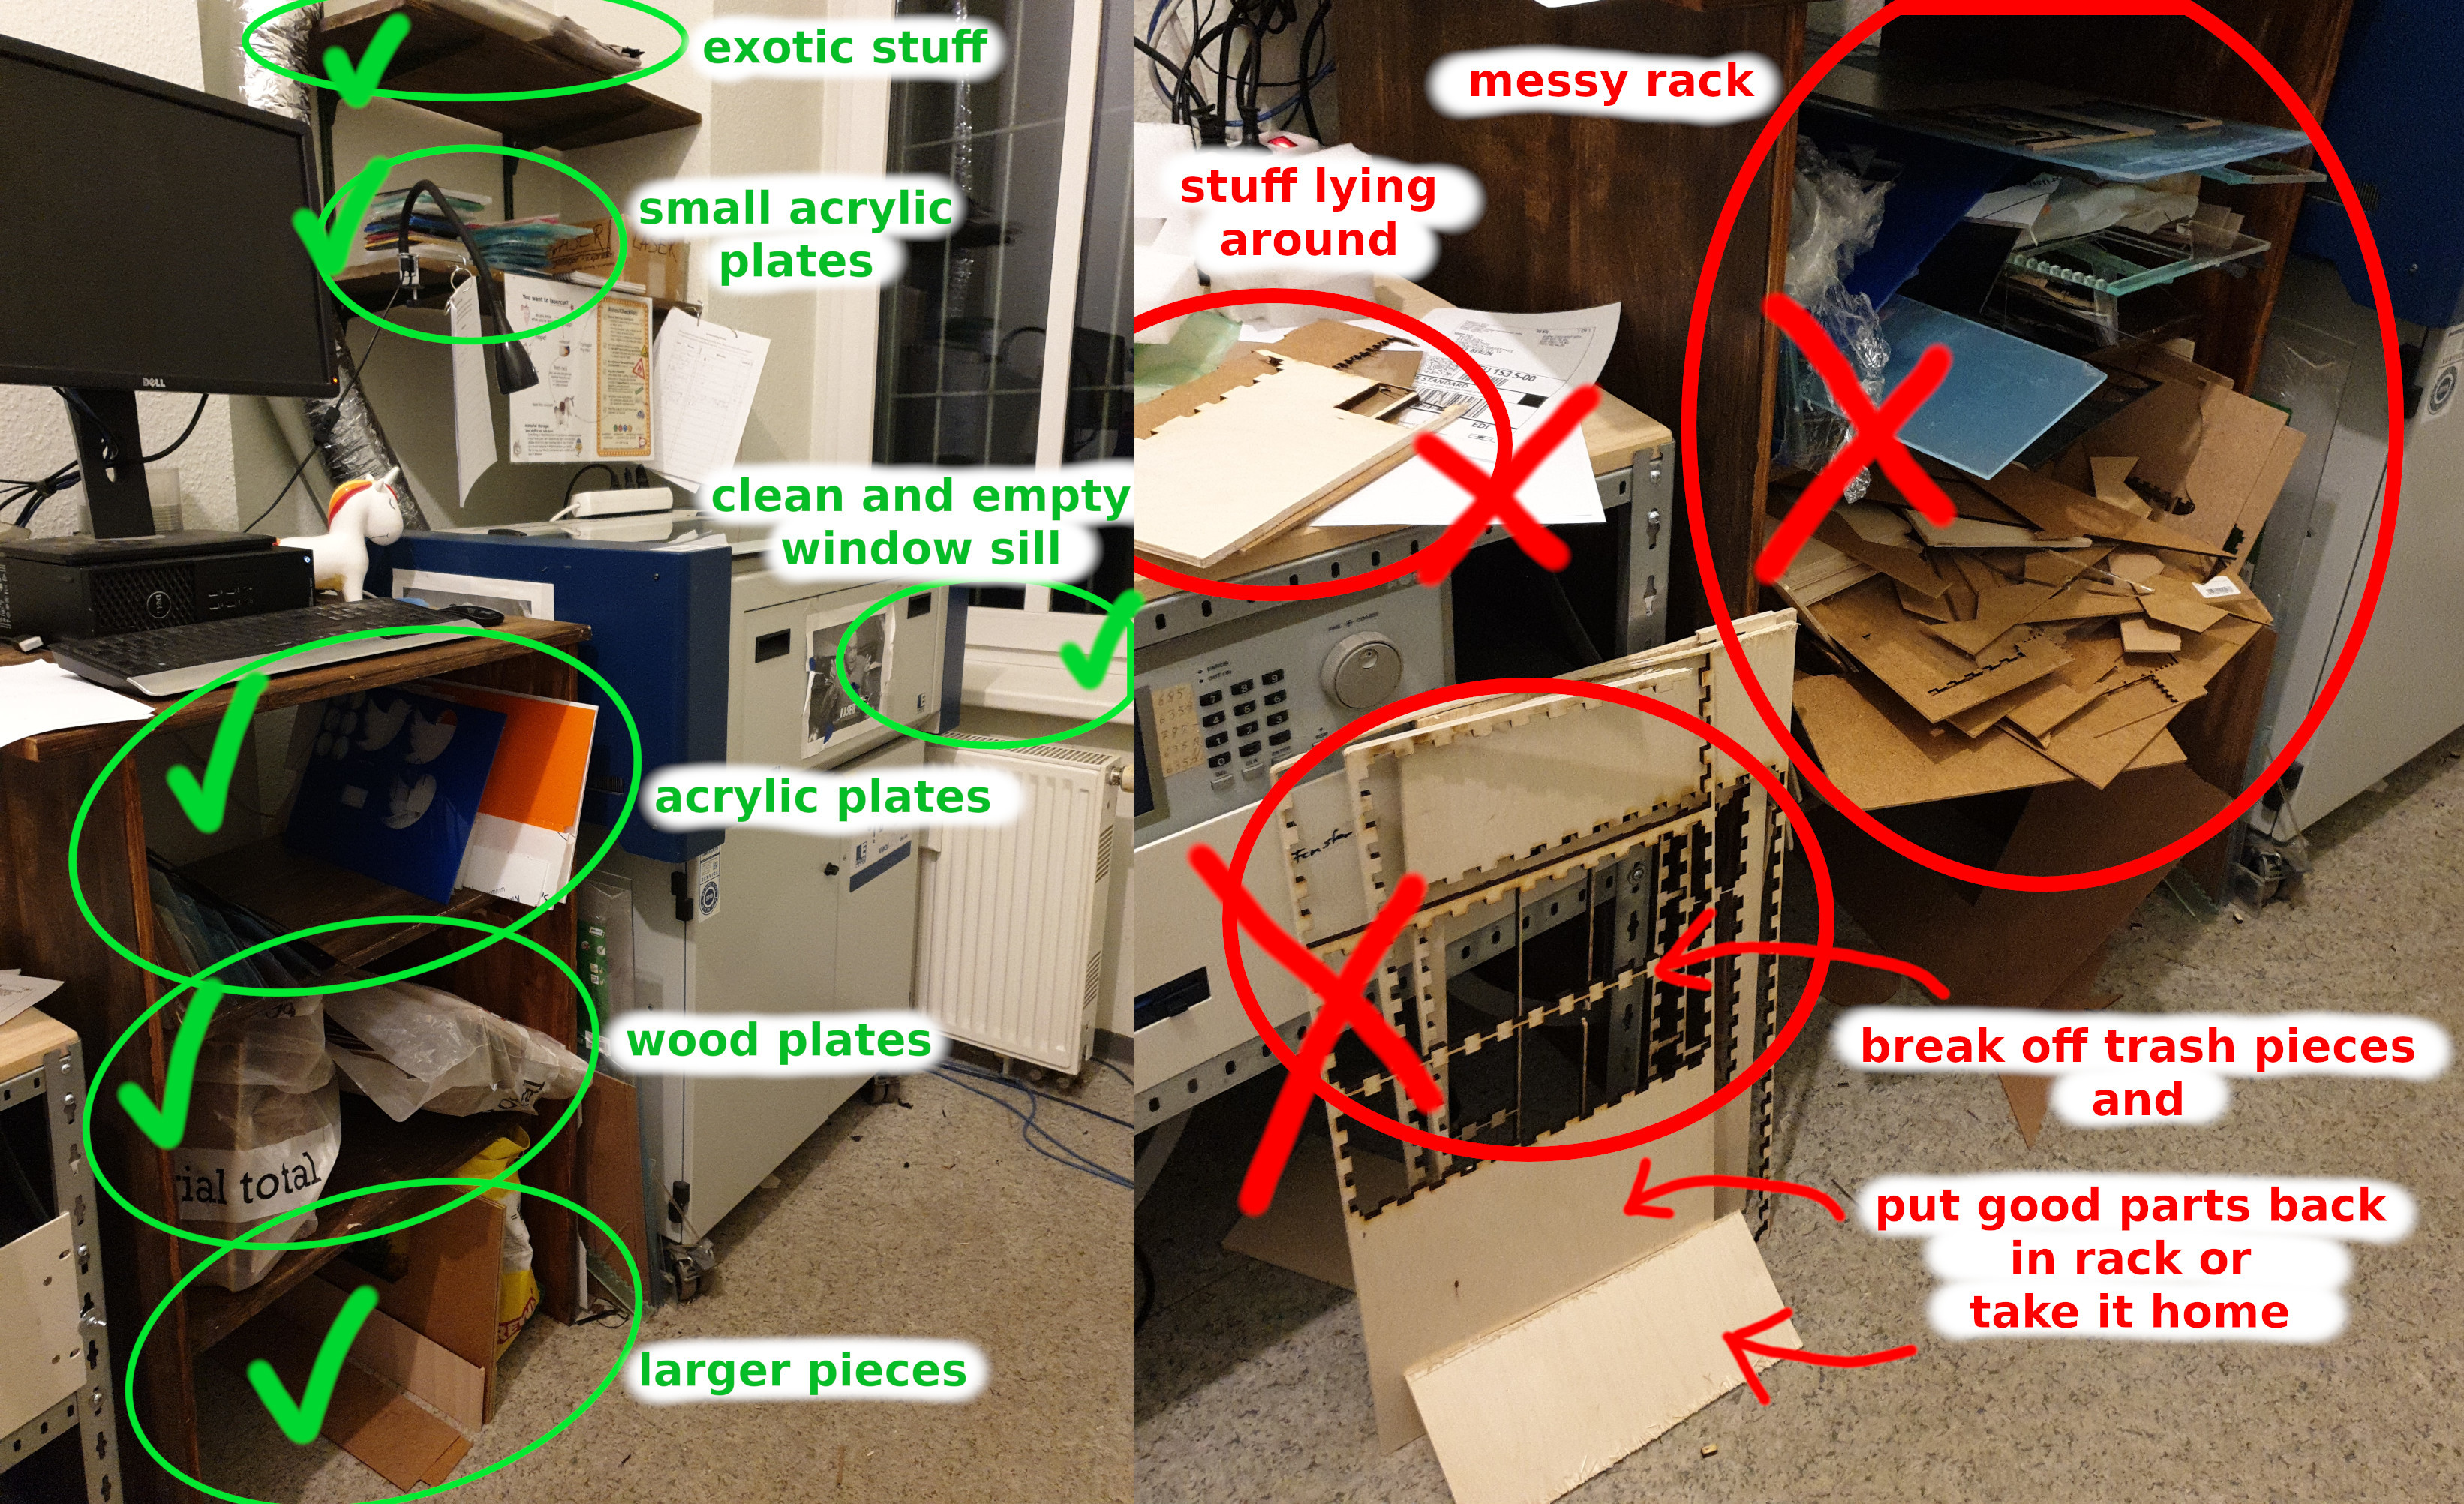
¶ Material rack
-
You may use the common materials from the rack. If you do, please donate to the unicorn (use the prices from online retailers like Amazon as a reference).
-
If you use your own material, please store it in your member box or take it home if it does not fit.
Labelling your stuff and leaving it in the machine room is not acceptable. If you find materials you would like to use, but there is a personal name written on it: please feel free to use it. Your personal stuff is not safe here!
-
Please clean up after yourself.
-
Make sure the material rack stays tidy. Do not leave stuff lying around on the window sill or other places.
-
Throw rubbish or small left over pieces into the rubbish bin provided, and please empty the bin in the backyard when you're done.
¶ Safety & Fire Extinguishers
DO NOT leave the lasercutter unattended. Makespaces have burnt down because someone started the lasercutter and went out to get some lunch. There was a motor failure, the laser continued to exert power on the same spot, the workpiece and machine caught fire.
-
It can happen that your workpiece throws some flames while being lasercut. Especially for easily flammable materials like wood, paper/cardboard or cotton fabric this happens quite frequently. Do not be alarmed. Normally the flames are pulled off by the ventilation and stop immediately when the laser stops cutting. It can, however, leave some black marks on your workpiece (consider choosing a lower power setting).
-
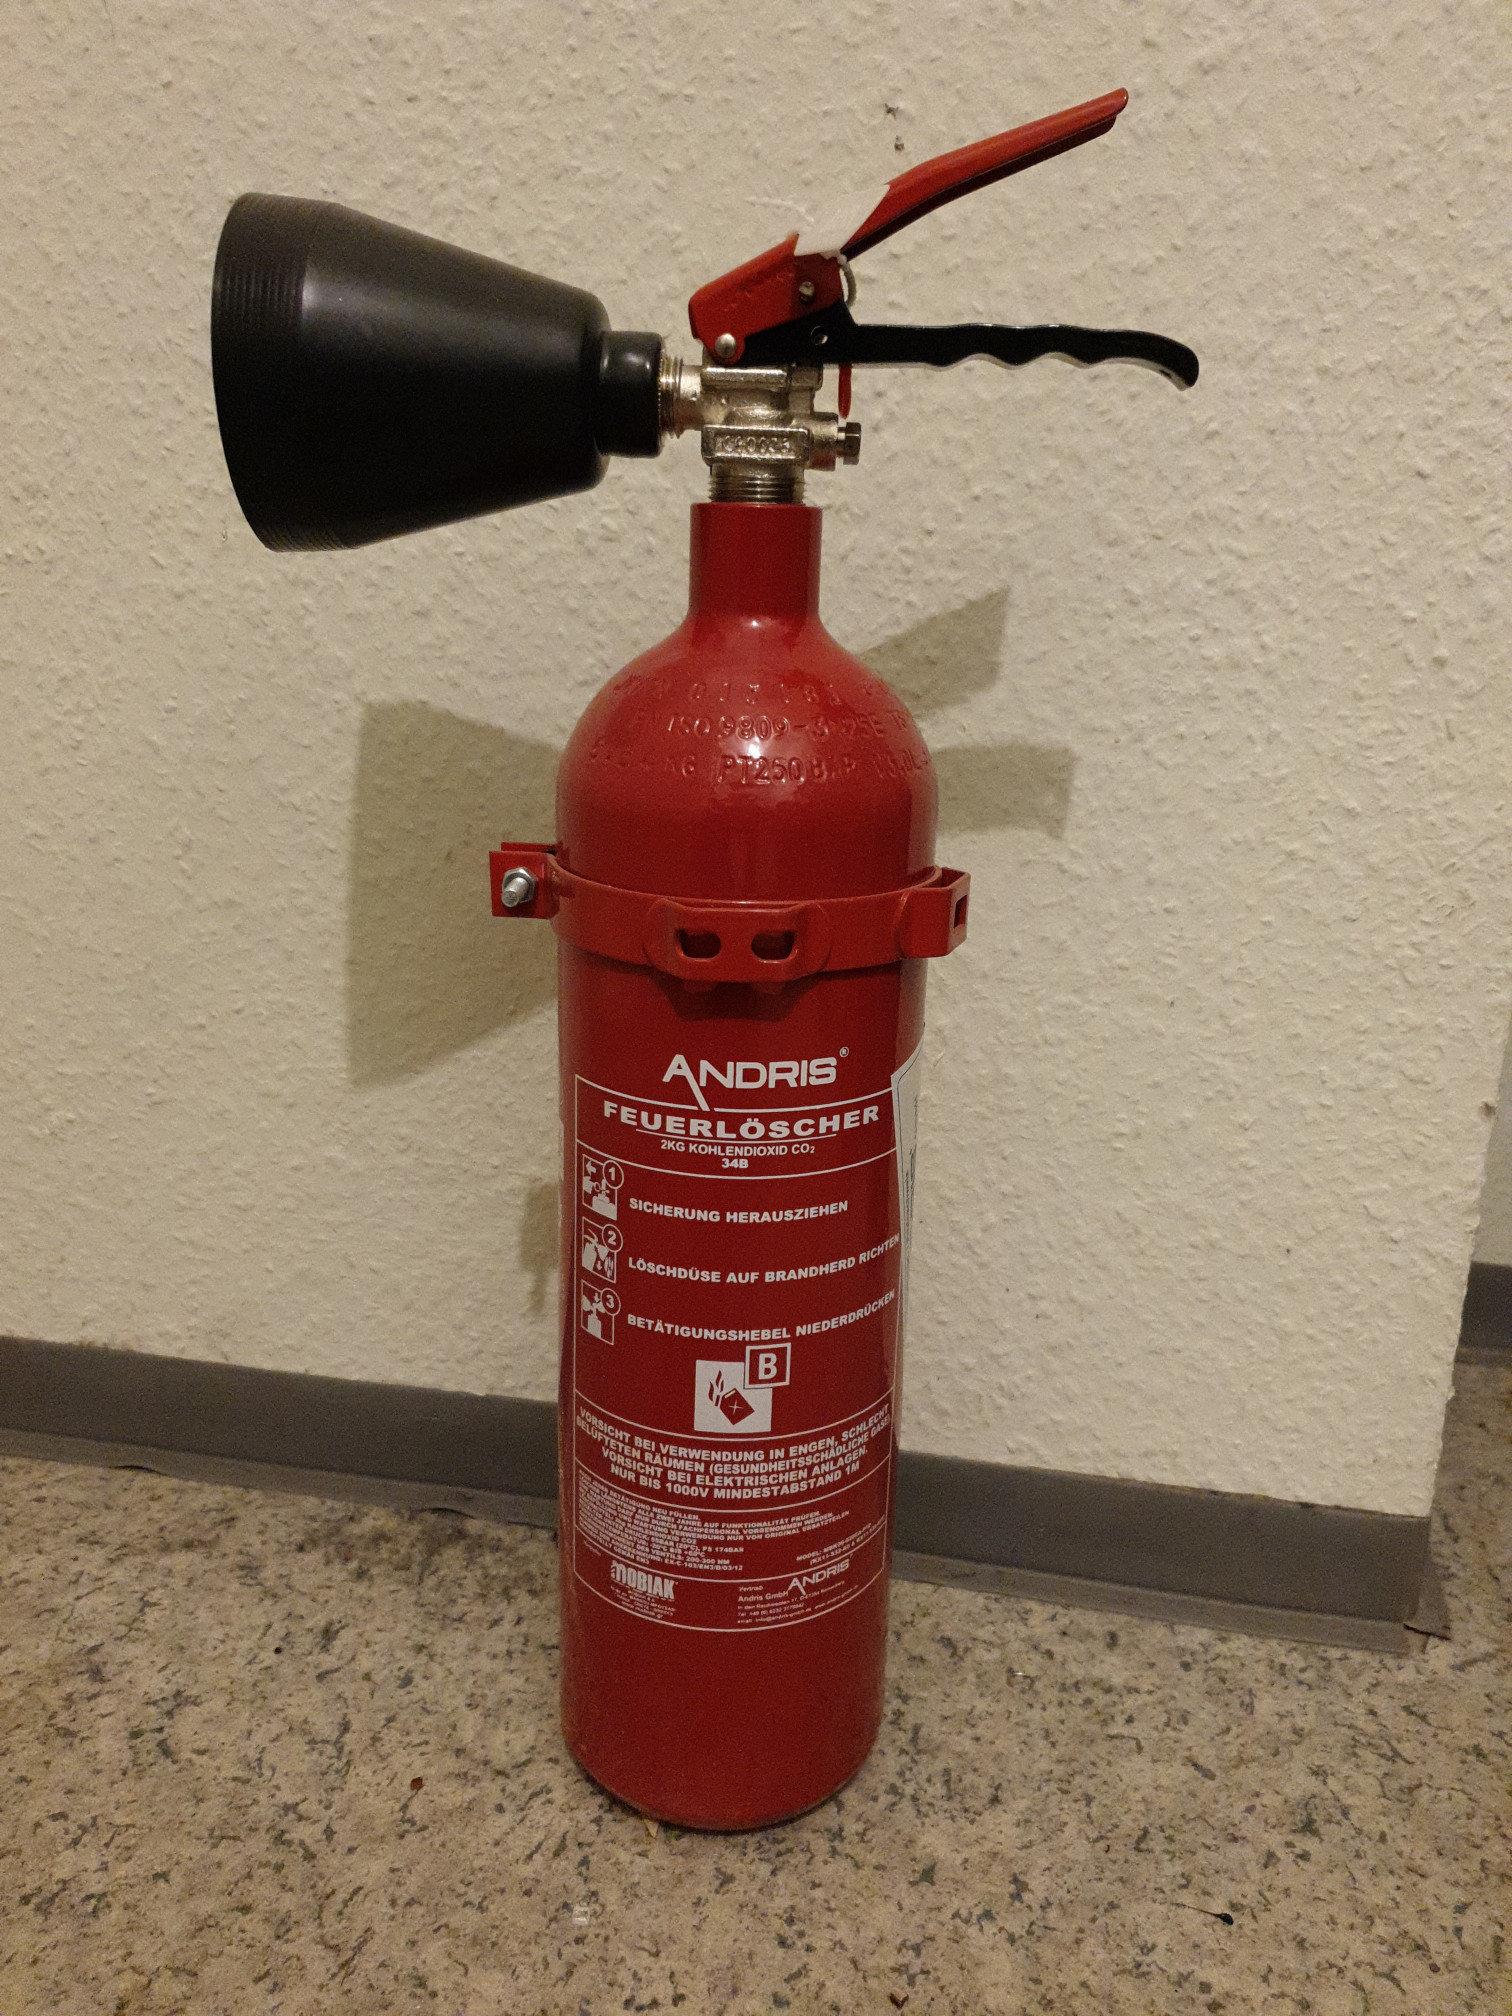
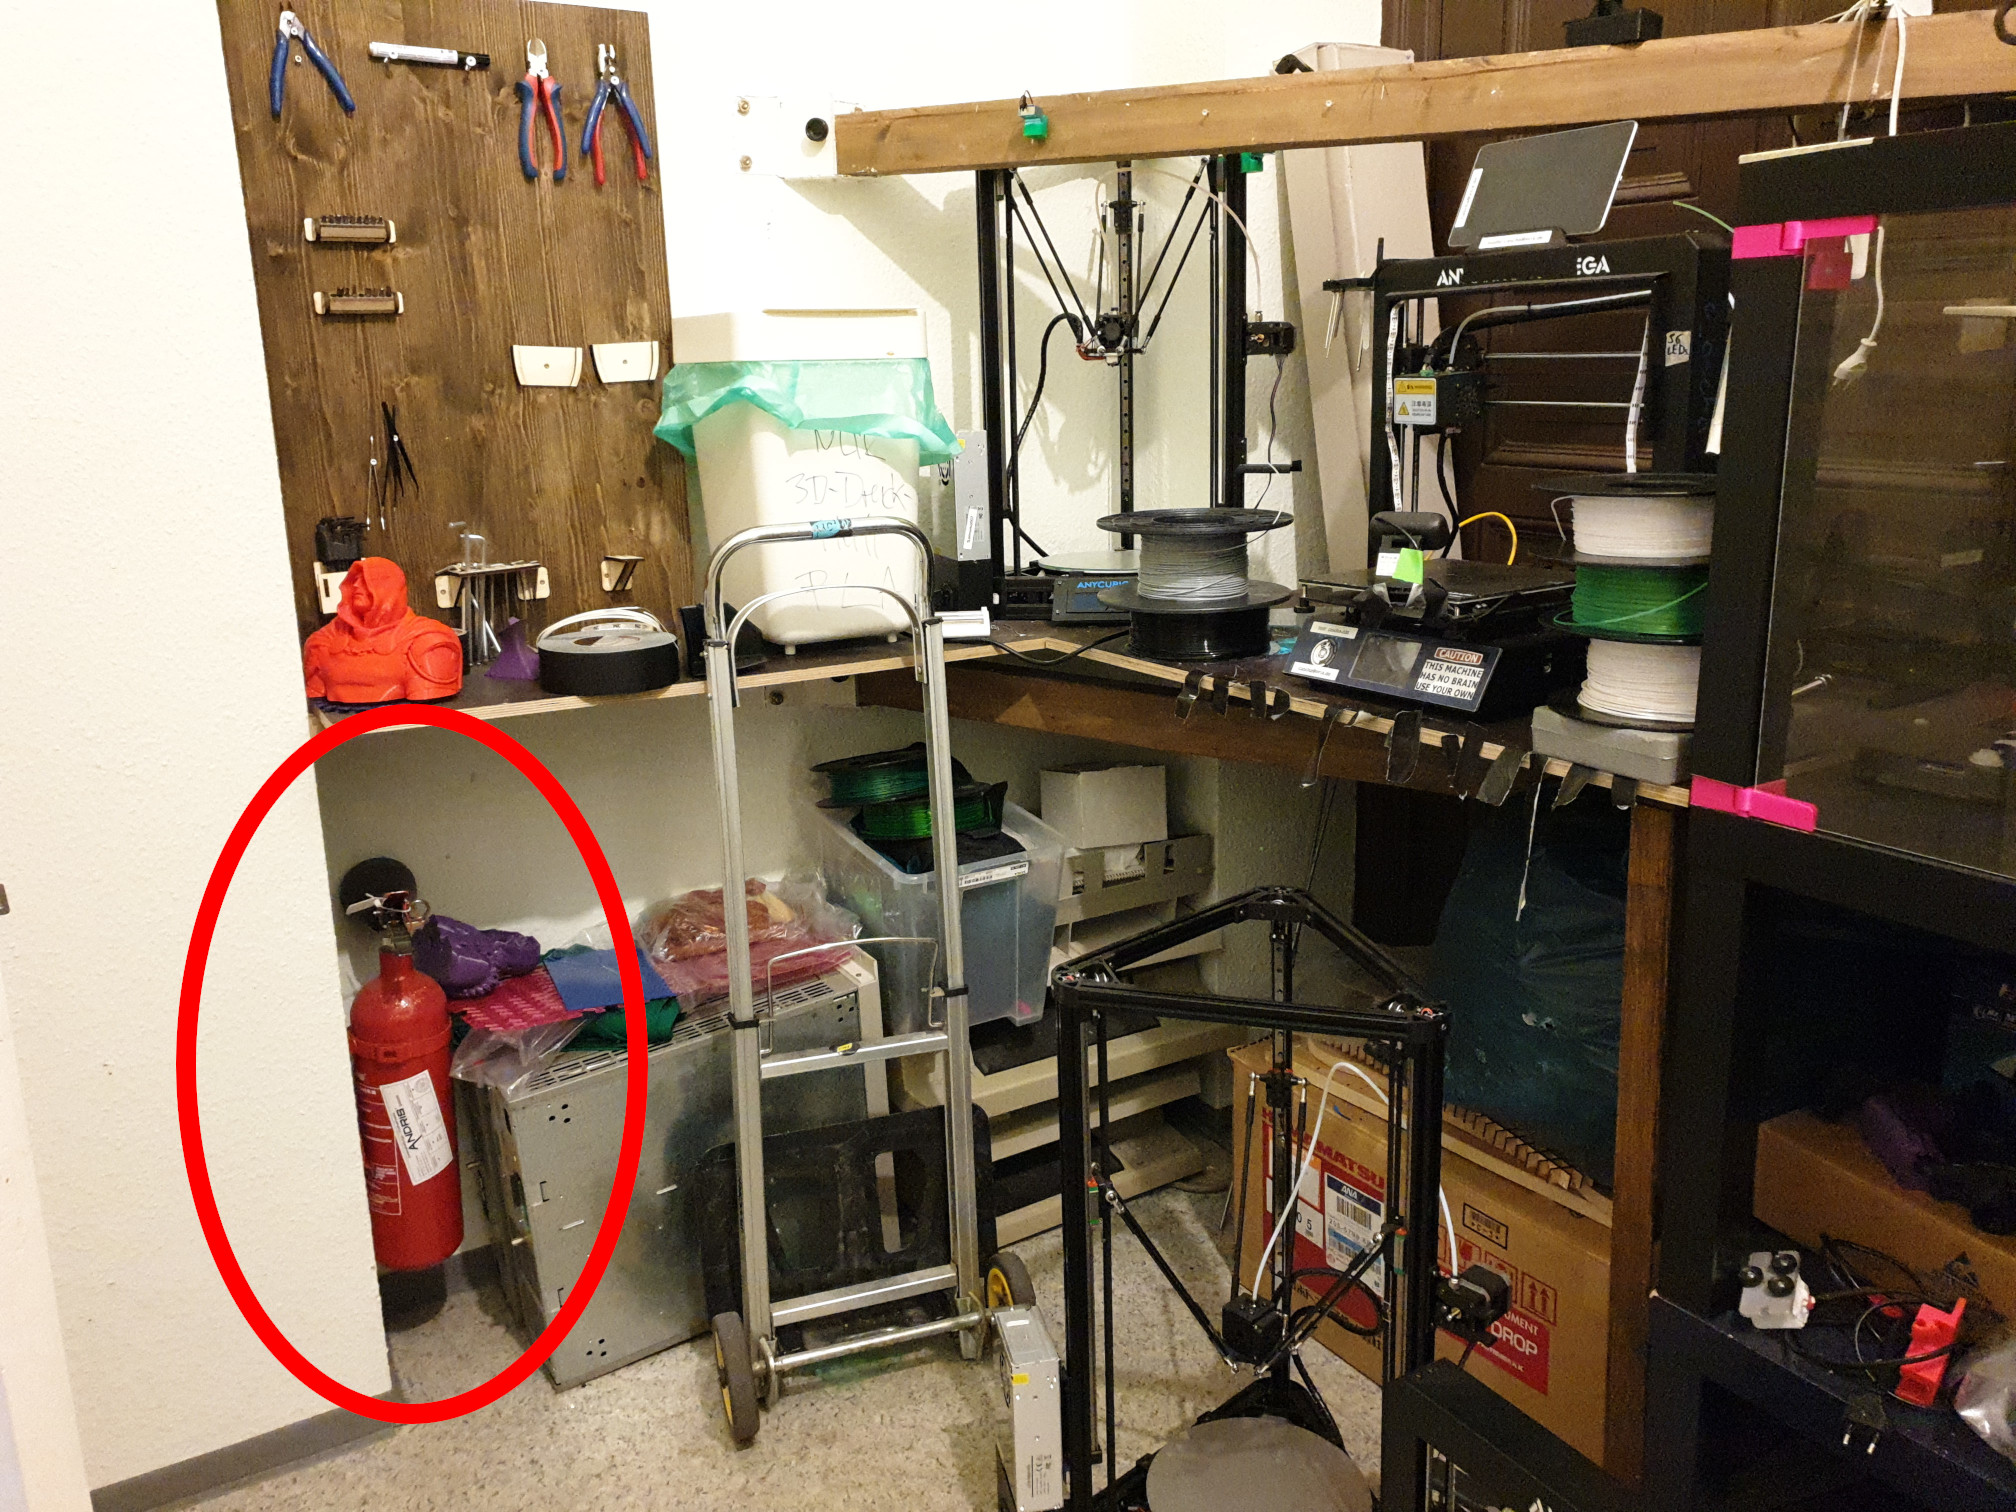
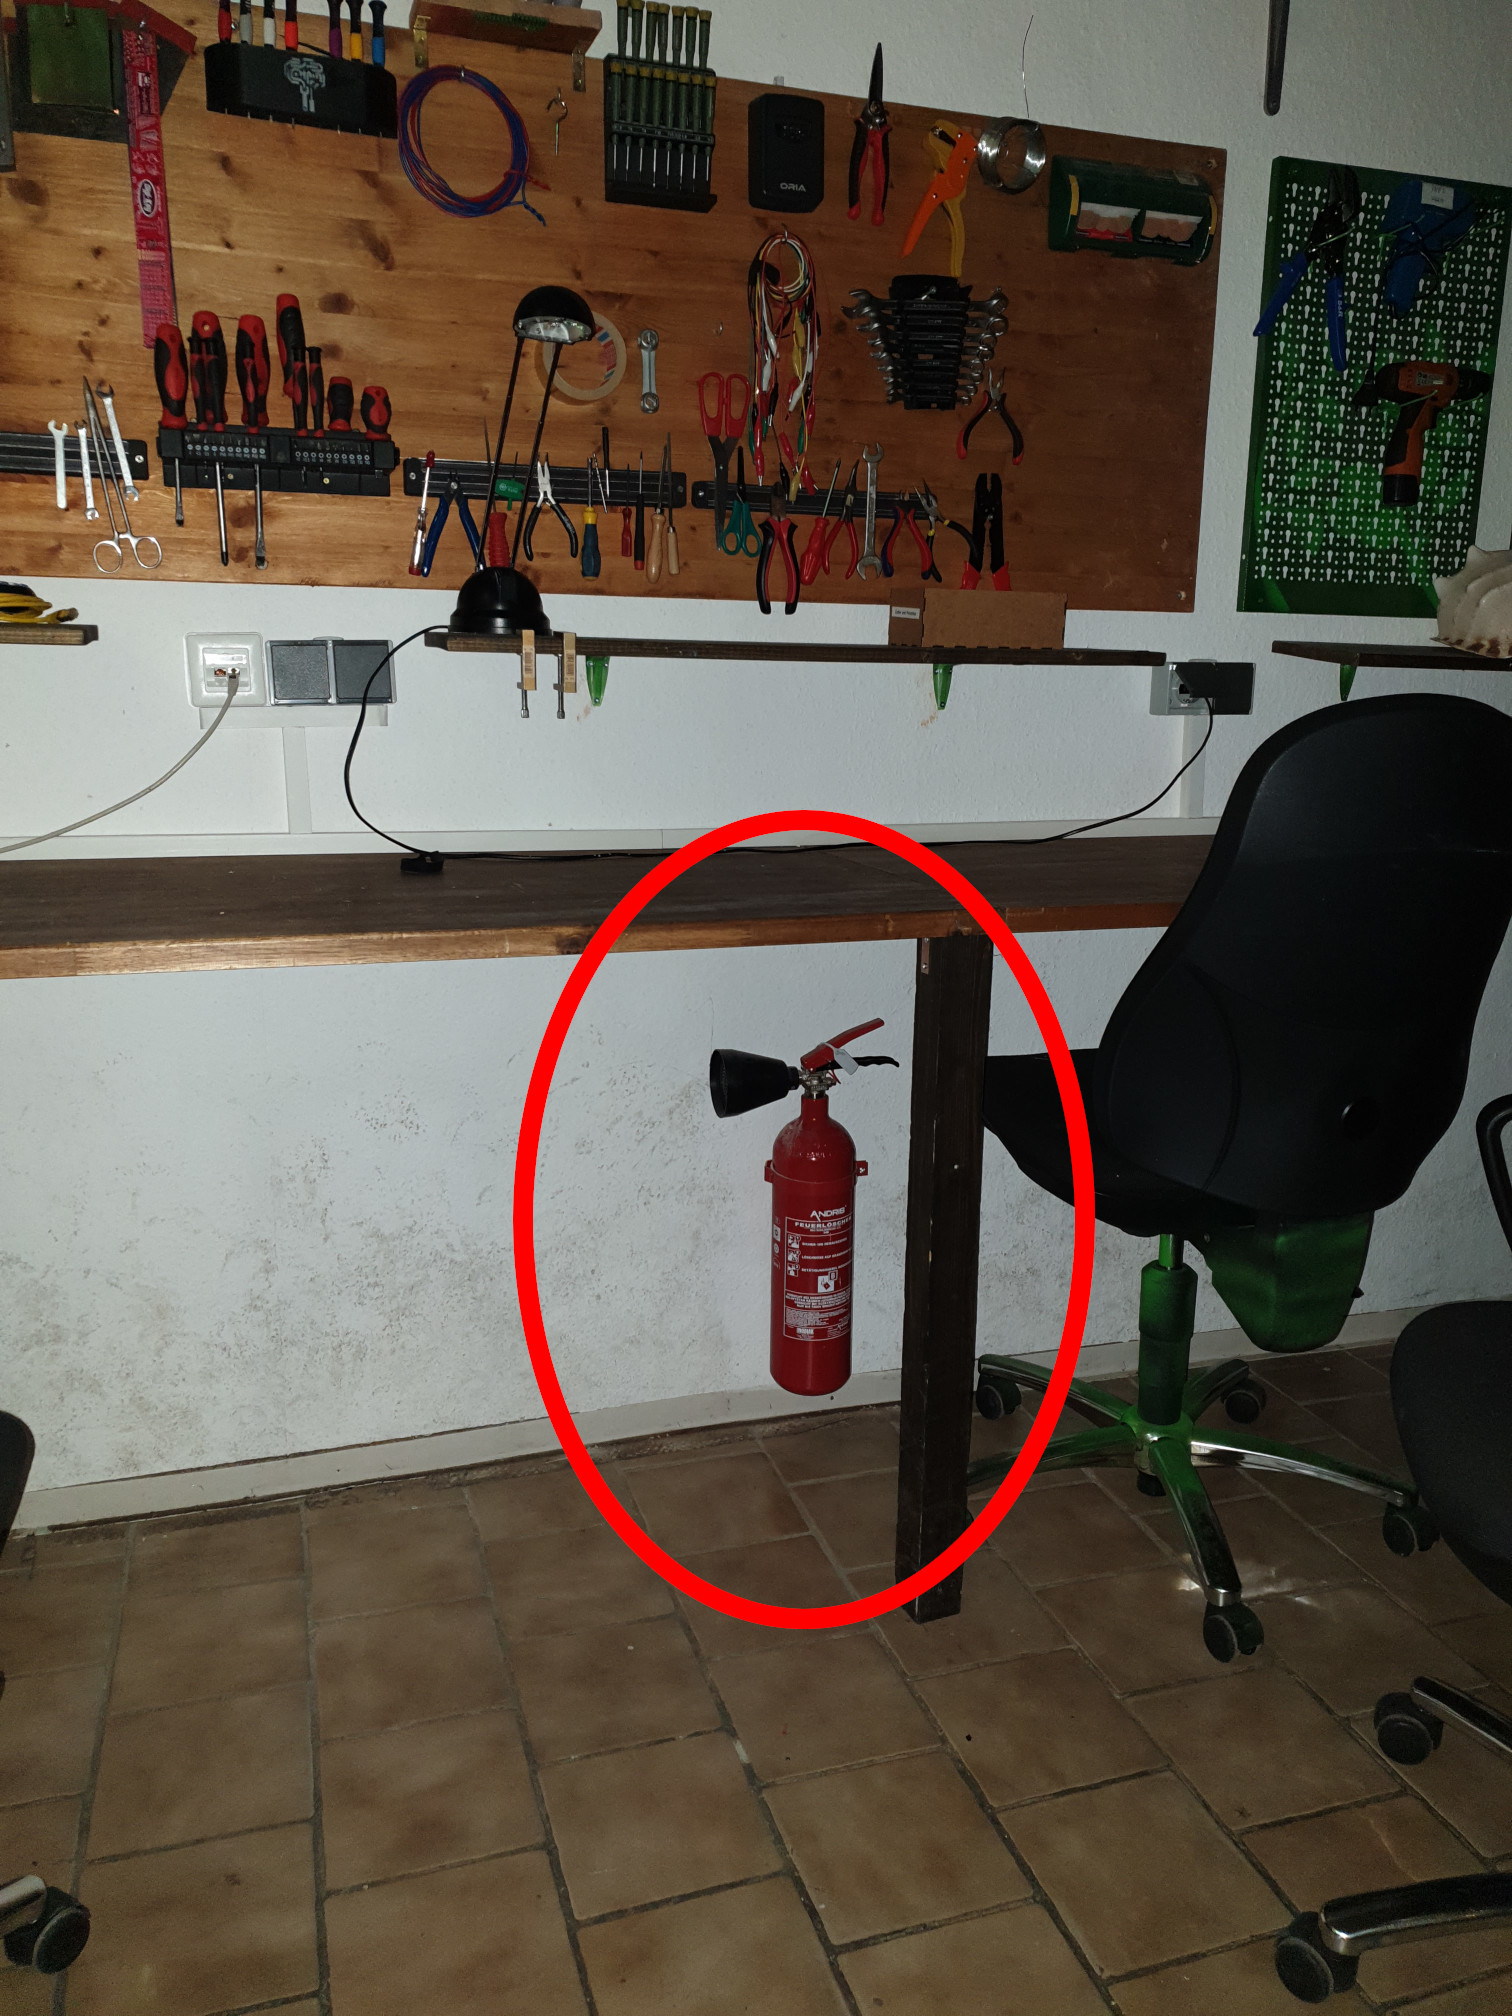
If, however, your workpiece or the machine seriously catches fire which you cannot extinguish by hand, we do have CO2 fire extinguishers stored at several locations at xhain. The closest one is in the machine room in the corner behind the door. The next one is in the main room under the workbench.
Make yourself acquainted with the locations and use of fire extinguishers.
If you had to use an extinguisher (even for a small amount):
After use, DO NOT put the extinquisher back to its original place. Leave it on the floor.
- Please advise @felix or @lorxor or the #general chat, so we can check if we need to replace the extinguisher. (An extinguisher is only useful when it is not empty!)
¶ Safety Interlock
The laser machine has three main safety interlocks, which, when triggered, stops the laser cutter immediately. Be aware, that both the motor movements and the laser pointer are unaffected by the interlock.
The personal safety interlock is triggered by:
- opening the top glass flap,
- opening the front flap.
- turning off the ventilation.
¶ Test cut-through ability
You can test cut-through ability in diffrent matierials on a sqaure of 4cm x 4cm using the script speedpowertestgrid.ls in the xhain users Documents folder on the computer next to the lasercutter.
- Open the file with visicut, by double-clicking it.
- set the right material and thickness.
- The script will test different speed and power settings for cutting and help you determine the right settings for your material.
¶ Tutorial
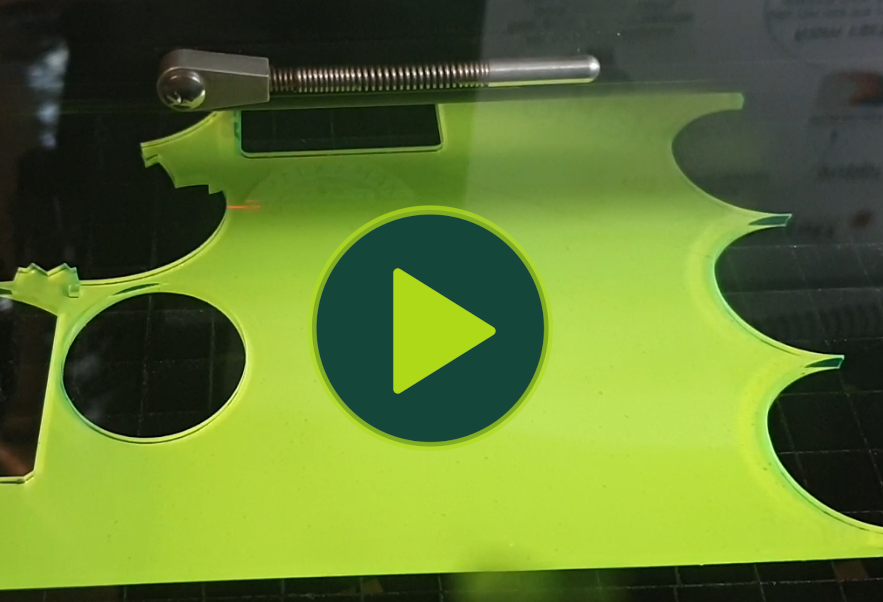
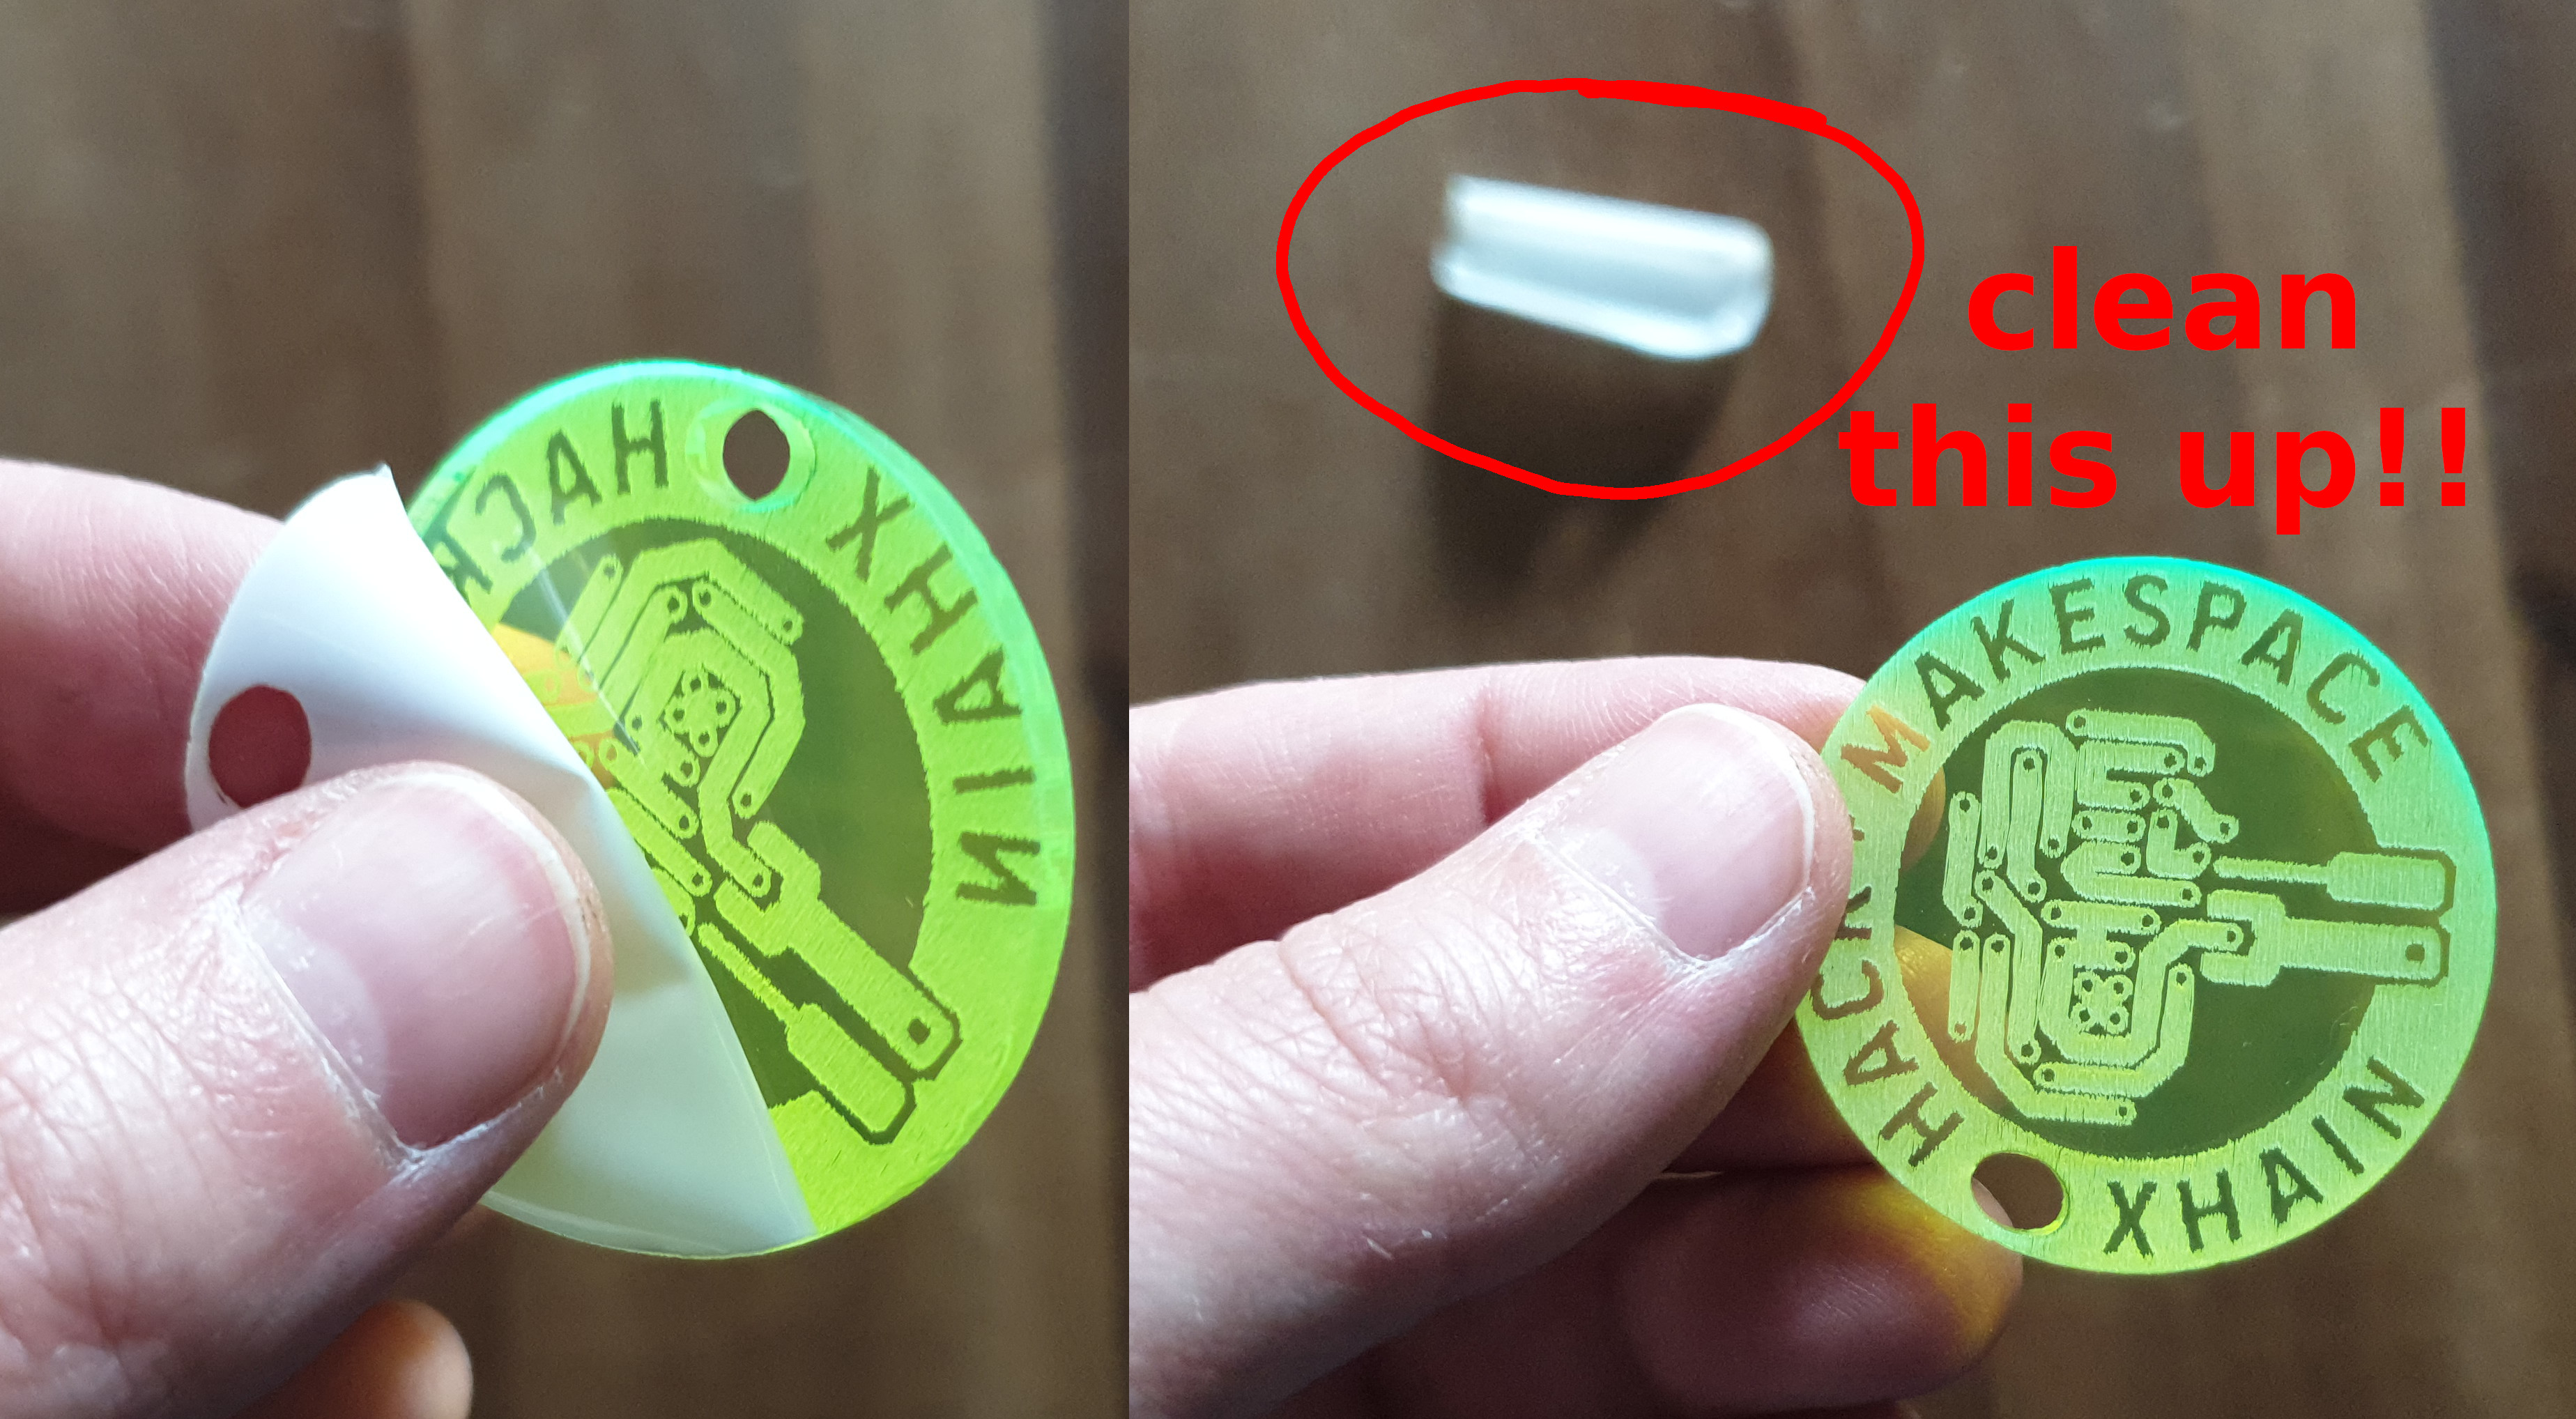
If you want to lasercut an xhain keychain as a test object, you can download the files from github.
¶ Step 1: file preparation with Inkscape
- Create a vector graphic file (*.svg) with a software tool of your choice (try Inkscape) and set the page scale and dimensions to mm. The maximum page size should be 30x60cm.
- Use solid lines (thickness is irrelevant) for cutting with a solid colour (e.g. red).
- Use solid filled areas for engraving with a different colour (e.g. black).
- Position your drawing in the top left corner of the page.
- Copy this file to the computer next to the lasercutter (no password for the computer is required).
¶ Step 2: Visicut software
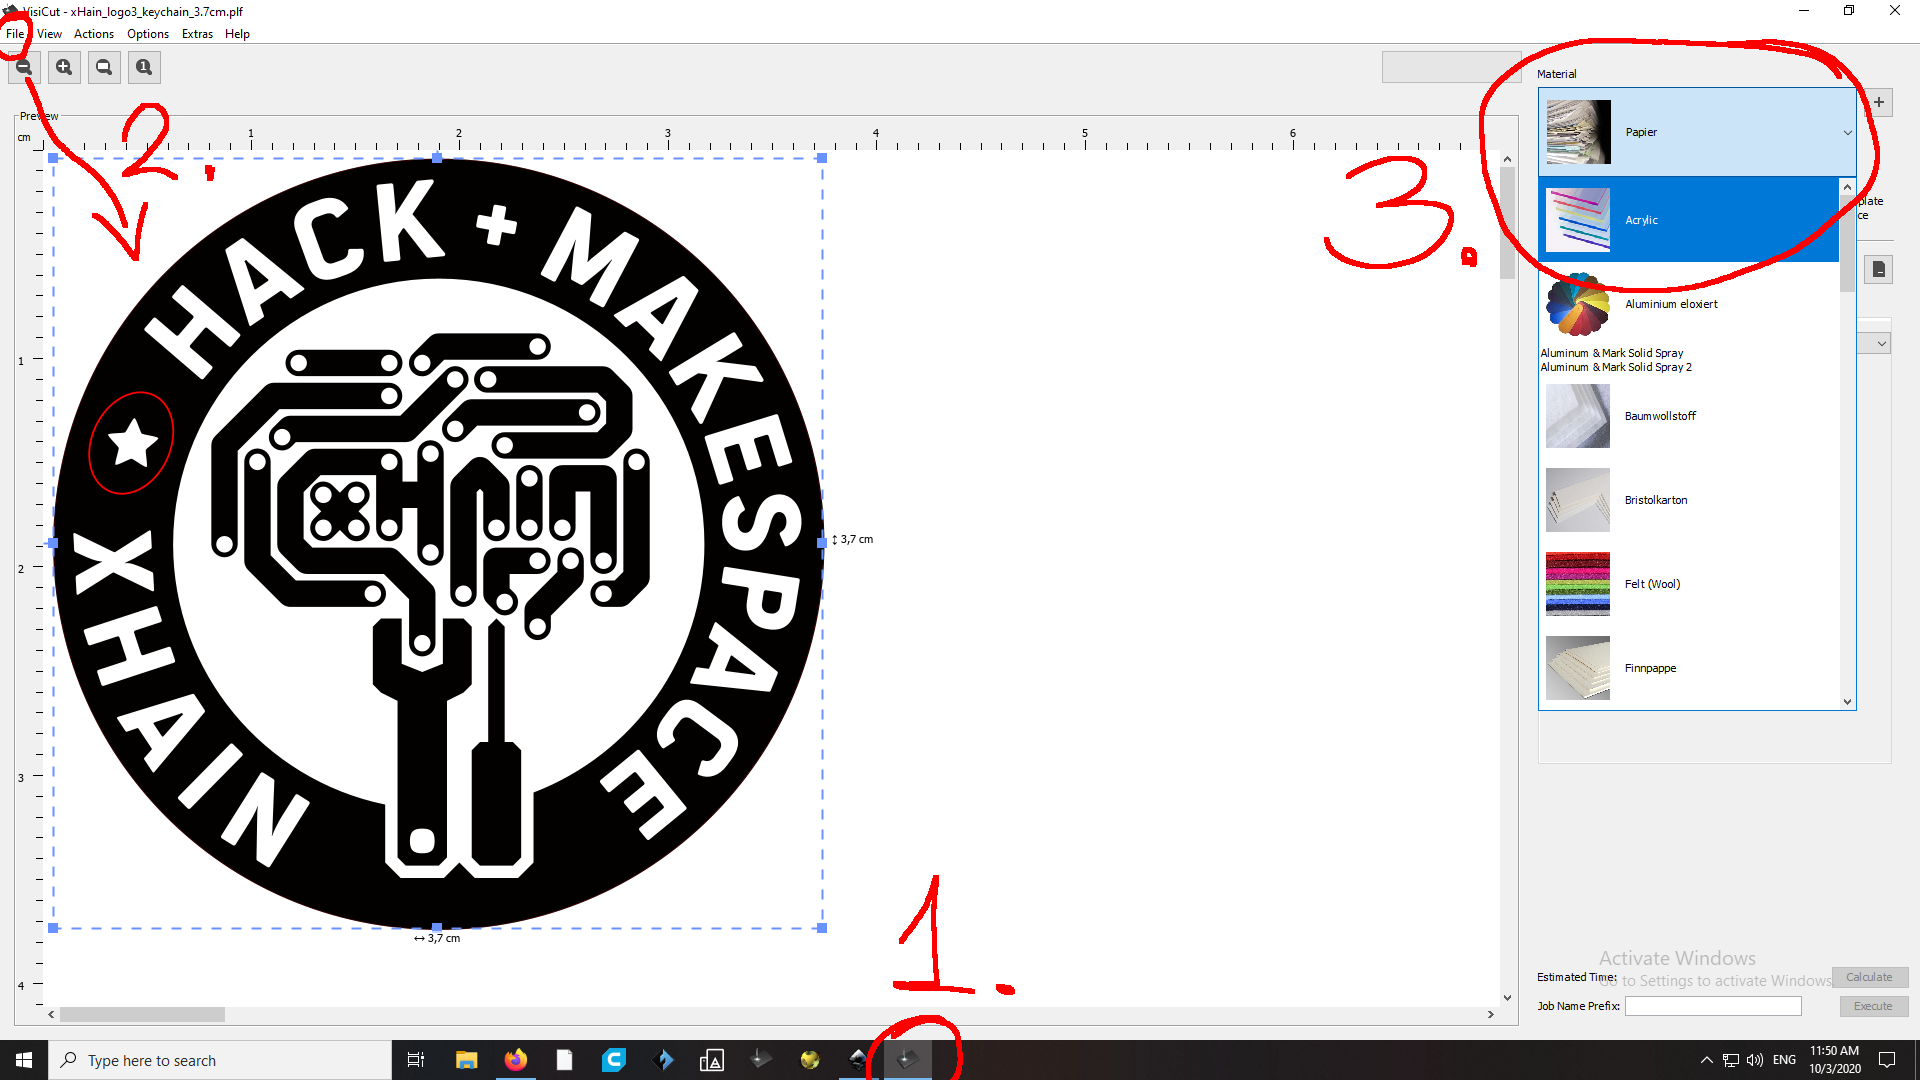
- Open Visicut by clicking on the black symbol in the taskbar or the link on the desktop.
- Open/load your *.svg file.
- Select the material you want to use from the drop down menu. In the example images we use an acrylic plate.
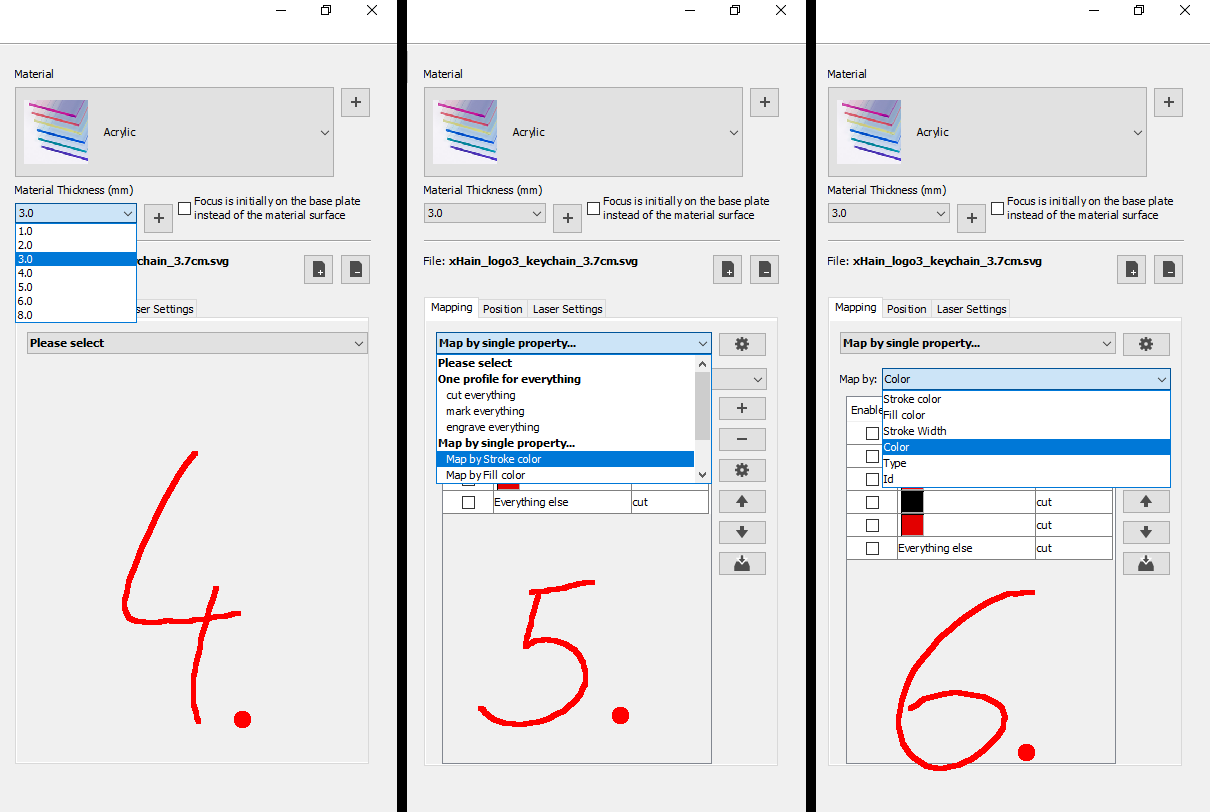
- Select material thickness (in our example 3mm).
- Select "map by stroke color" in the field "map by single property...
- select map by: color

- Check "enabled" for the colours/lines you would like to cut and select "cut" in column "profiles".
- Visually inspect what the lines will look like in the preview.
- Note: the line thickness displayed is irrelevant, only a thin line will be cut.
- Pay attention to the scale in mm. If you messed up your file by not setting the units correctly, the size of your part might not be correct. If so, go back to your vector graphic software or use inkscape on this computer to correct the file.
- Check "enabled" for the colours/areas you would like to engrave and select "engrave" in column "profiles".
- You can temporarily disable the other colours to inspect if the preview for your engraved areas looks ok.
- Reenable all colours you would like to be processed after you are done with the inspection.
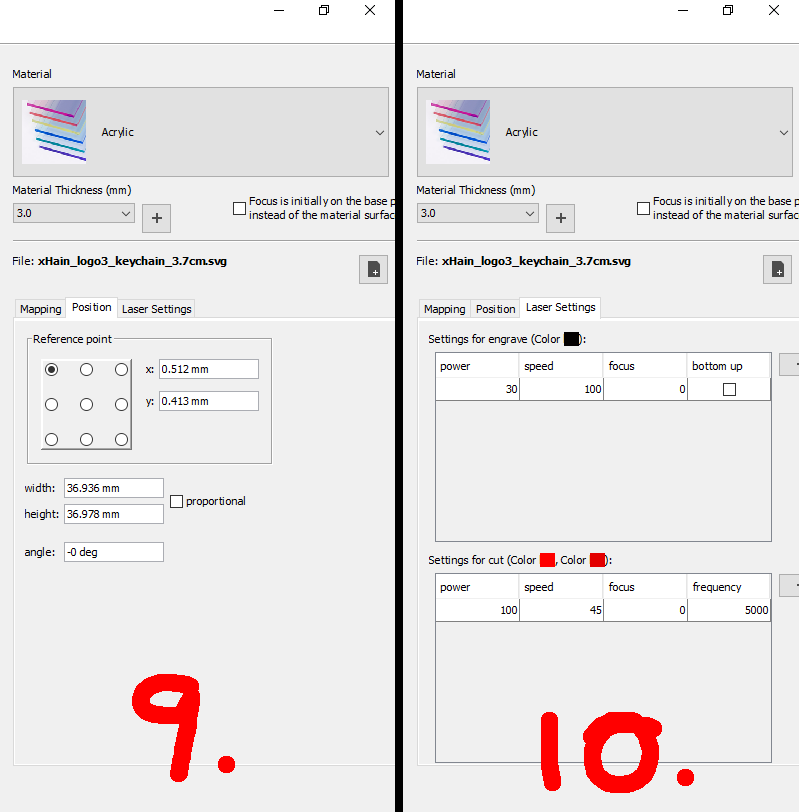
- Positions tab: depending on where you positioned your drawing inside your file page with inkscape, you can now adjust the position again relative to the laser home position (upper left corner) with the settings on the "Position" tab.
- Laser Settings tab: if you are a beginner and you use standard material you should not touch these settings at all. If your material is not listed in the drop down menu, get help from an experienced member to adjust these settings. If you are already well acquainted with lasers, you can take a look at the manual page. The (paper) manual is located on the shelve above the lasercutter.
DO NOT touch these settings if you're not entirely sure what you are doing! Your workpiece could catch fire!
DO NOT overwrite the presets in the list! Create and save a new entry if you would like to keep your personal settings.
- Click on "Calculate" button to get a very rough estimate of the lasercutting time. Unfortunately this estimate is very inaccurate.
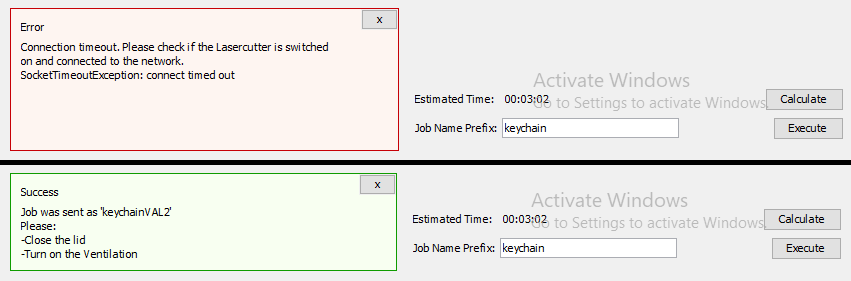
- Give your job a meaningfull name and click on "Execute" button to send the file to the lasercutter after turning it on (next step).
- If you didn't turn on the laser, an error message will be displayed.
¶ Step 3: get the laser ready
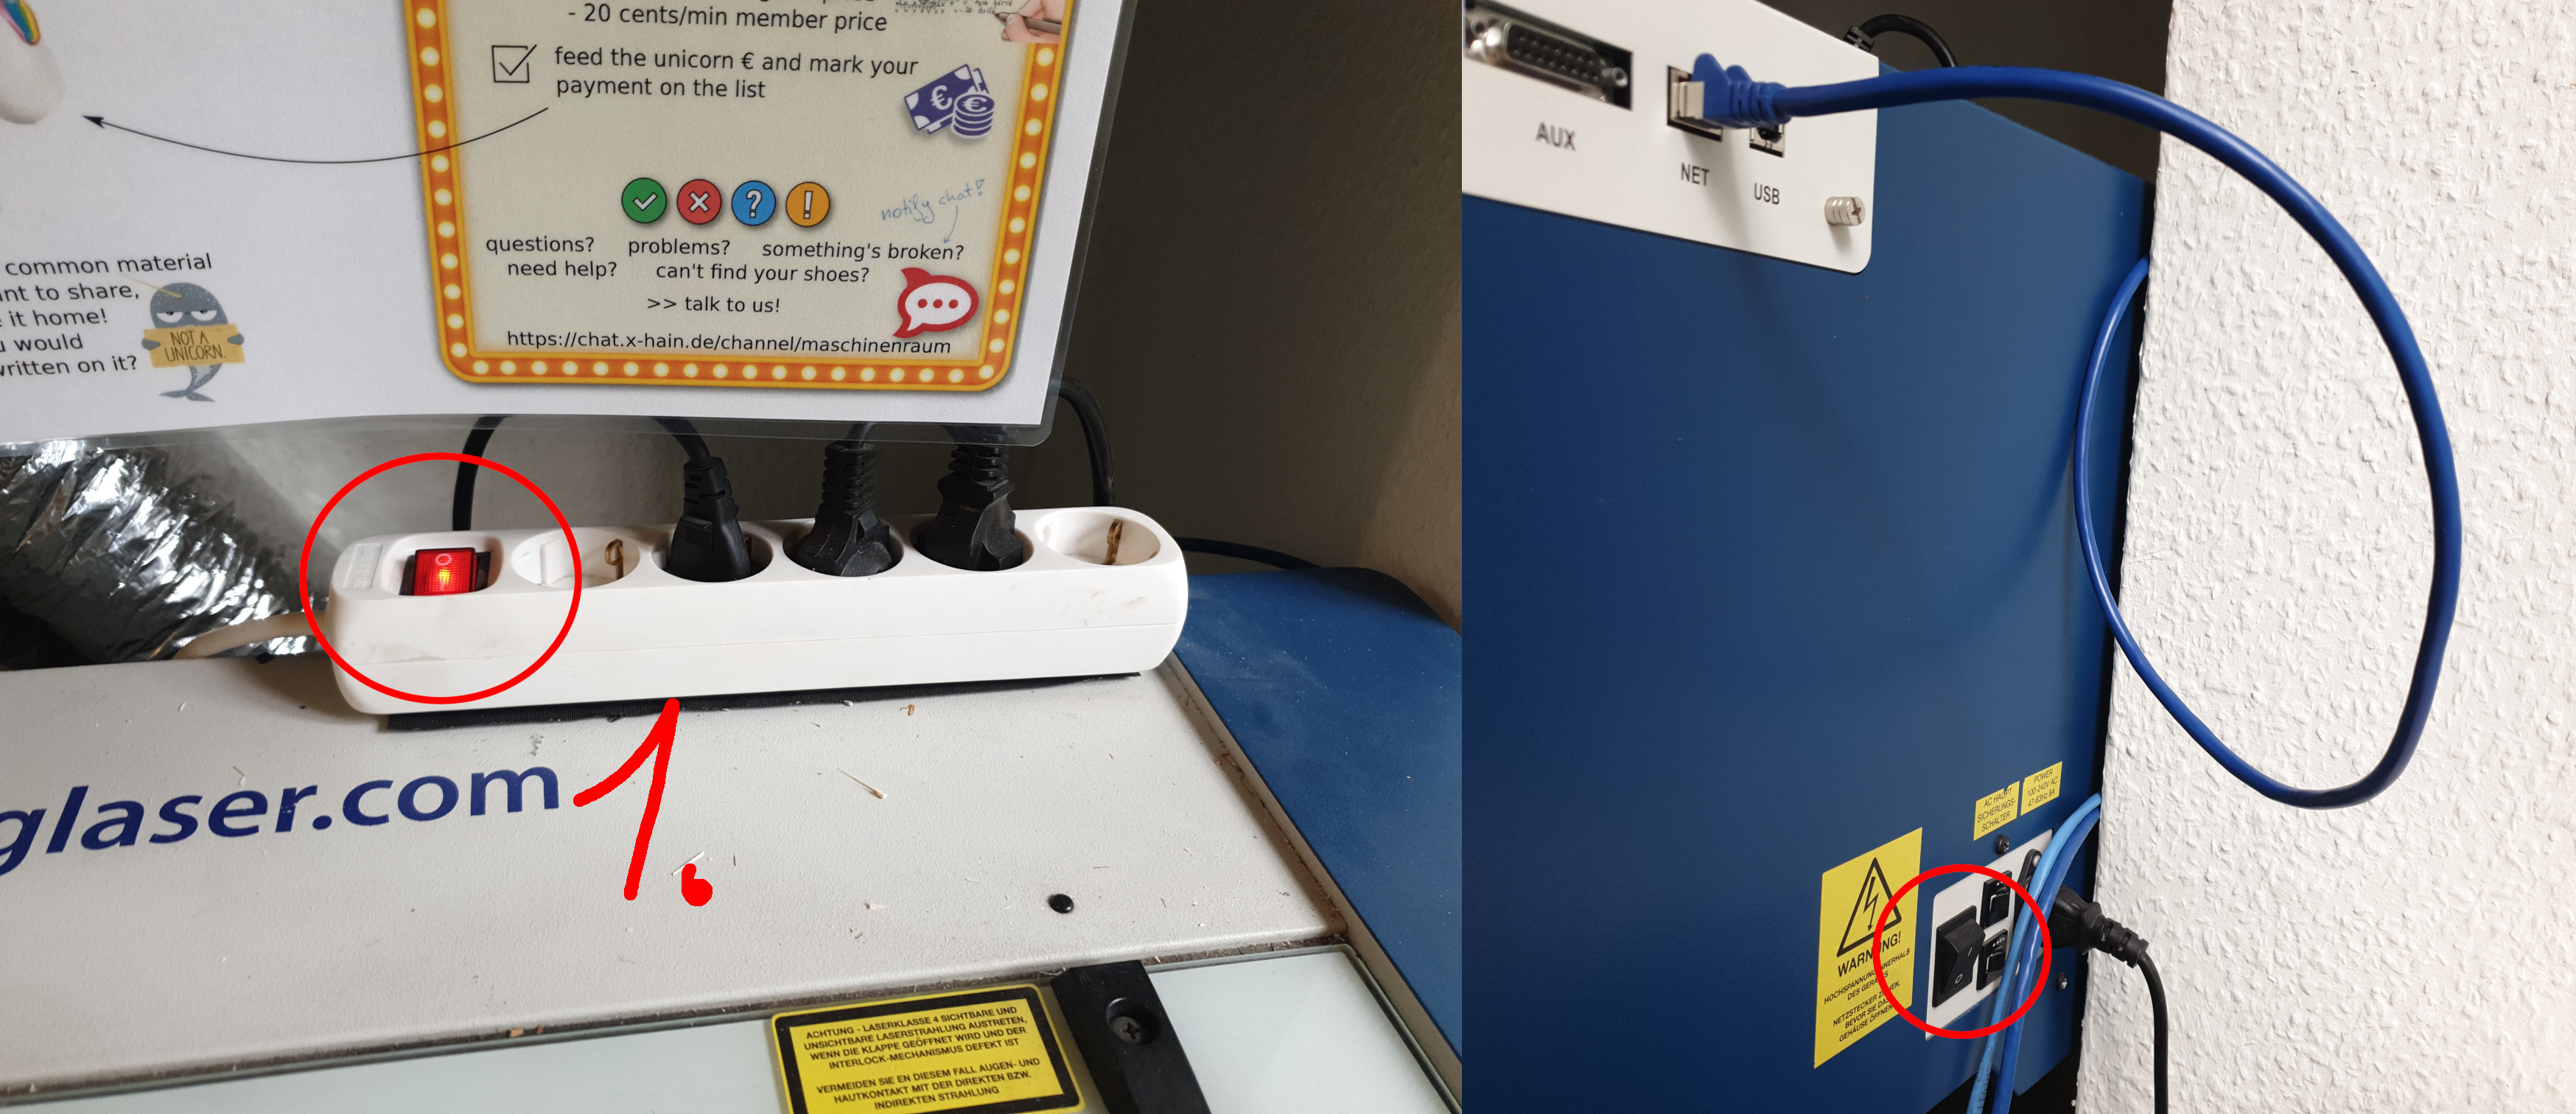
- Switch the laser on by switching on the multiple power socket on top of the laser. The laser will measure its position and return to default home. The display will show an empty job list.
- If the laser does not power on, the previous user has also flipped the switch at the side of the laser. Turn it back on. (...and please don't turn the laser off by this switch, only use the power socket!)
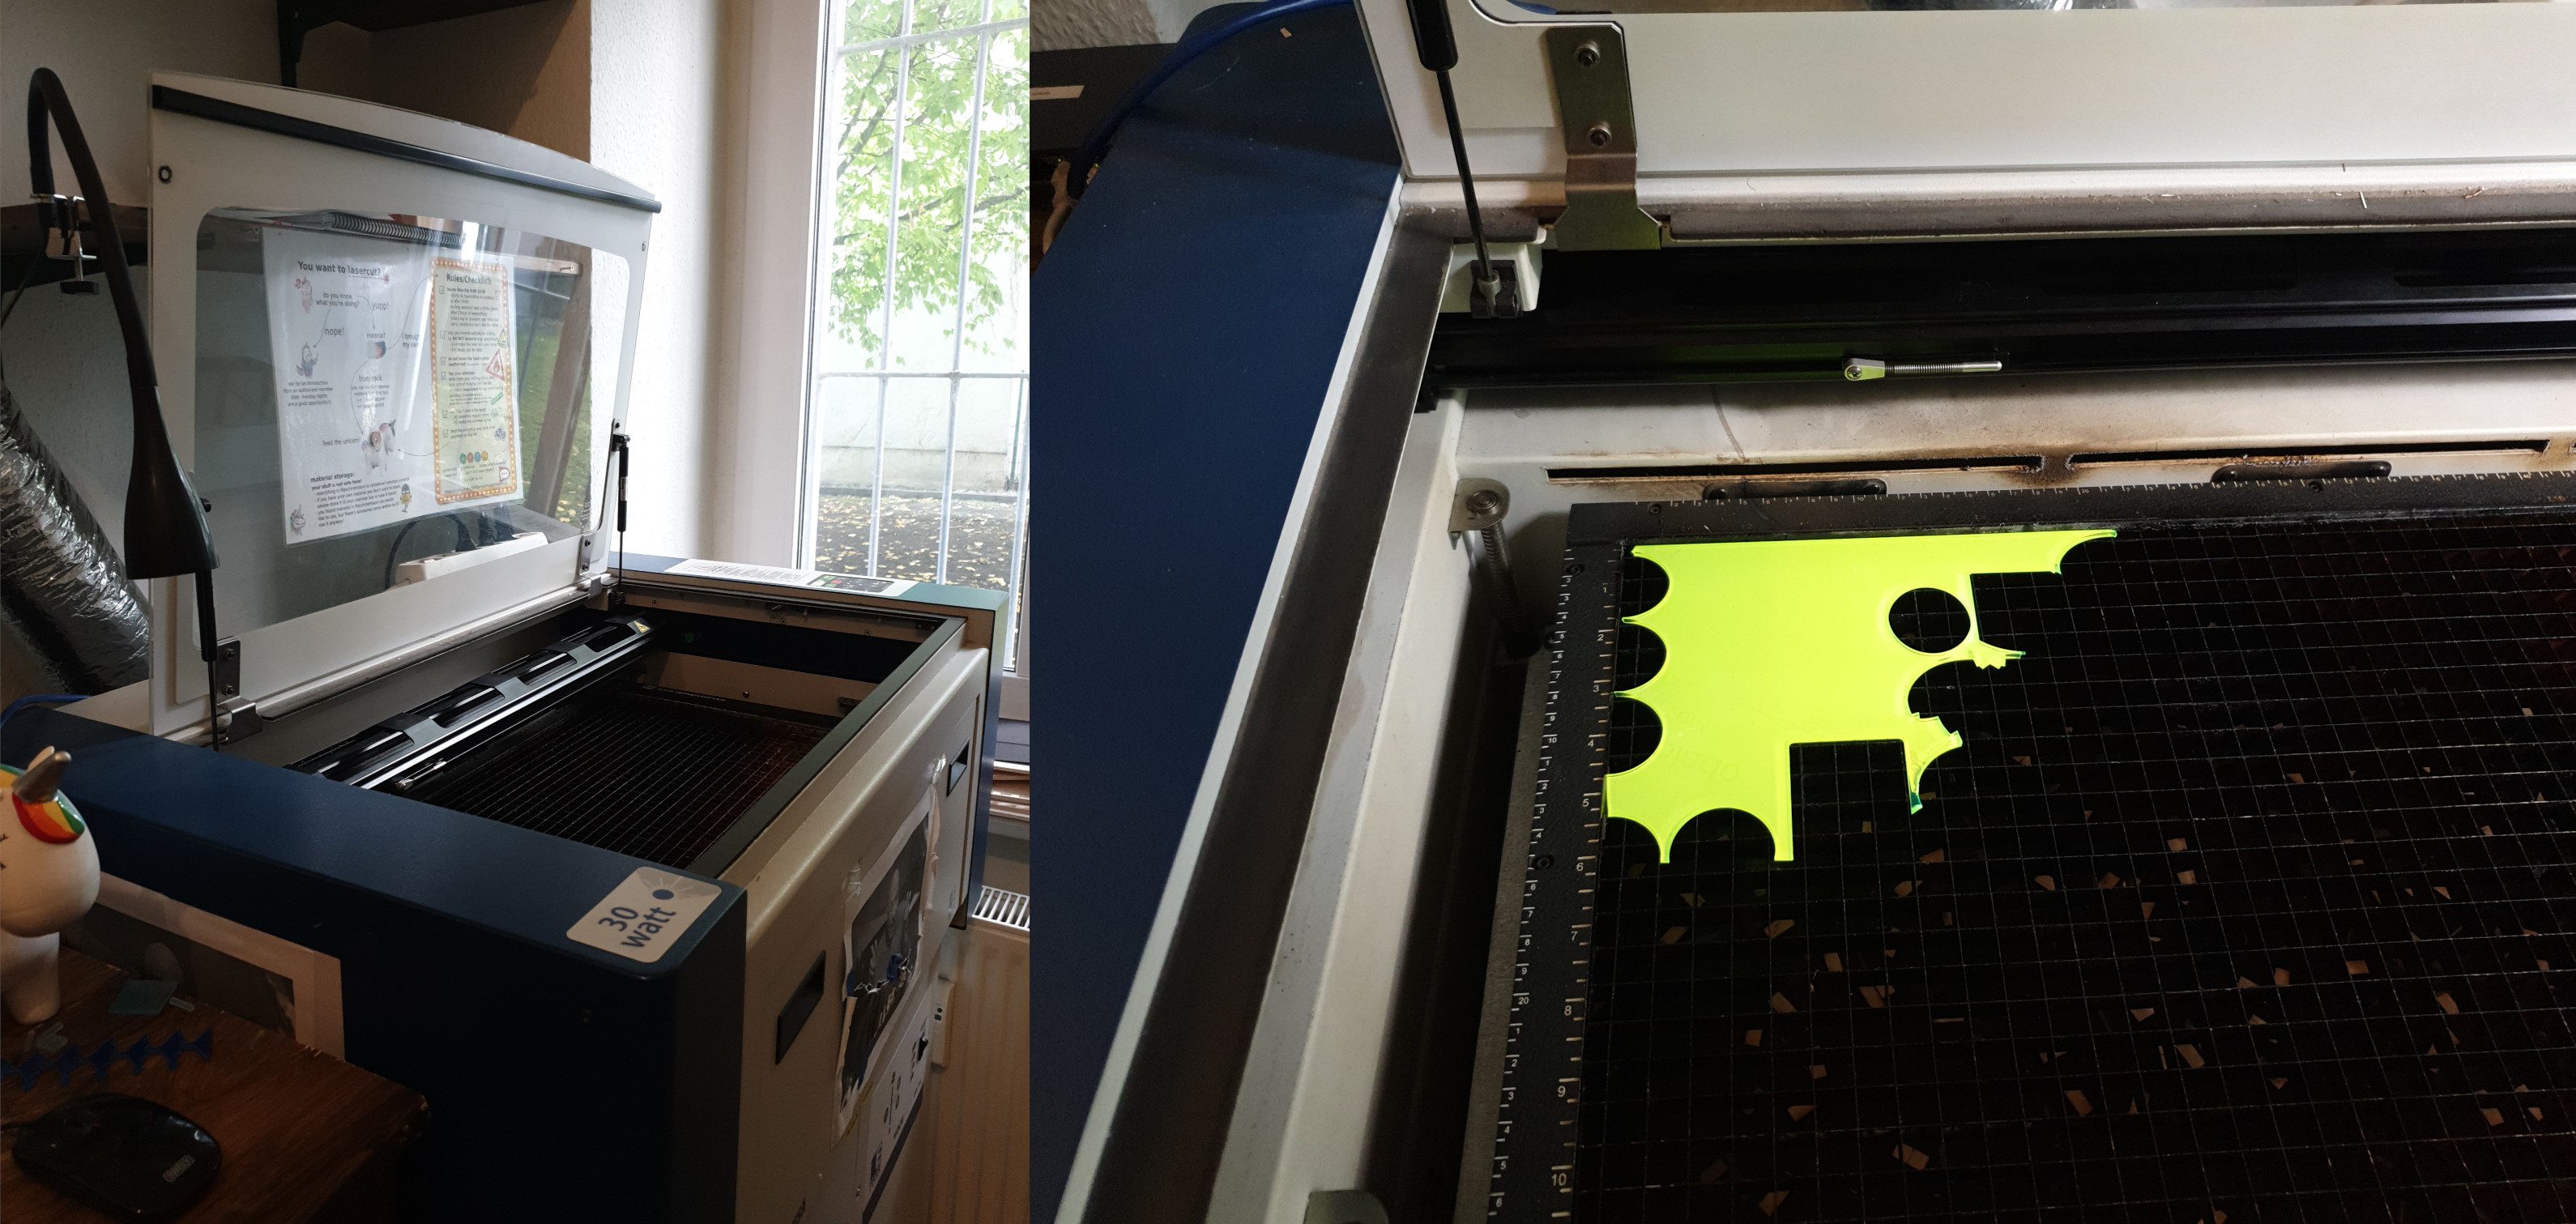
- Open the glass flap of the laser and place your workpiece inside. Align it to the top left corner of the grid.
Hint: if you're using acrylic and would like to engrave the surface, remember to remove the top protective film first. If you don't, the plastic sheet will melt and be burnt into the surface, it will look very ugly and your workpiece is messed up. Also these plastic layers were not meant for lasercutting any may give off toxic/dangerous fumes.
- Removing protective covers from the bottom surface is recommended, but it will not mess up your workpiece if you forget. When the job is finished the edges of the plastic sheet will be fused with the edges of the acrylic, so it becomes a little more difficult to remove it (you may need tweezers).
- In Visicut click on "Execute". The job is successfully sent to the laser and displayed with the name you have specified. In our example that's "Job:1.keychainVAL2".
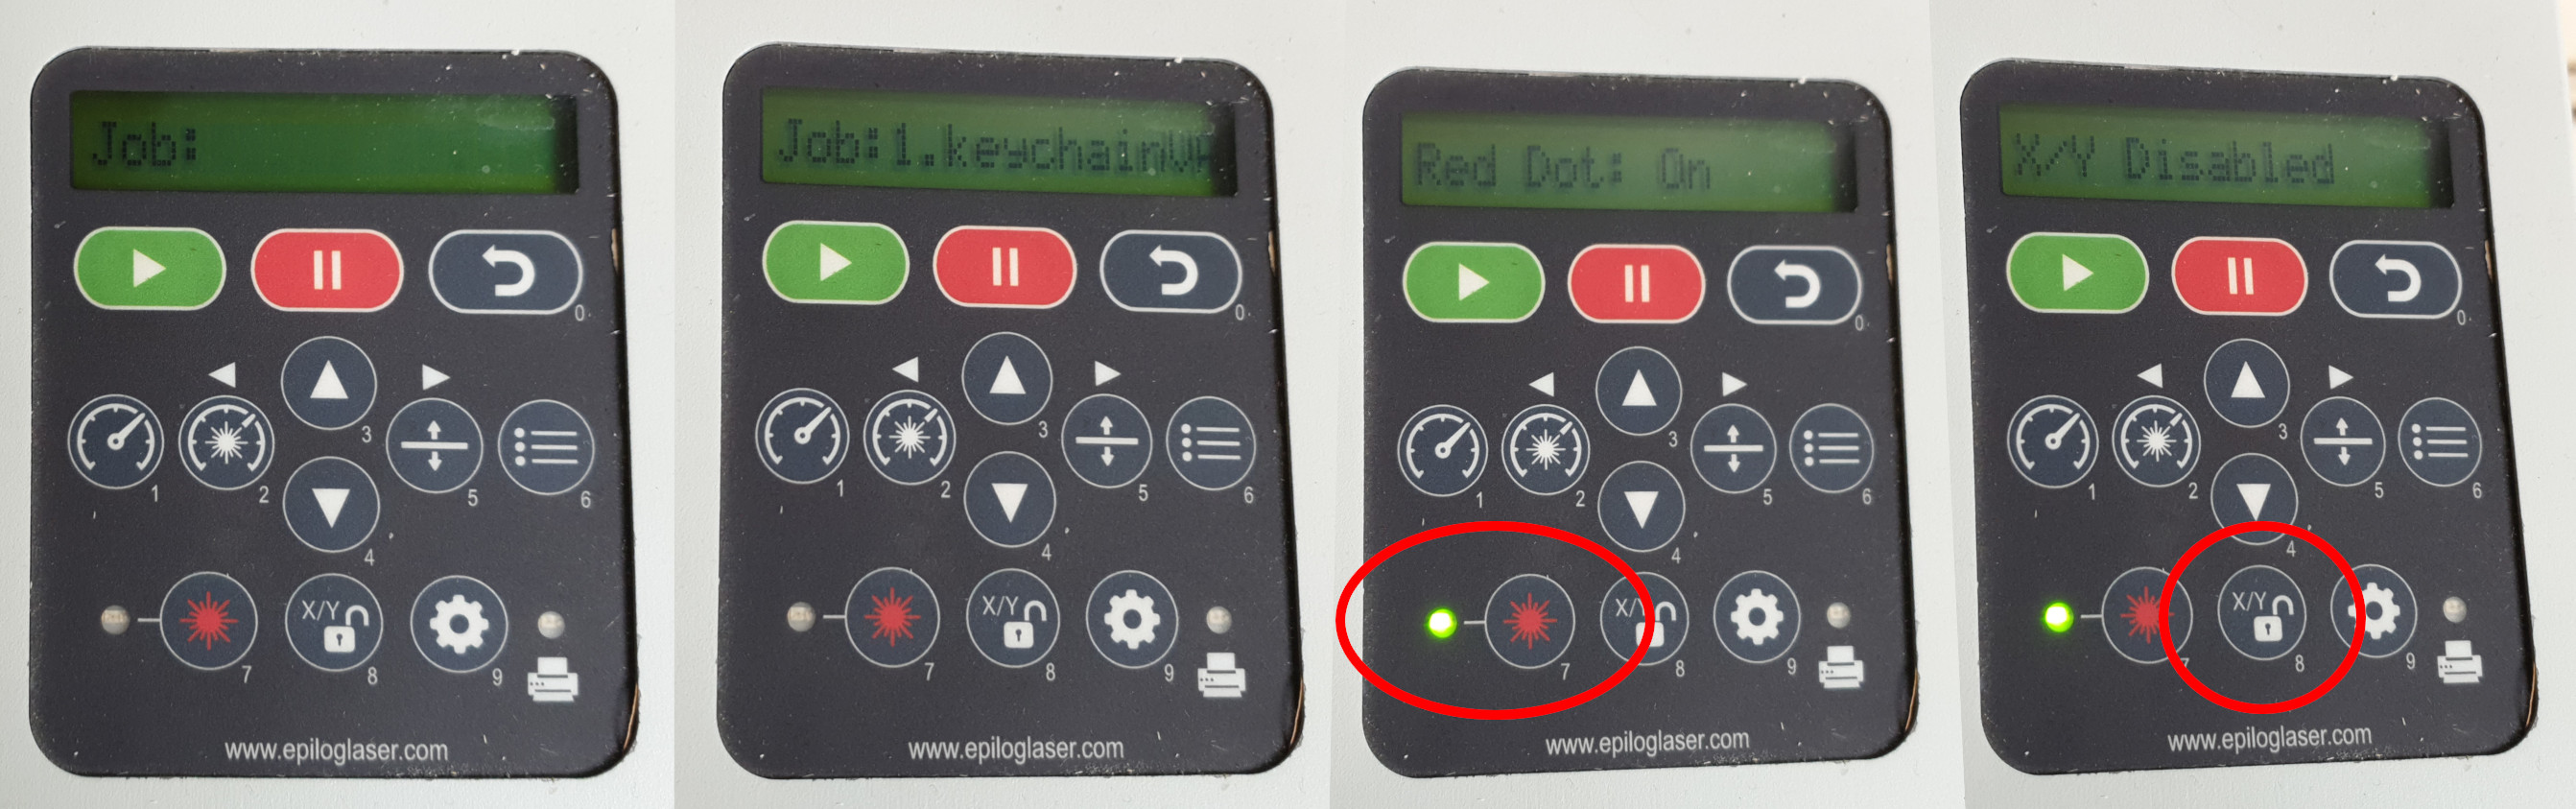
- Turn the laserpointer on by pressing key number 7 on the keypad, the red flash symbol.
- Unlock the motors by pressing key 8, the X/Y-unlock symbol.
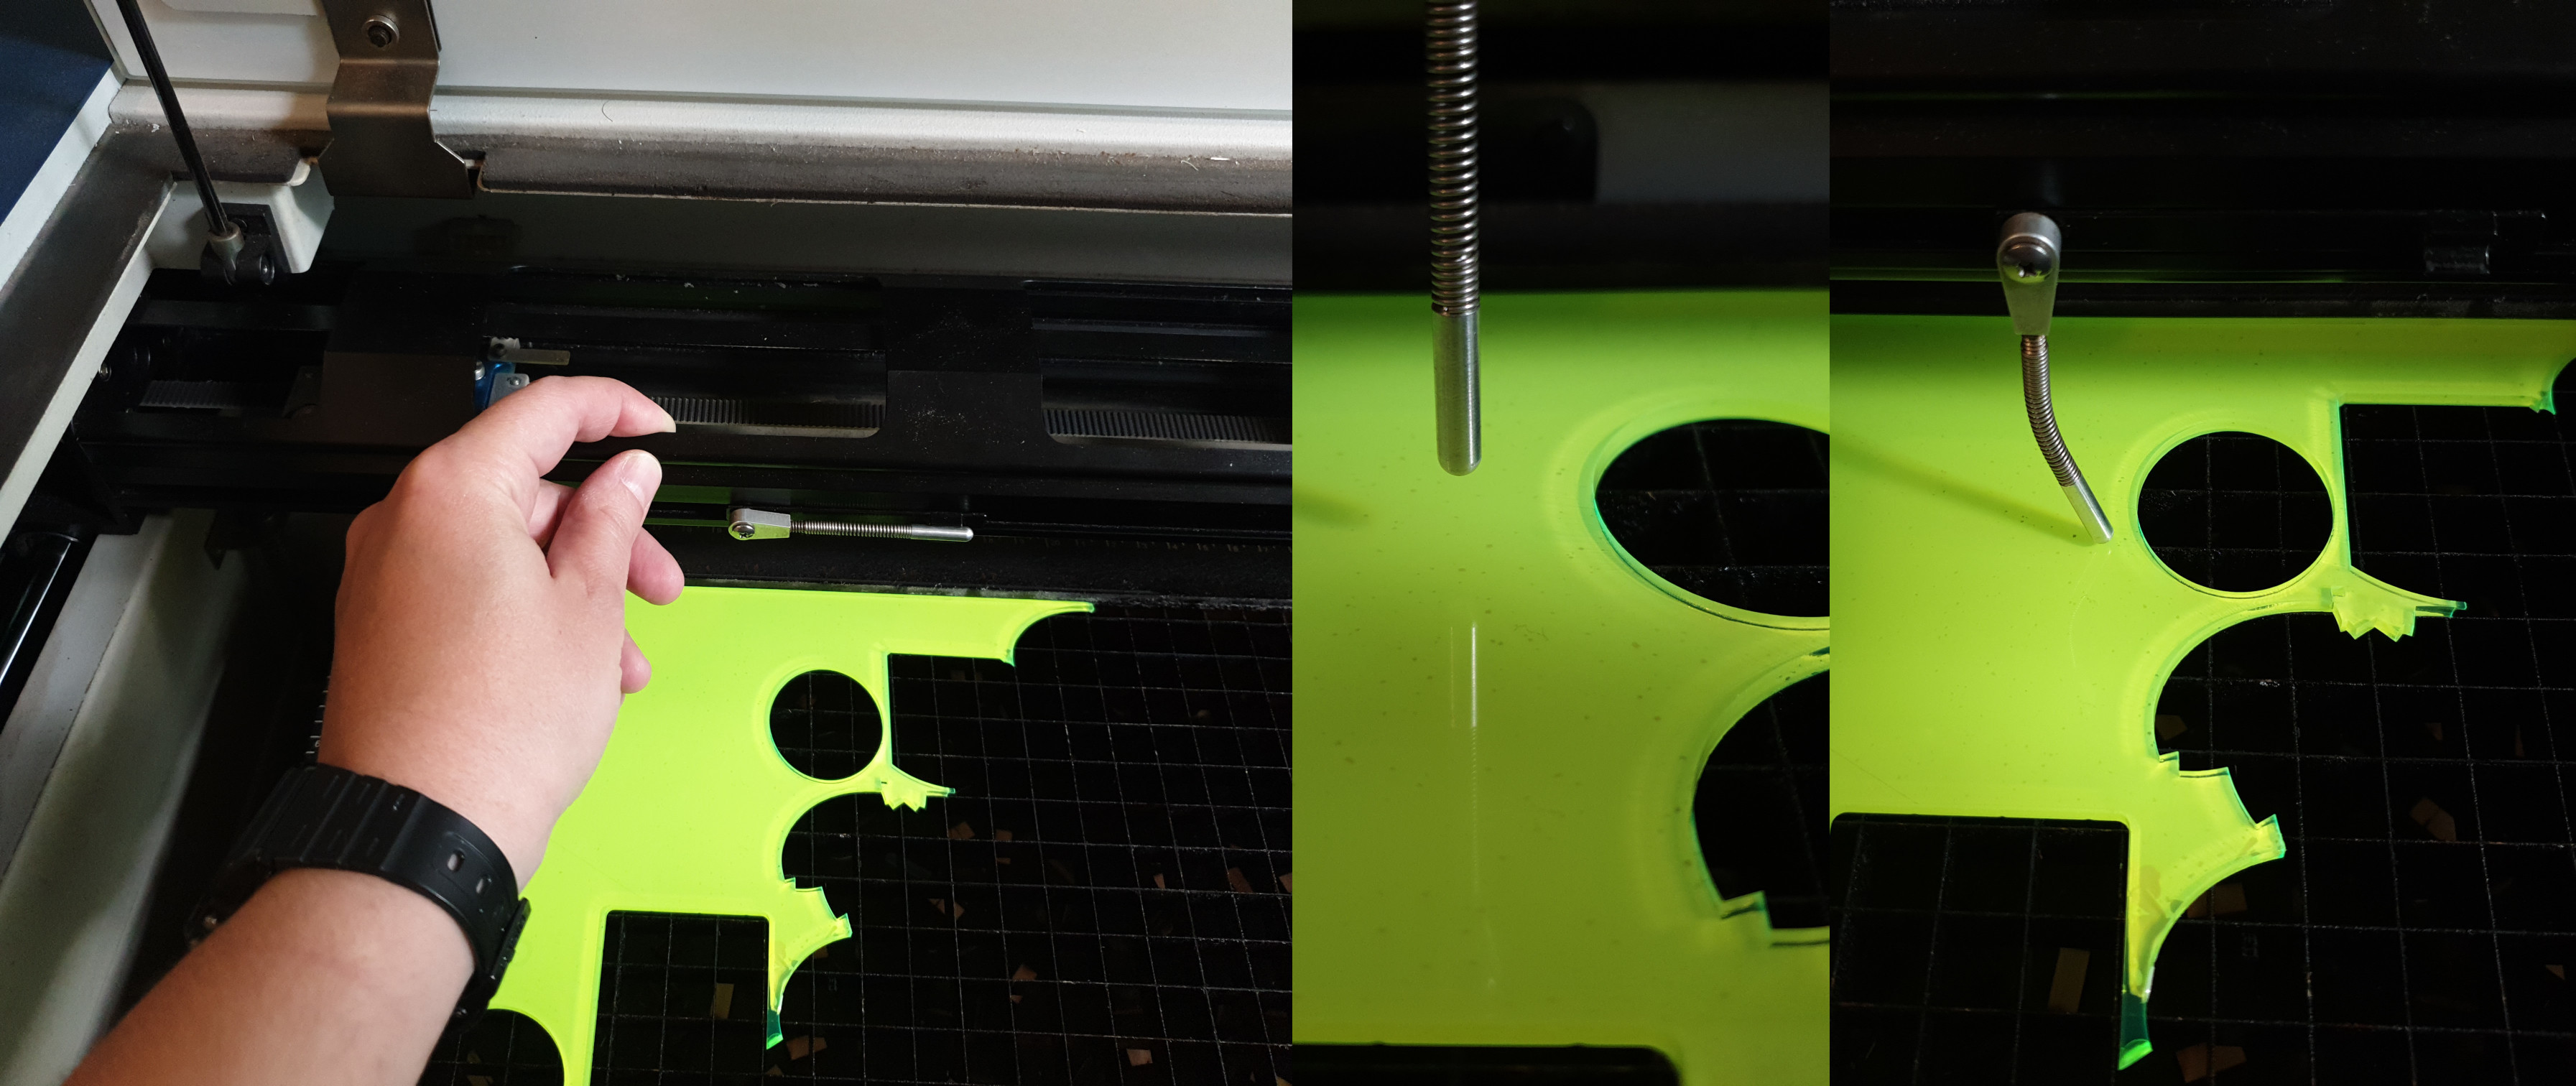
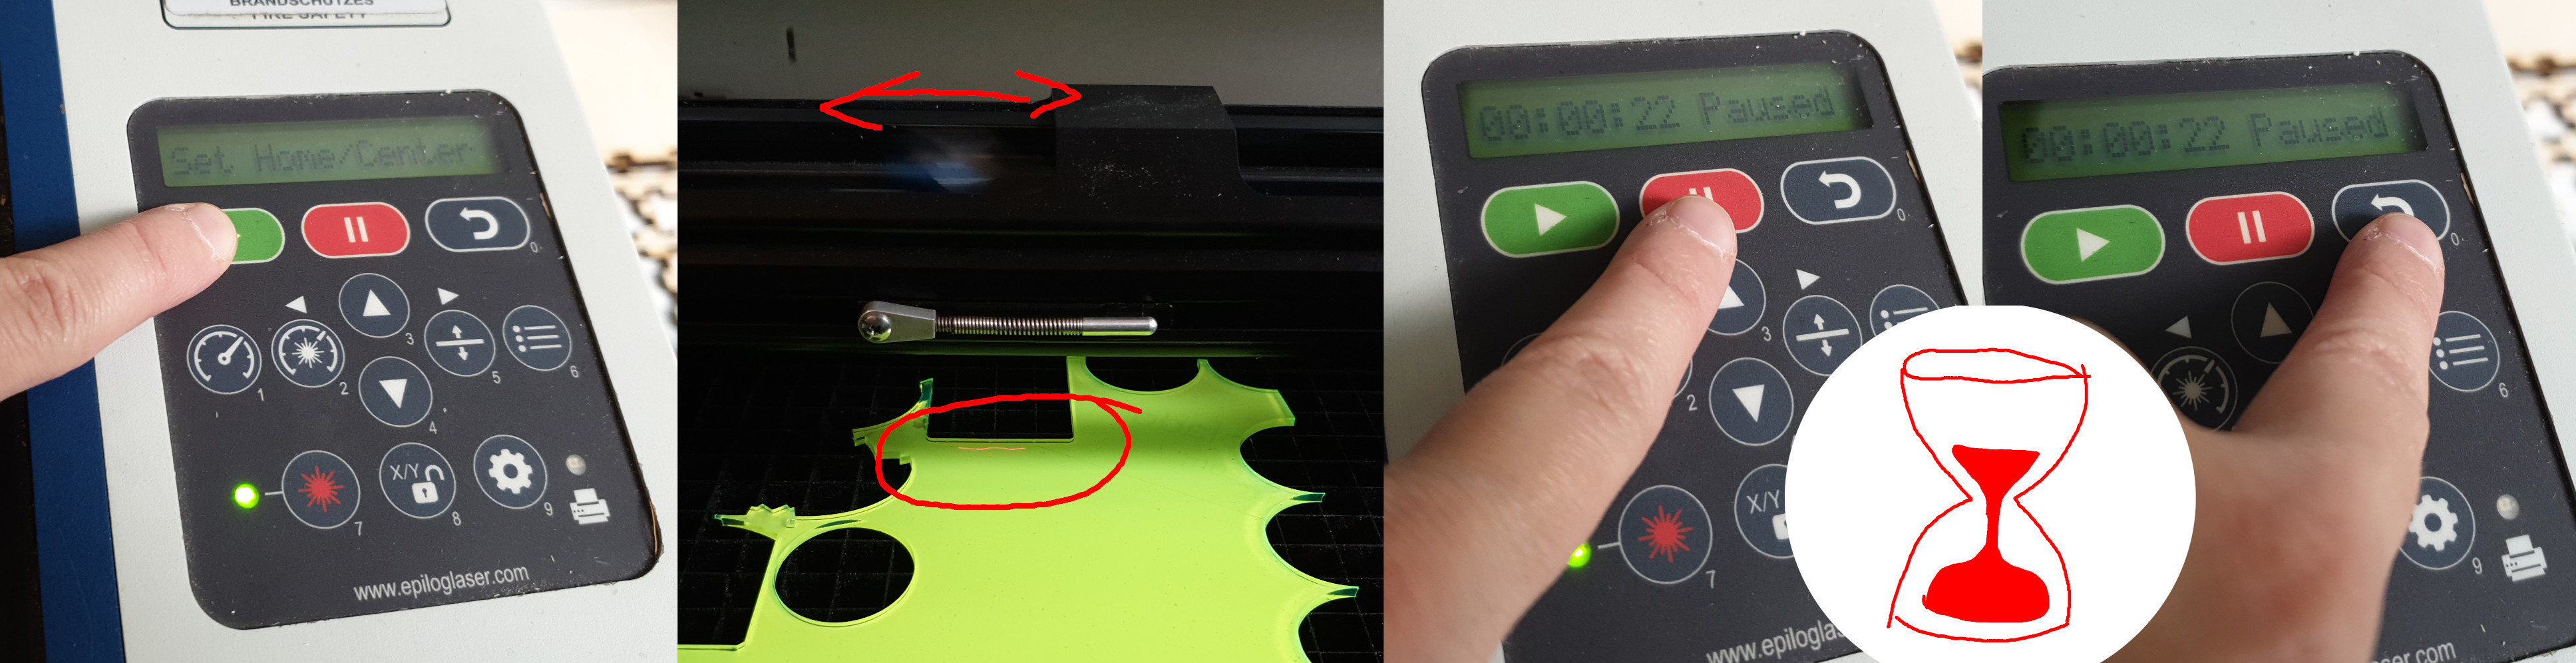
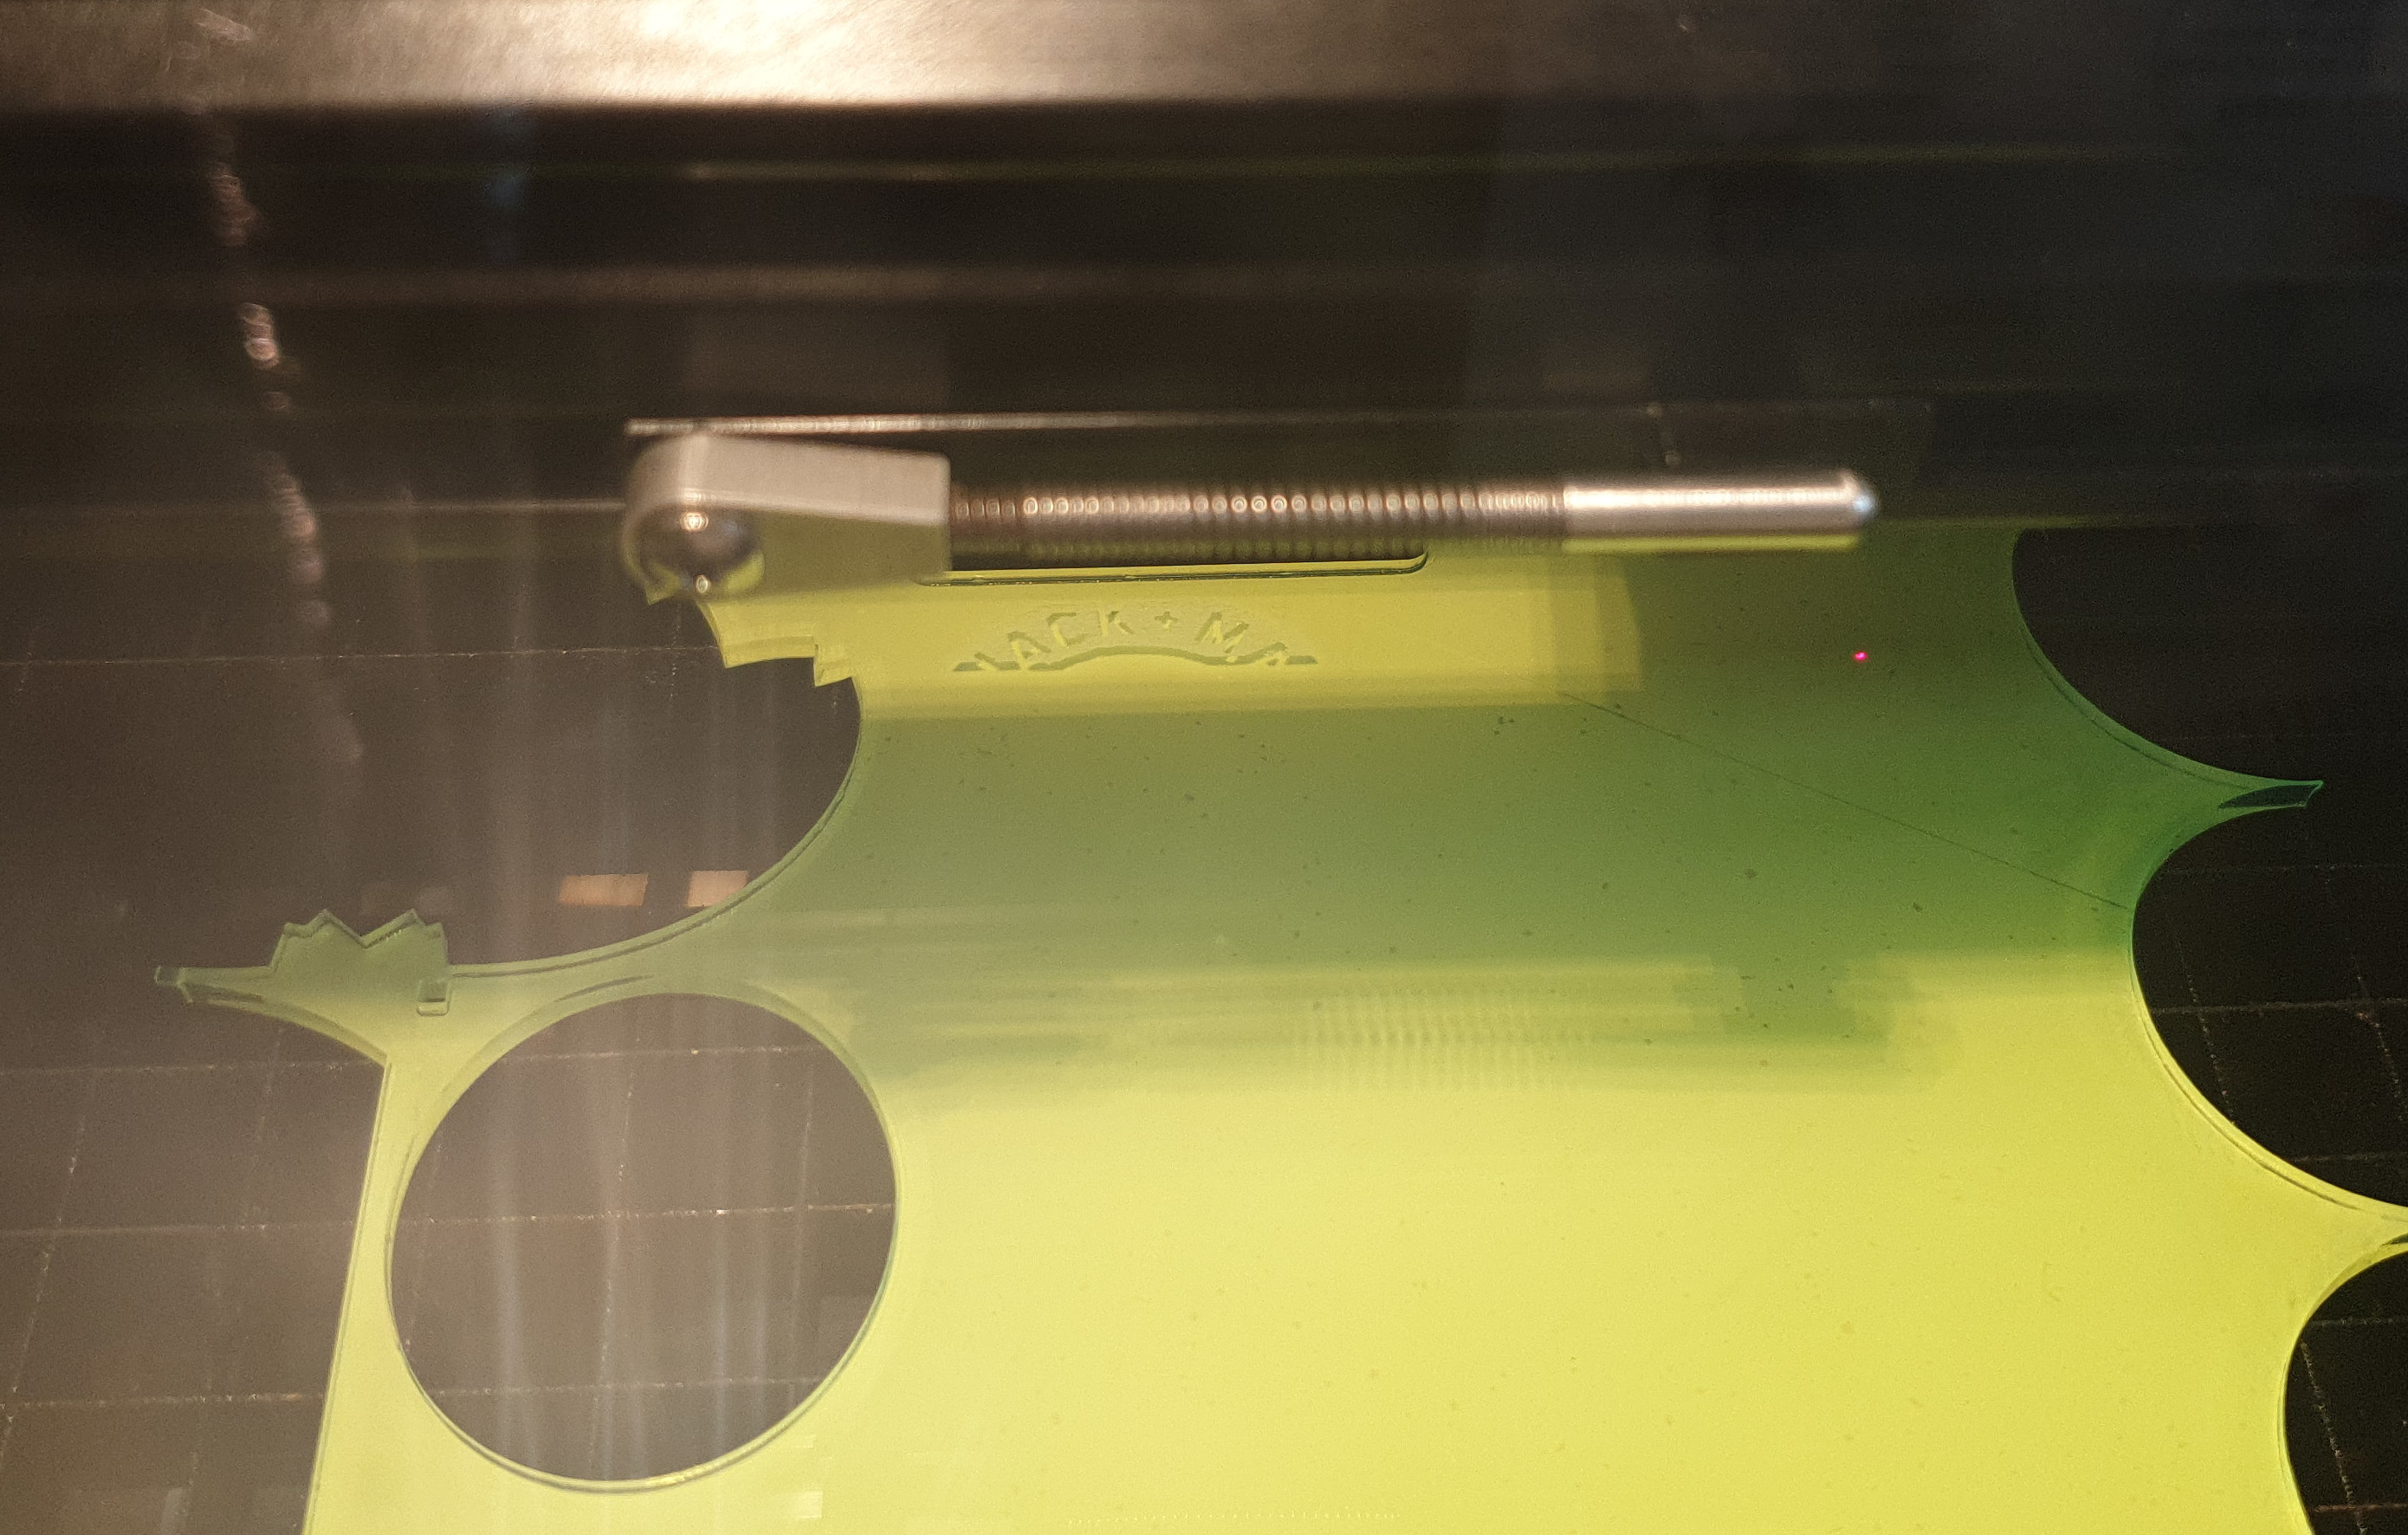
- Grab the rail and pull it forward to a position above your workpiece. Release the focus measure tool (metal rod). It will most likely not be aligned well and either dangle in the air or be bent by the workpiece.
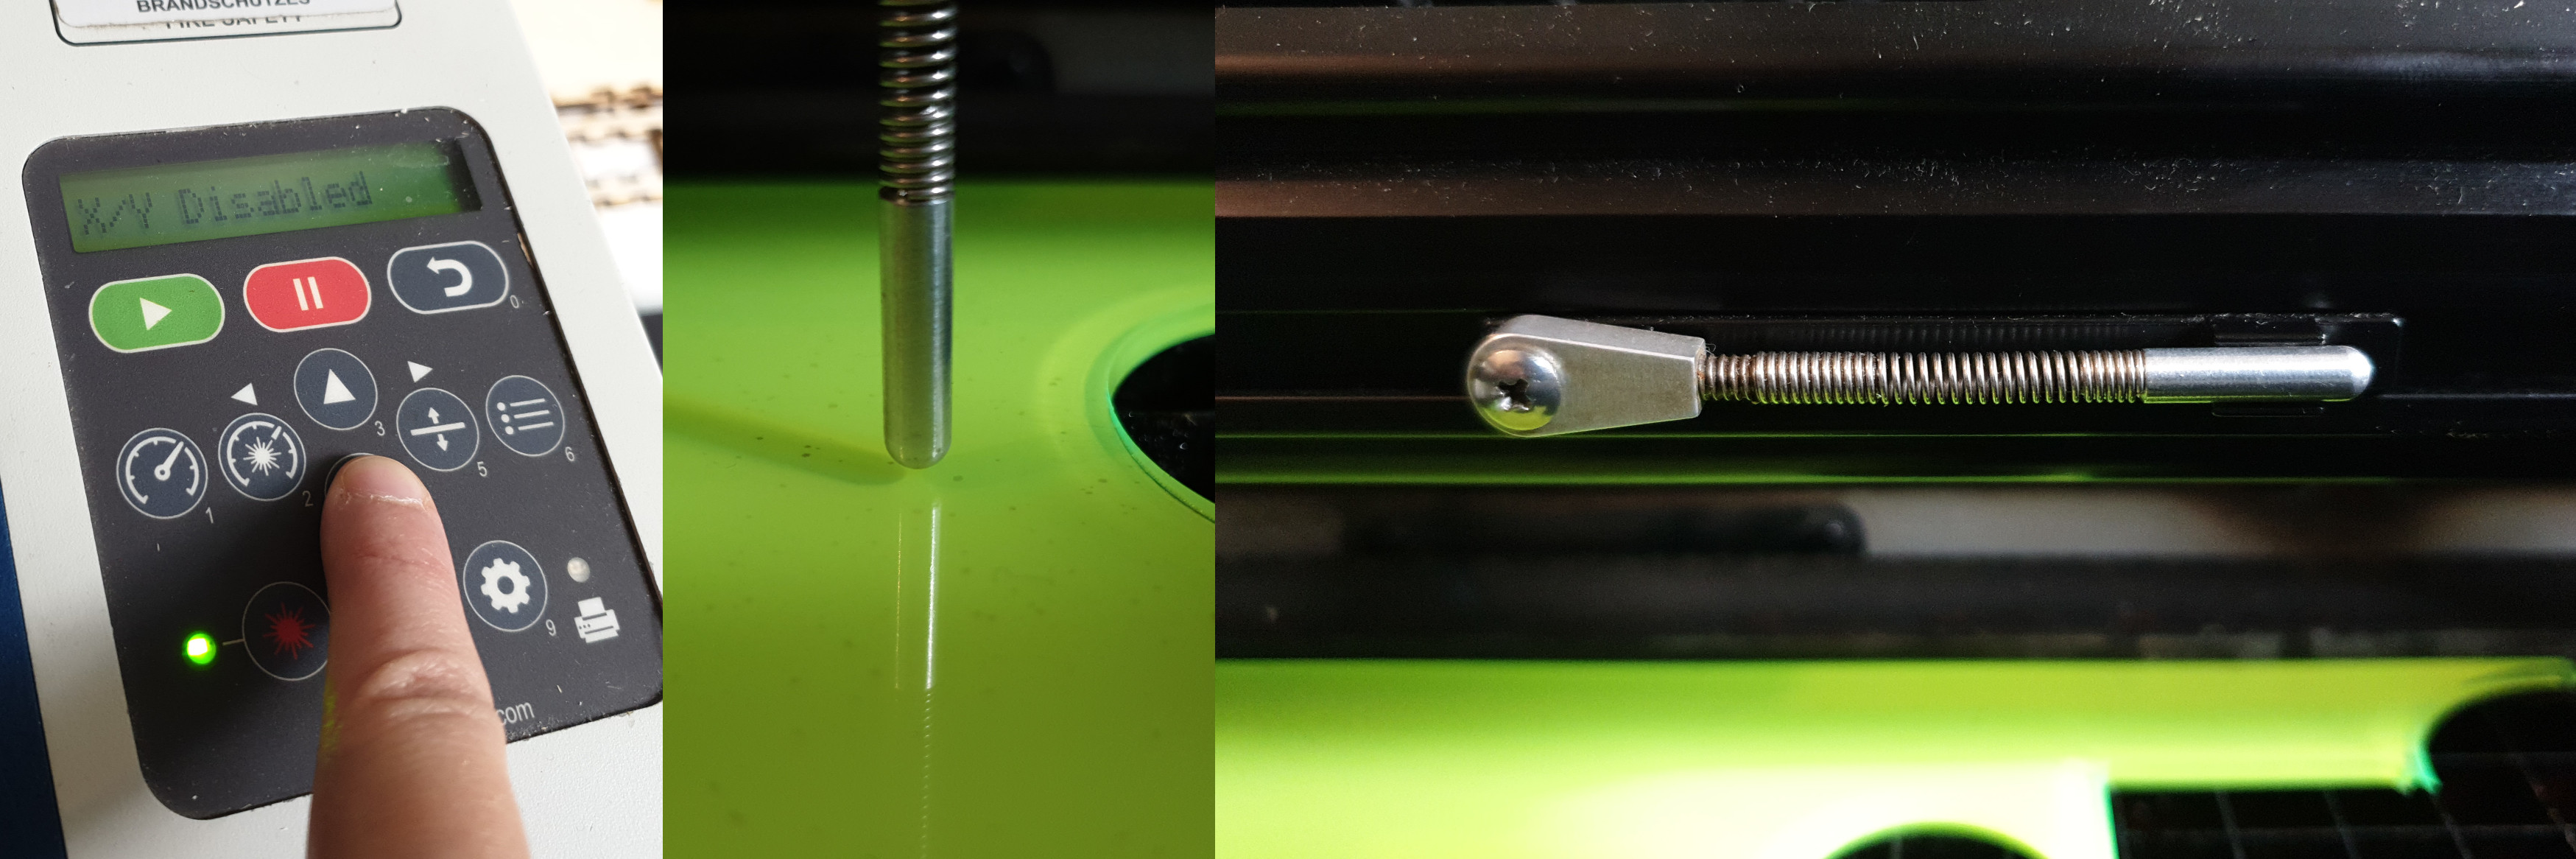
- With the motors unlocked, push the up (#3) or down (#4) keys to adjust the height of the bed (grid) until the metal rod barely touches your workpiece.
- Return it to its resting position when done.
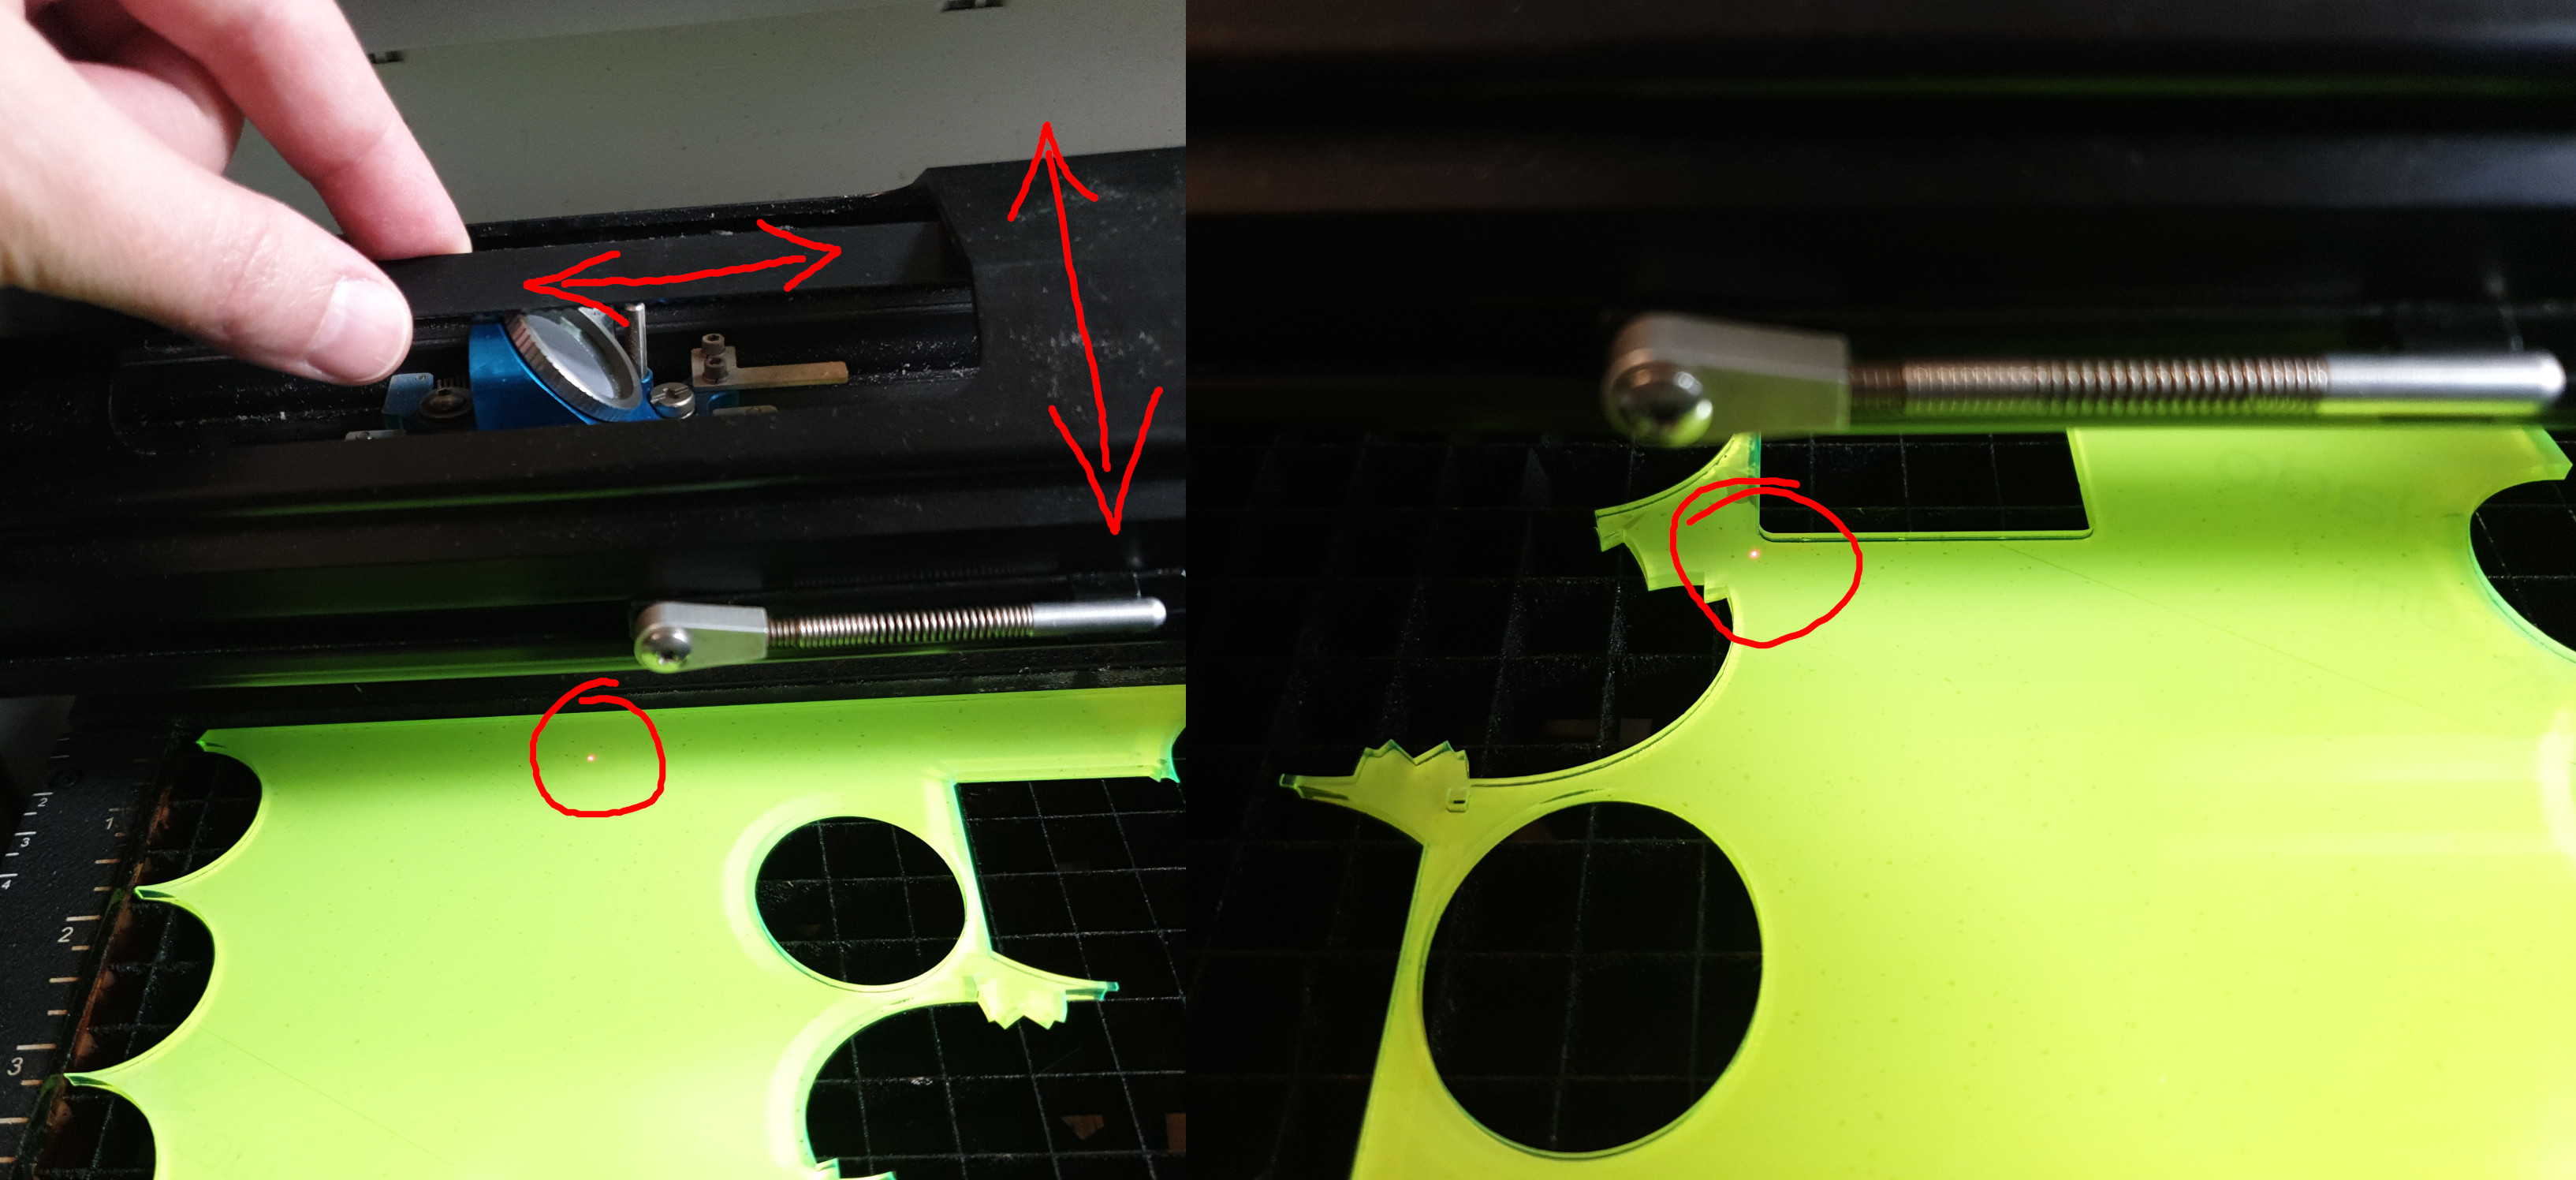
- Adjust the position of the laserpointer by moving the bar forward and back, and by carefully moving the rubber band left and right.
Make sure you don't touch the blue mirror mount, especially from the bottom where the lens is located. We don't need your fingerprints on it.
- Move the laser pointer to the top left corner of your workpiece. This is the reference point for your top left visicut sheet. If your drawing is placed at some distance from the top left corner, the cutting/engraving will also begin thus far away from the initial laser pointer position (your defined home location).
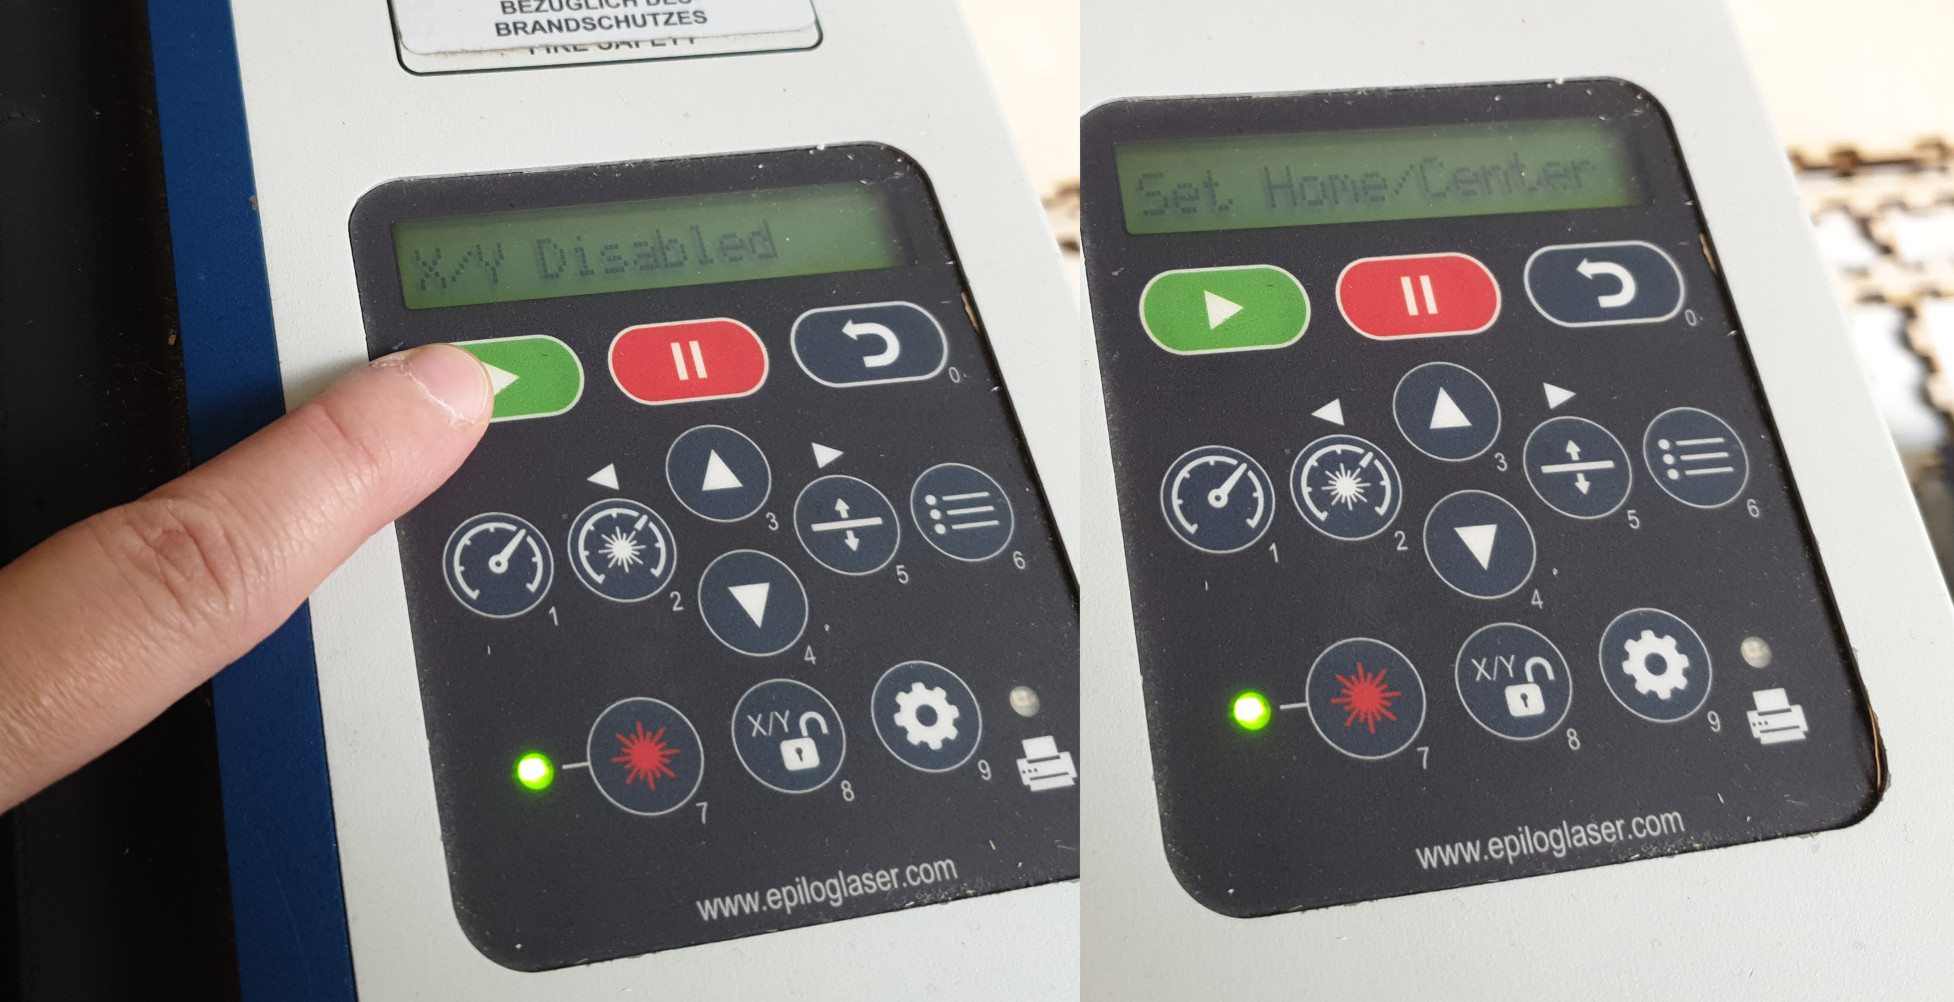
- Once you are happy with your home position, press the green "play" button on the keypad. The display will confirm the home position has been stored by displaying "Set Home/Center". The motors will now be locked again.
- With the glass door still open, select the correct job by using the up/down keys. Press the "play" button again to start the job. Since the interlock is engaged (glass door is open) the cutting laser will be kept offline, while the motors will move the laser pointer around. This way you can check if the laser pointer leaves or enters any areas it should not.
- If you need to adjust the position you can repeat the previous steps.
First, press "Pause" and wait for the laser to finish its current movement. If you don't wait the laser will completely mess up the home reference position!
- Once the laser stopped moving, press the black return button. The laser will return to your defined home position.
- Unlock the motors again by pressing the lock-symbol button.
- Manually move the laser pointer to the corrected position.
- Press "play" to accept current position as "home".
- Make sure the correct job is selected by pressing the up/down arrow buttons. Note: When a job is finished or aborted, the next job in line will automatically be selected!
- With the glass lid still open, again press "play" to restart the simulation of the job.
Once you are happy with the position and placement of the laserpointer and your workpiece, you can proceed to the next step to begin lasercutting.
¶ Step 4: start lasercutting
- Close the glass lid.
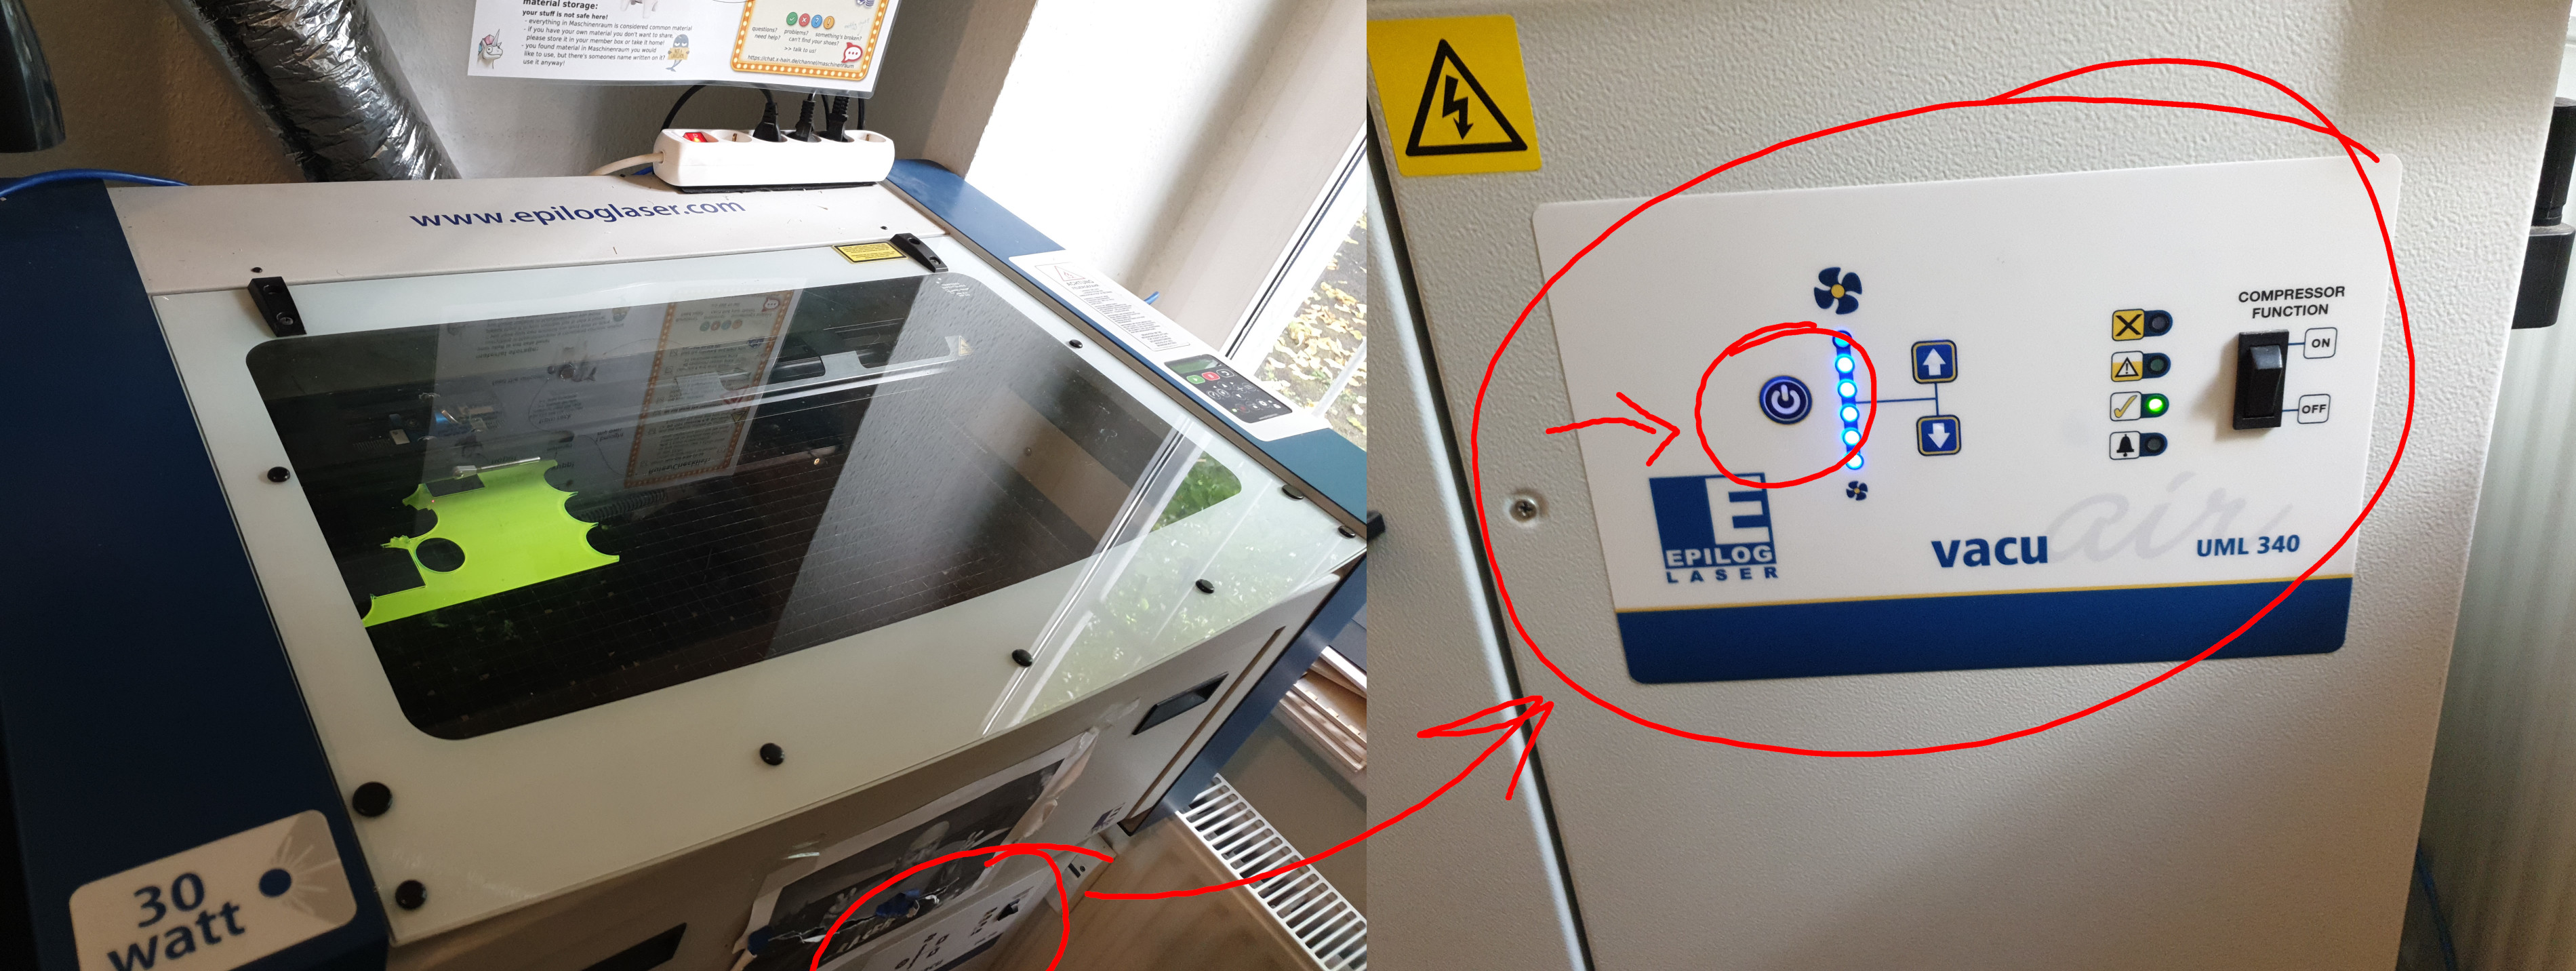
- Turn the ventilation on.
- If you are the first person to power up the laser today, for the first few seconds the laser will not cut/engrave.
- Pay attention if this is happening. If it is, do not remove your piece when the job is done, but start the job again until the missing cuts/engravings are completed, then pause (pause button) and quit the job (return button).
- Make sure the correct job is selected by pressing the up/down buttons.
- Press the "play" button to start the job. The laser will now begin to cut or engrave.
DO NOT leave the lasercutter unattended! DO NOT leave the room!
¶ Step 5: pausing/aborting the job
If something went wrong and you are not happy with what's happening, you can pause the job by pressing the pause button. If you don't want to mess up your home reference, then wait for the ongoing movement to finish.
- You can then either open the door and fix your workpiece, then continue where you left off by pressing "play",
- or you can abort the job by pressing the return button. The laser will then return to the home position.
¶ Step 6: emergency abort
In case of an emergency, simply open the glass lid.
- If your workpiece caught fire (e.g. can happen with cotton fabric), you can quickly open the lid which will stop the lasercutter immediately (interlock safety). You can then stop the flames. In the mean time, be aware that the machine will continue its movement with the laser pointer in place.
- If you close the lid the lasercutter will begin cutting again!
- If you want to abort the job completely, press pause (then wait for movement to finish) and return.
¶ Step 7: job is finished
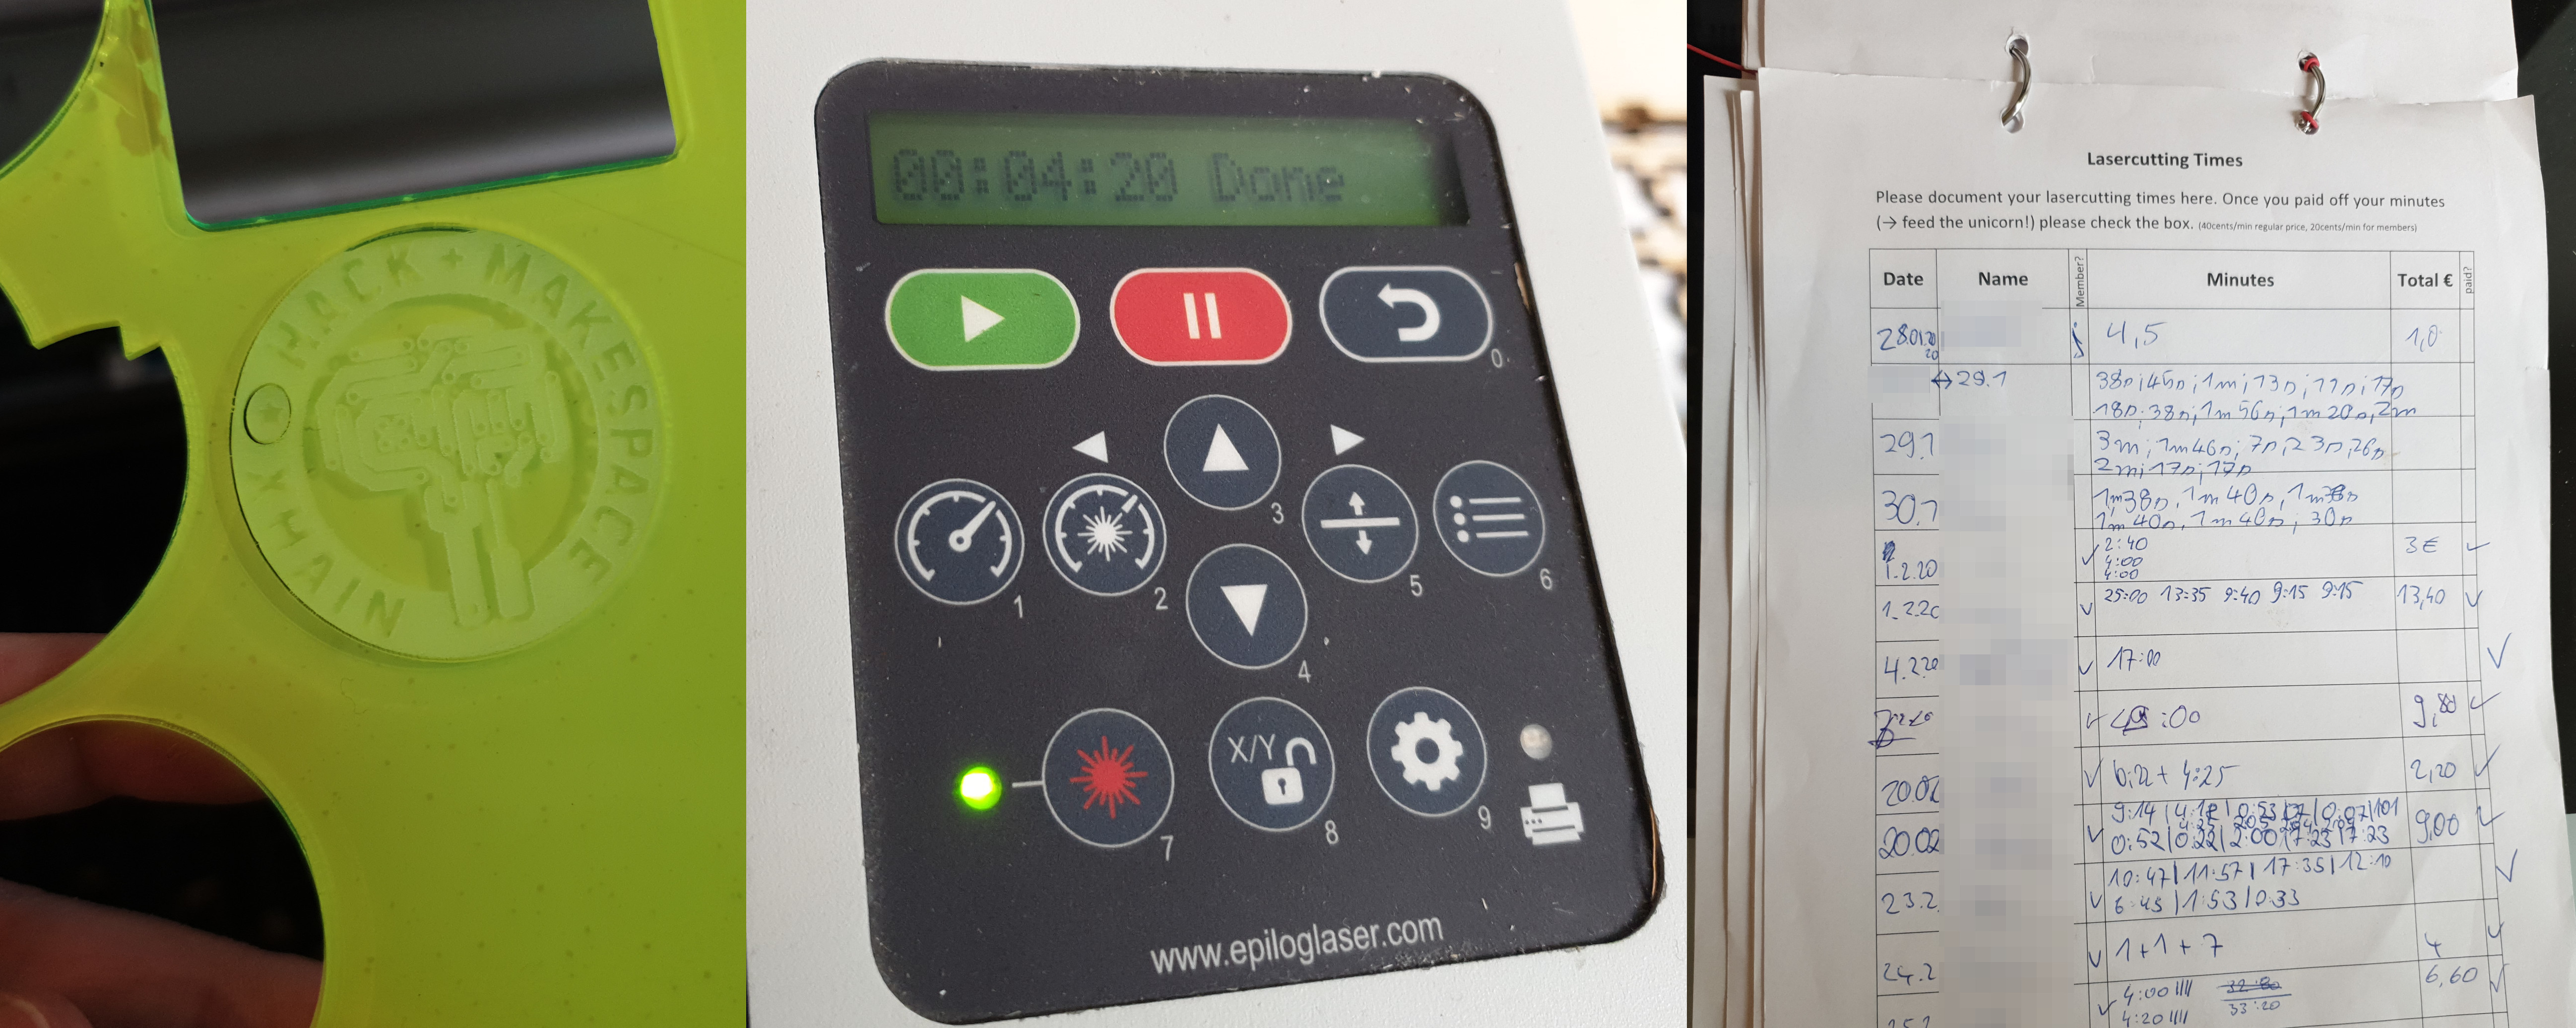
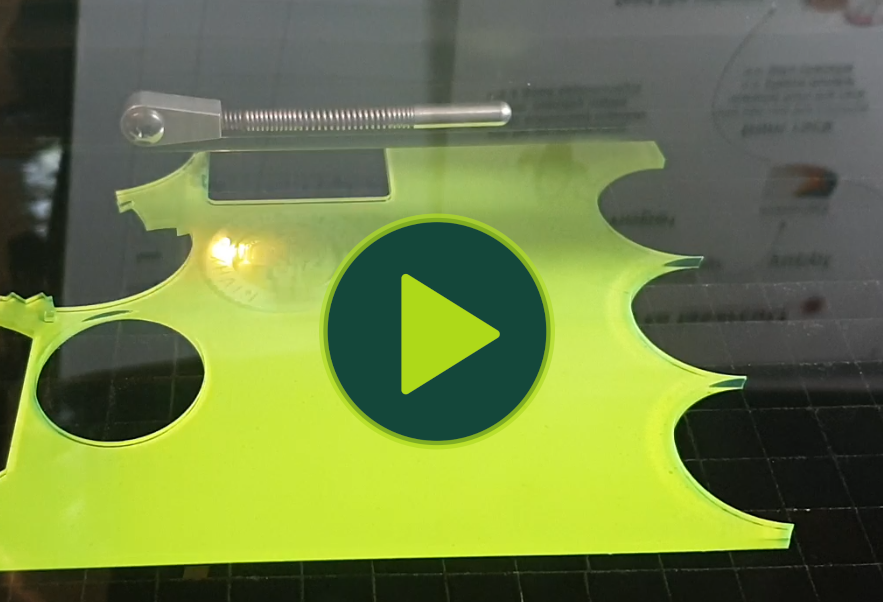
- When the job is finished the lasercutter will beep once and return to your reference location.
- The display will show the time taken for the job.
Important: Write down the minutes into the list provided. It should be located on the shelve above the lasercutter.
- If you want to start another job you can repeat all the previous steps (except the ventilation is already on).
¶ Step 8: final steps
- When you've finished for the day, wait at least 10min after the last job before switching off the ventilation in order to get rid of any leftover fumes.
- Calculate the sum of your total laser time and write it down on the sheet. Fill in all the other fields as well, calculate the price and feed the unicorn with your money.
- If you don't have money on you, you can leave the "paid" column blank and come back some other day for payment. But please don't forget about it!
3. After the ventilation is switched off, also turn off the multiple power socket on top of the laser.
- Please DON'T use the switch at the side of the laser. The whole point of the multiple socket is to make life a little easier for everyone.
- Return the list to the hooks on the shelves and generally clean up after yourself. Don't leave broken off pieces lying around. We do have waste bins!
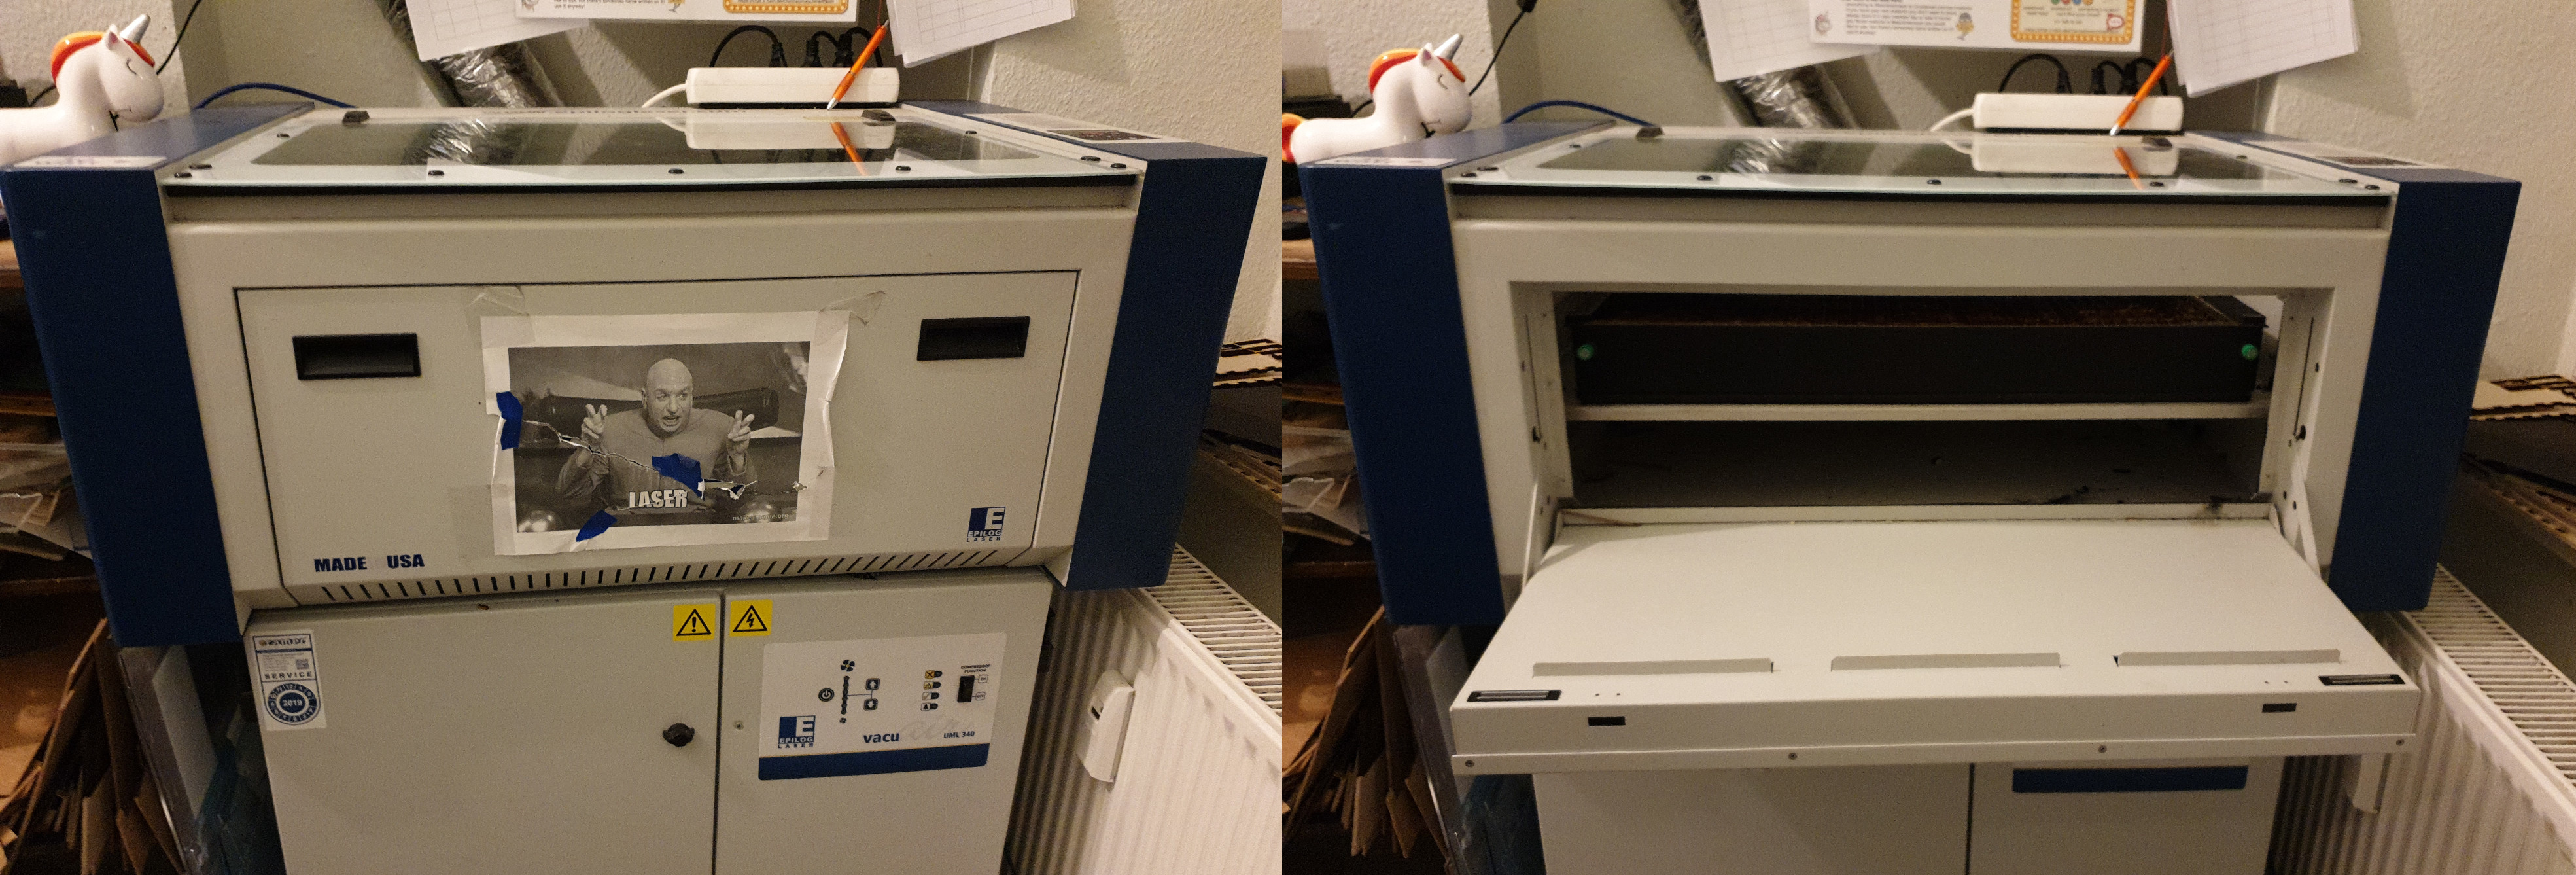
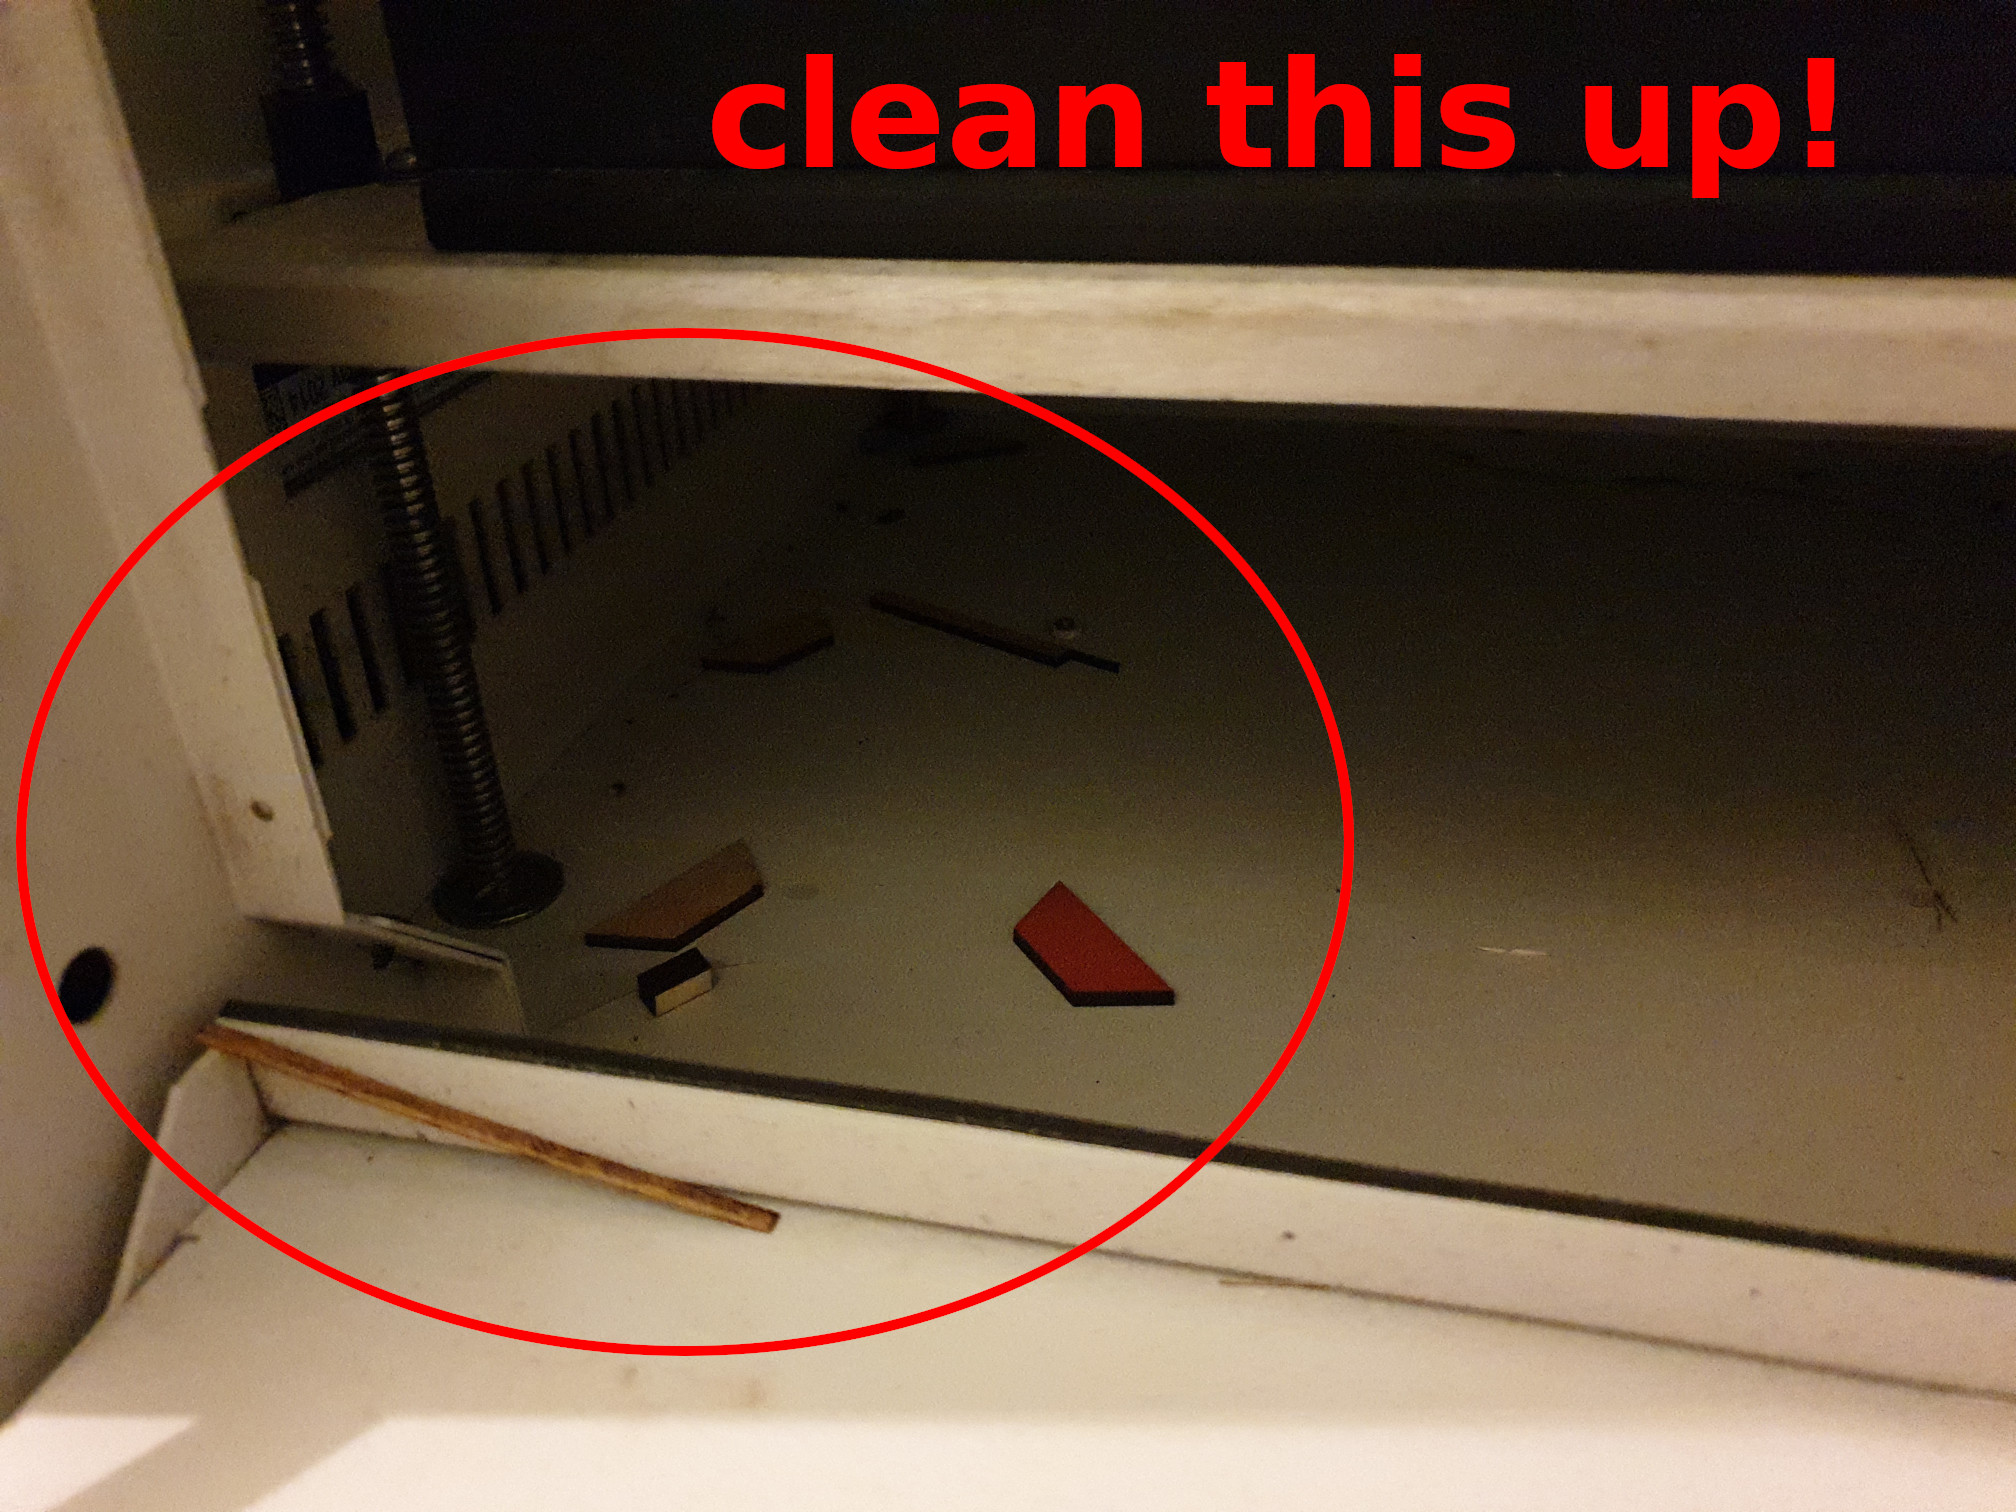
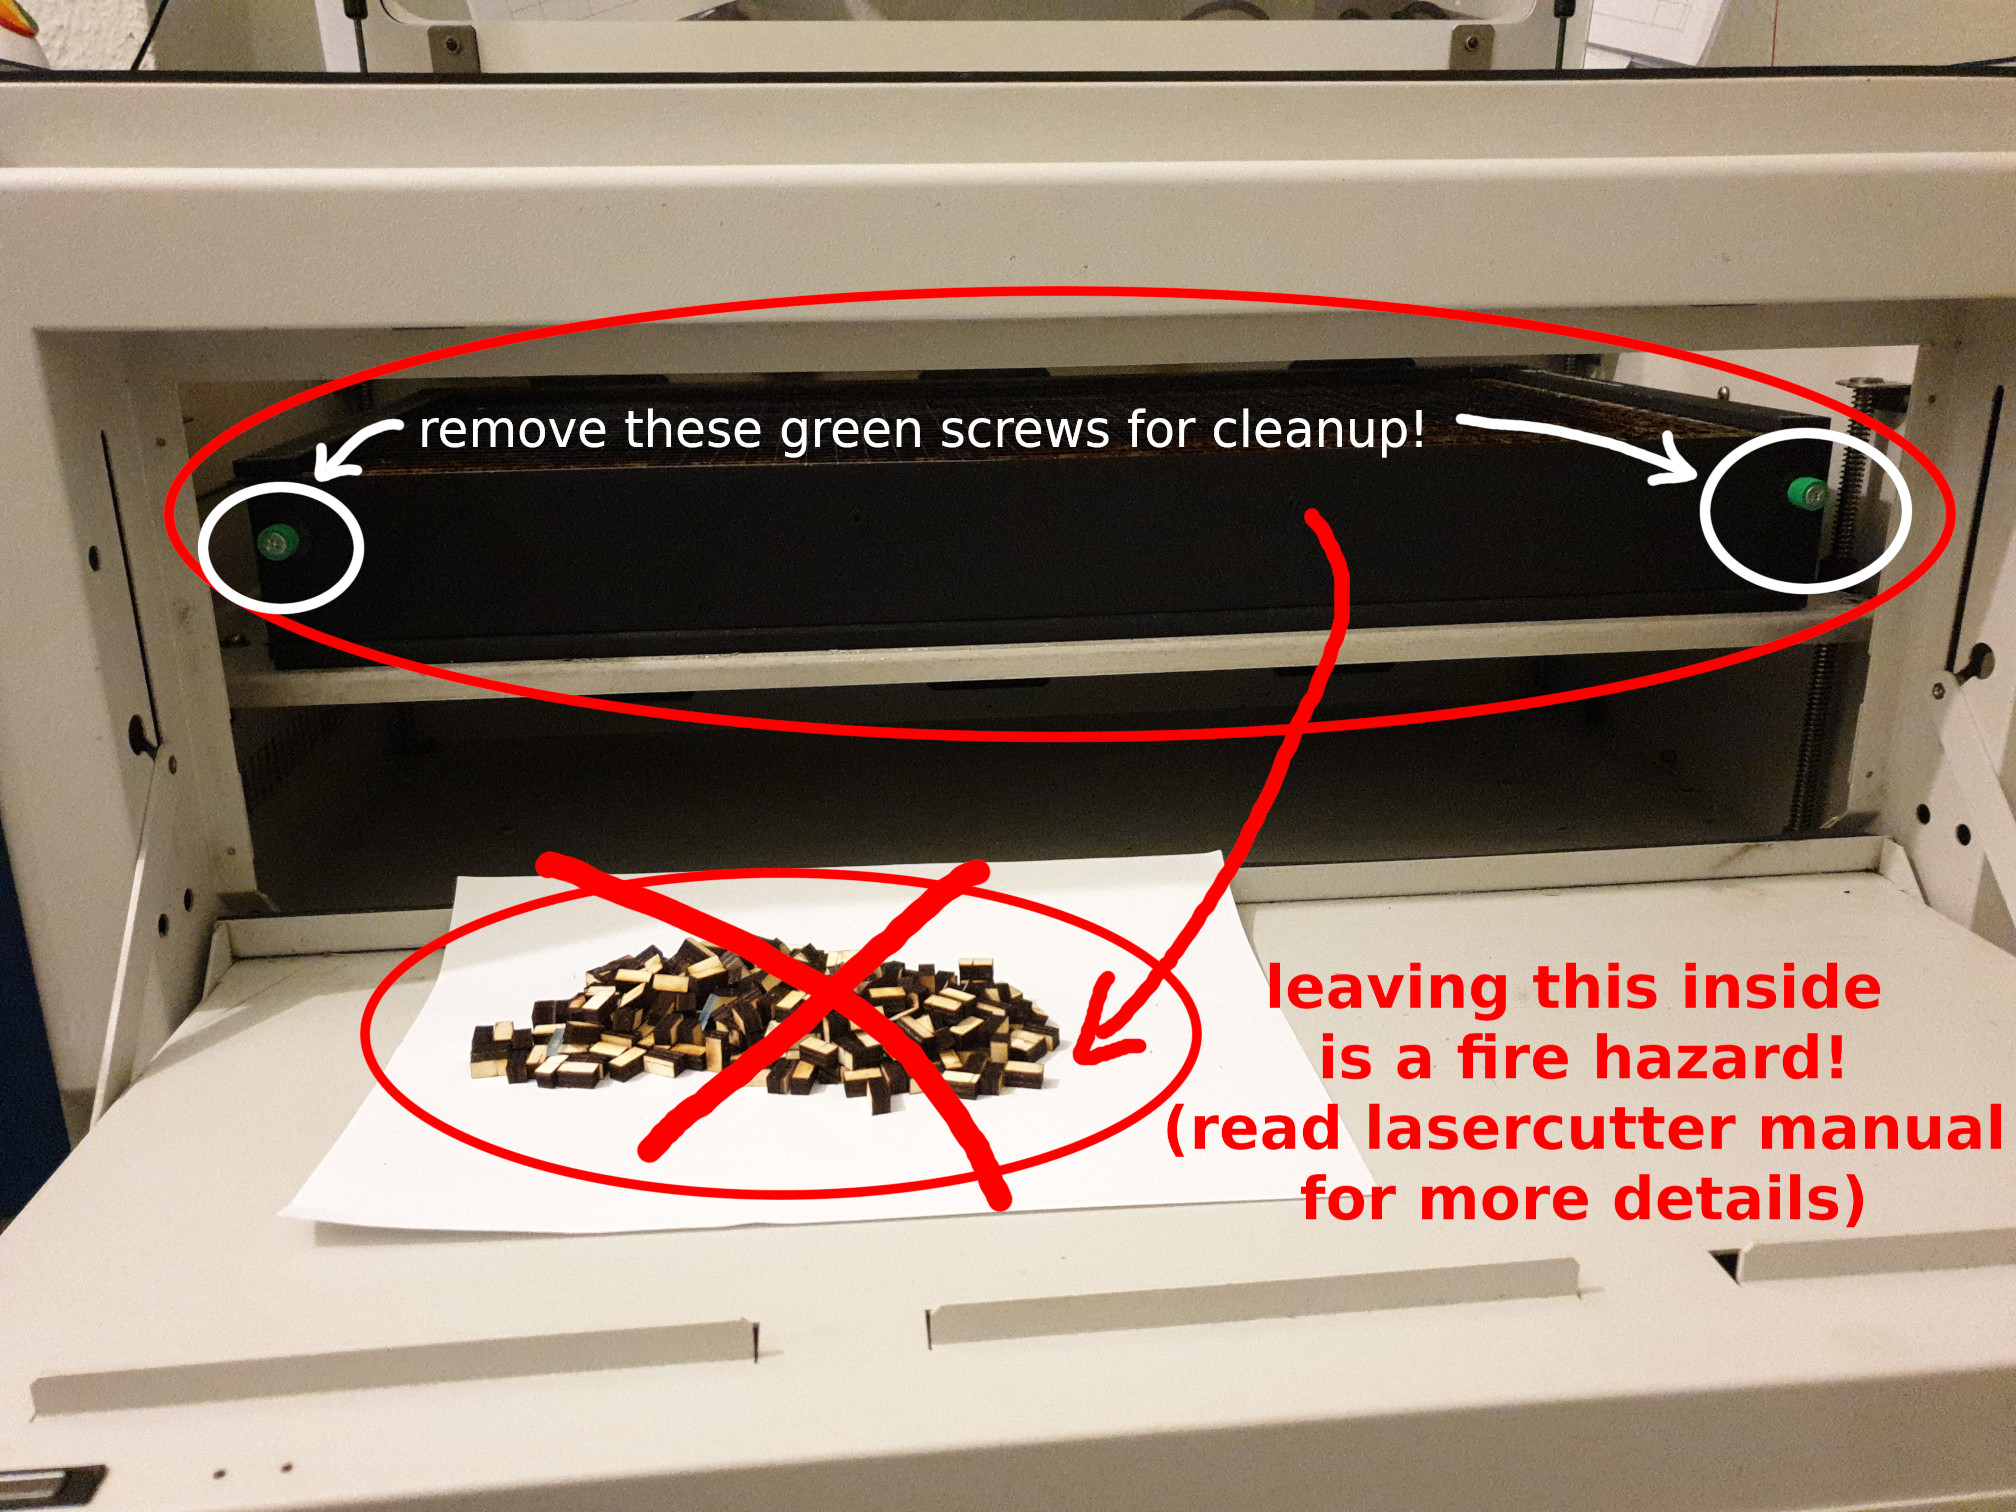
- Please try to keep the lasercutter as clean as possible. Always clean up any leftover pieces inside the machine or layers of dust when you're done. You can open the front flap to reach inside and pick up pieces that have fallen through the grid. You can unscrew the green screws to reach directly under the grid.
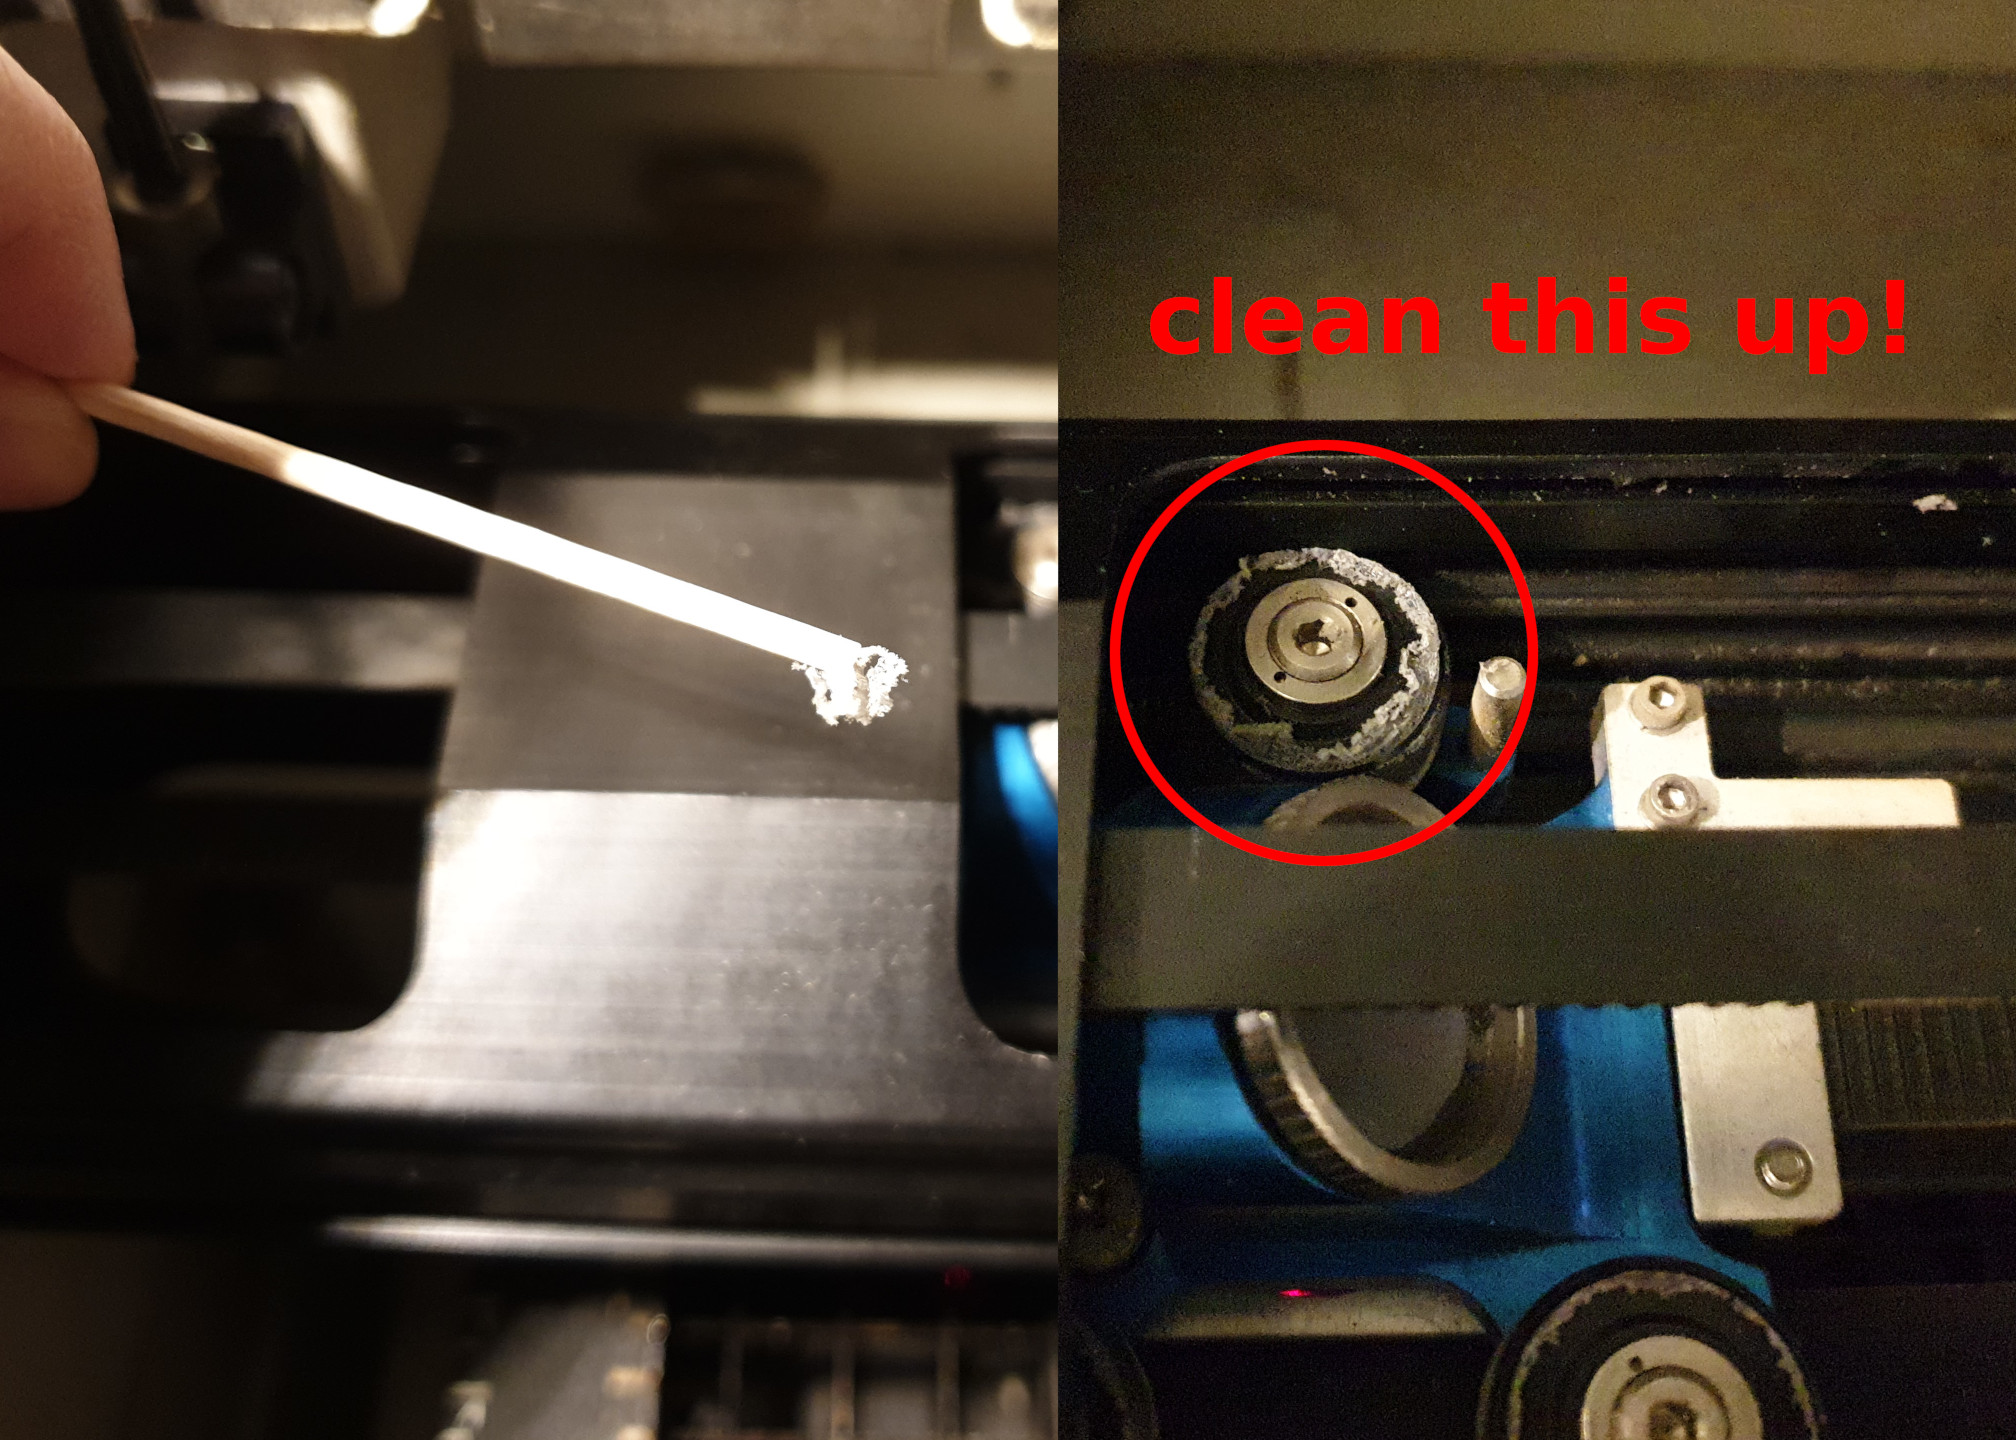
DO NOT touch the optical components (mirrors/lenses) AT ALL, neither with your fingers nor with any objects, tissues, cotton pads etc.! Optical components are very sensitive creatures.
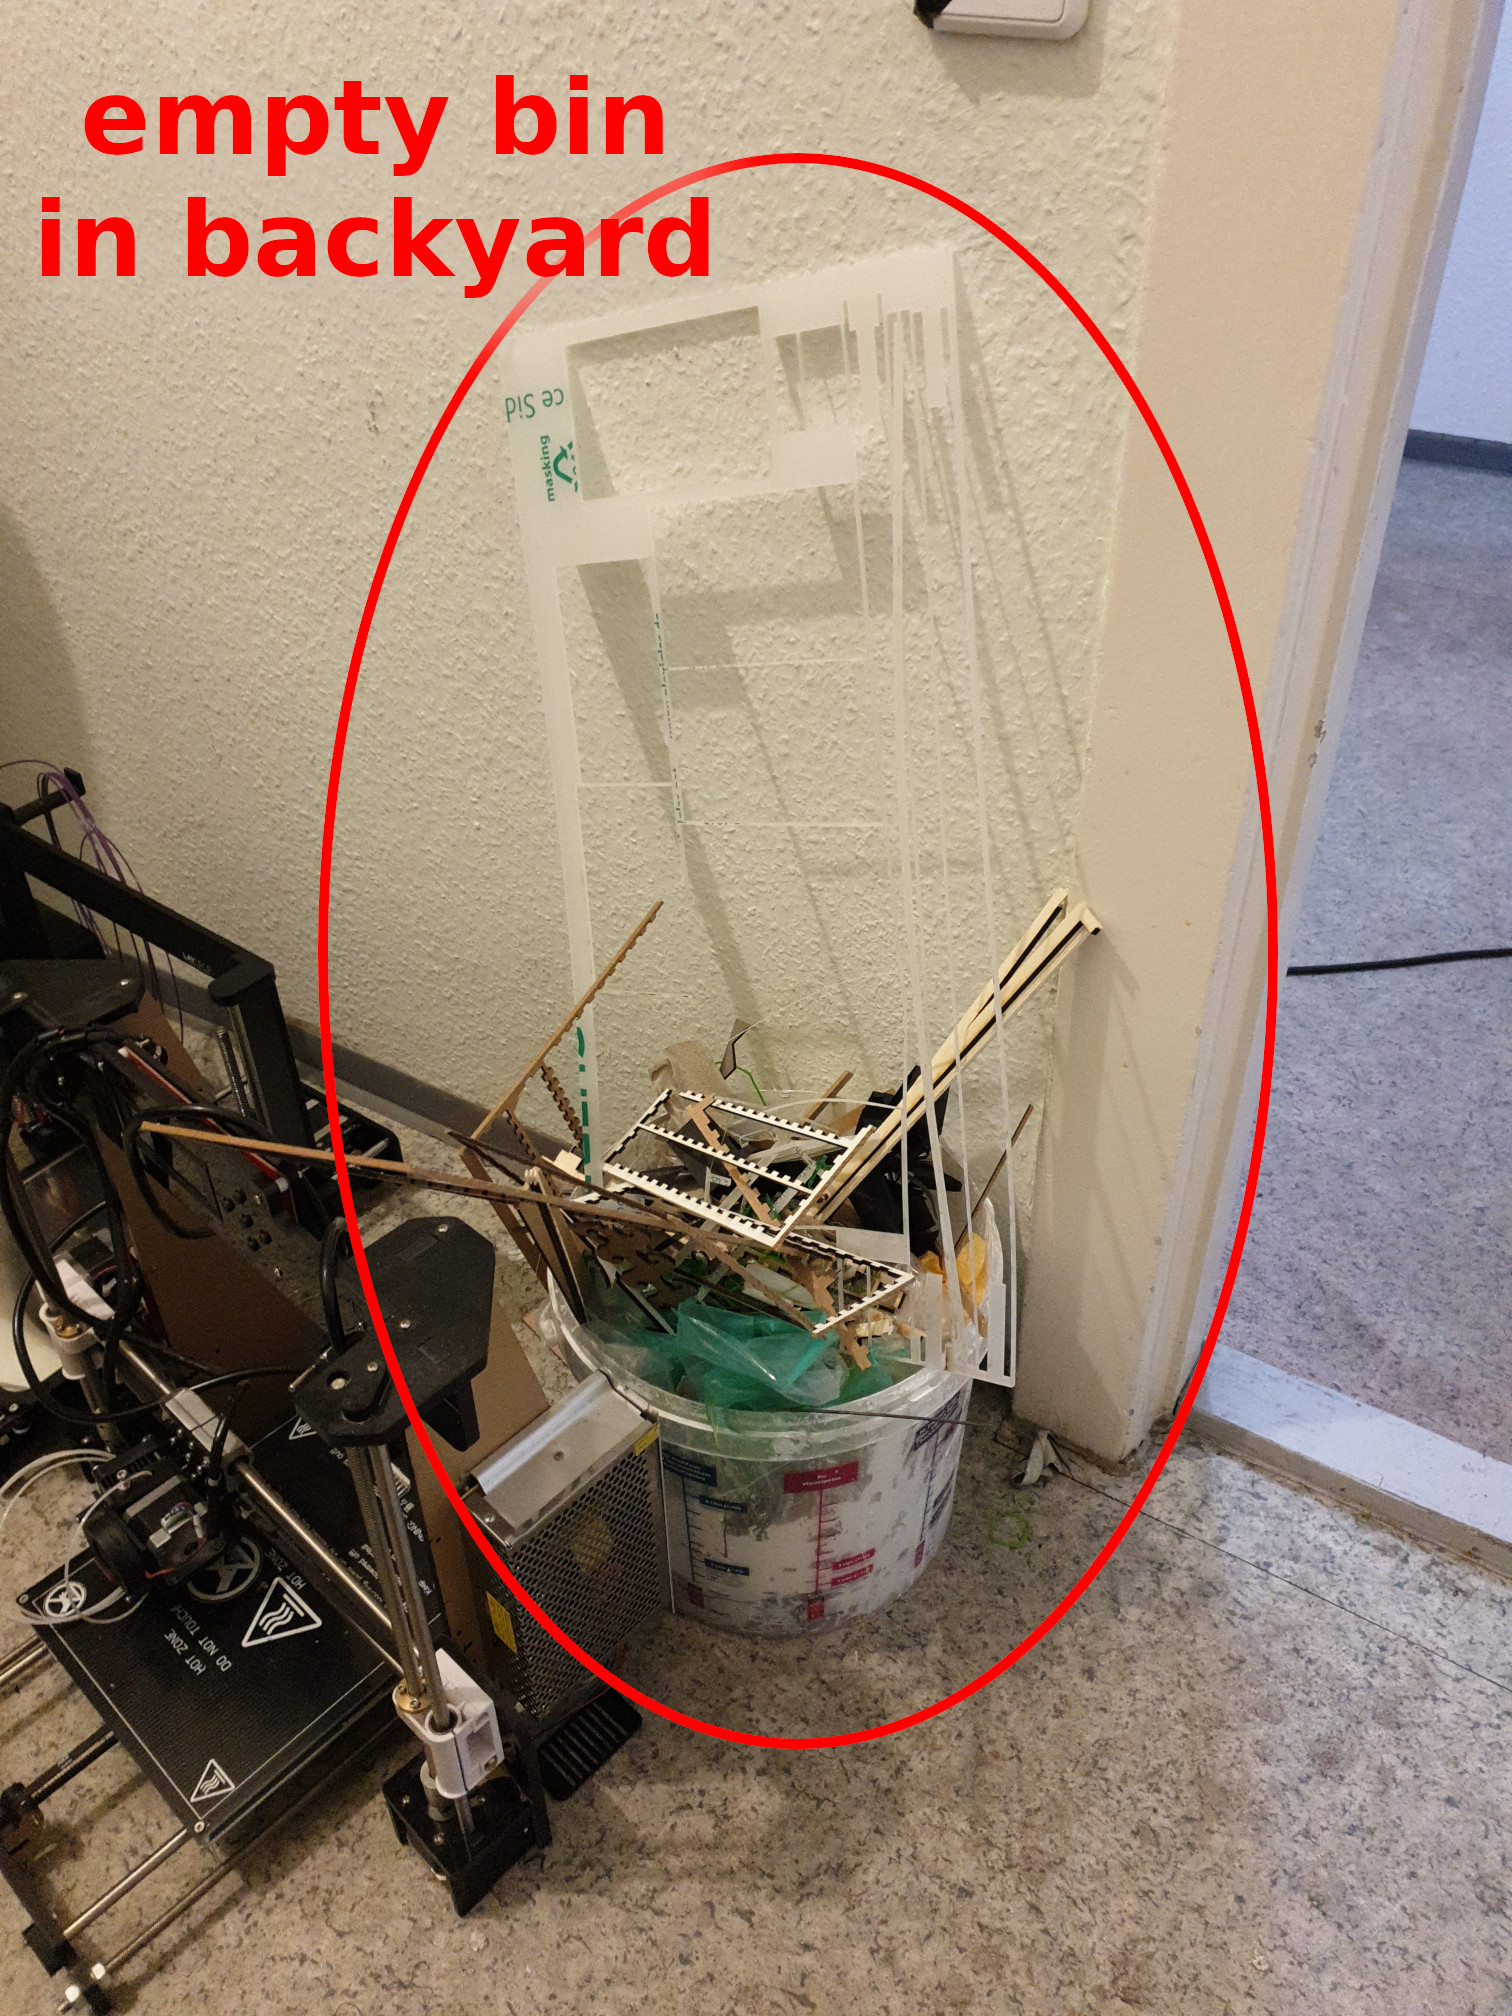
6. If the bin is full, it is your job to empty it in the containers in the backyard! (blue Furby will help you get there)
¶ Maintenance
Please try to keep the lasercutter clean and clean up any leftover pieces or layers of dust after yourself. Make sure you don't touch any optical surfaces (mirrors/lenses) at any time.
If you feel the performance of the laser has dropped, and you suspect the lenses and mirrors may be covered with a layer of dirt, DO NOT clean them yourselves. You may also check the maintenance log (paper list on the lasercutter shelve) to see how long it has been since the last maintenance job.
- contact @lorxor to request maintence of the optical components.
¶ Bed leveling:
Authorization required for bed leveling.
Reason: the screws require an imperial 3/32" allen (hex) key. Using a metric allen key may damage the screw.
Instructions:
https://www.epiloglaser.com/assets/downloads/tech-support/Zing-Checking-Table-Level-Adjustment.pdf
¶ Air Filter(s)
Our laser cutter has now two filter units connected in series.
The pre-filter was designed and installed by @markus89 (big thanks!). details here: Markus' Filter system for Lasercutter
The ULM 340 filter is comprised of two filters, a simple pre filter and the active coal main filter. Those filters tend to hold a year and longer with the current usage at xHain.
If there's a problem with one or both of the filters, then the LEDs glow constantly orange for 75% used and constantly red when the filters are at 100%. Should the LEDs blink and you hear clicking, the controller might need to be reset.
uml_340_german.pdf
¶ Autoflow Reset
(should only be performed with clean filters)
Ensure the start signal present with all the hose/ducting in place.
Turn on the extraction unit. Press and hold the + & - buttons until the Green and Red led’s begin to flash together. Once this happens release the buttons. The unit will now slow down and stop, when all 3 LED’s (Green, Amber & Red) begin to flash the PCB is reset.
¶ Autoflow Setup
Press and hold the + & - buttons until the Green Led begins to flash. Now press the + OR the – button to adjust the flow. When the flow is correct leave the unit, when the green LED is stable the unit is set. The extraction unit will now maintain the airflow until the filters are no longer serviceable.
¶ Useful Links Fractal
https://boxes.hackerspace-bamberg.de Burn Factor for the Epolouge(0.04 not tested)